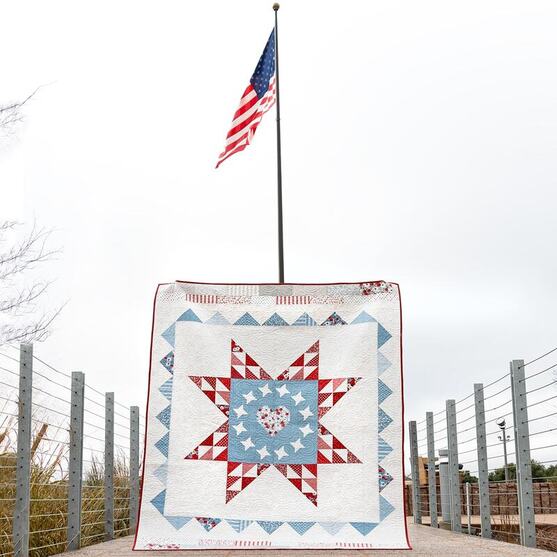
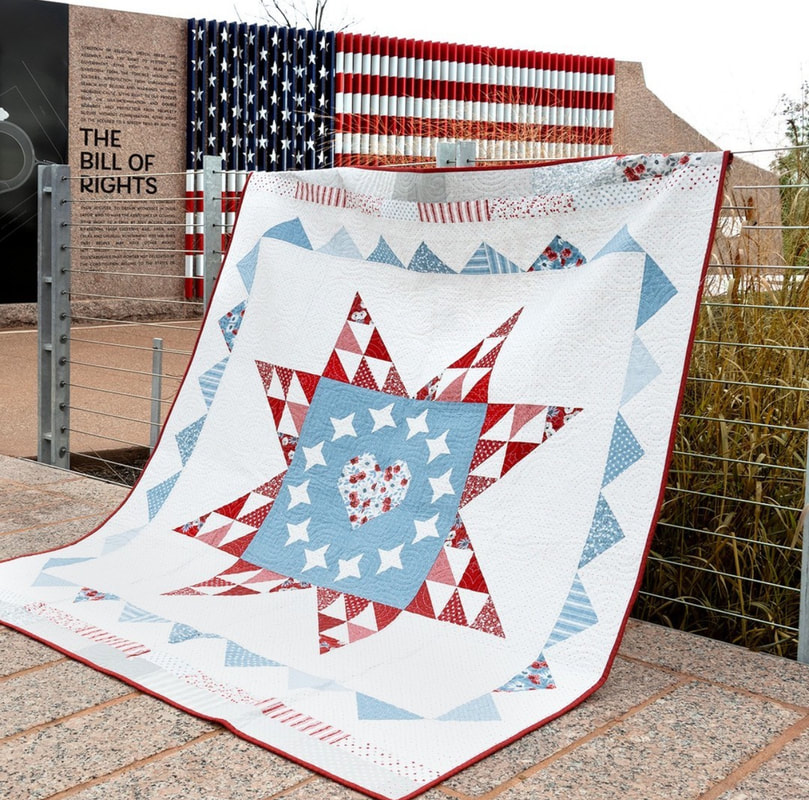
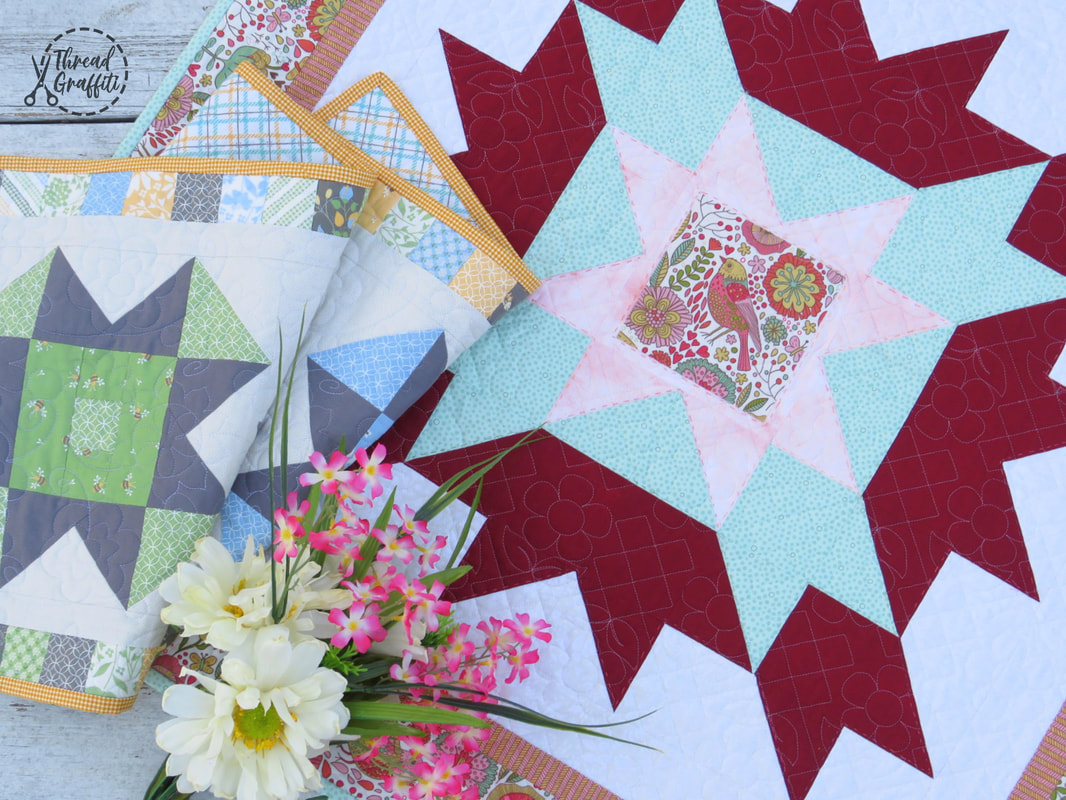
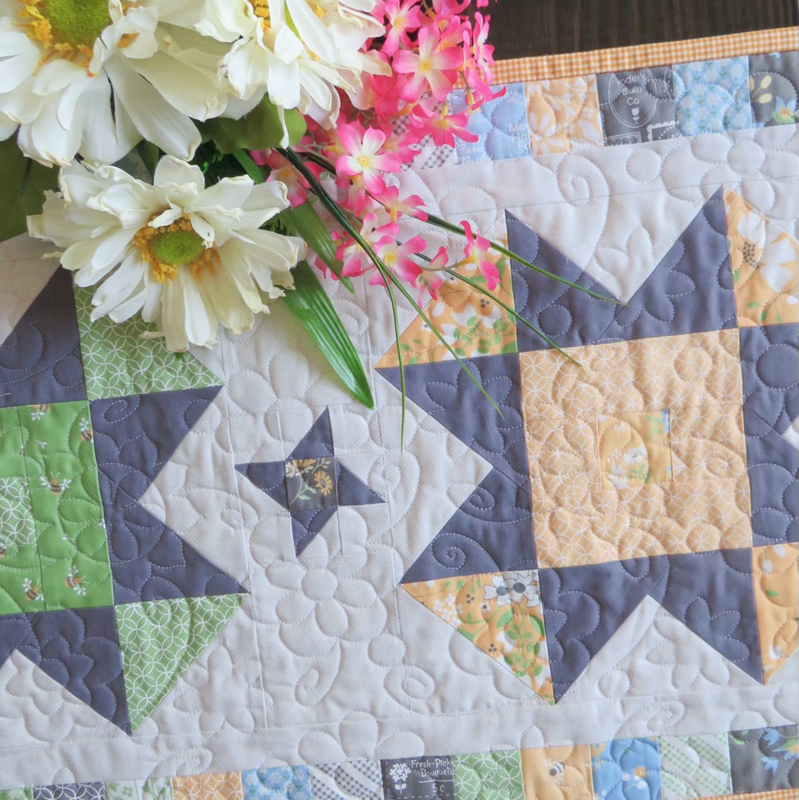
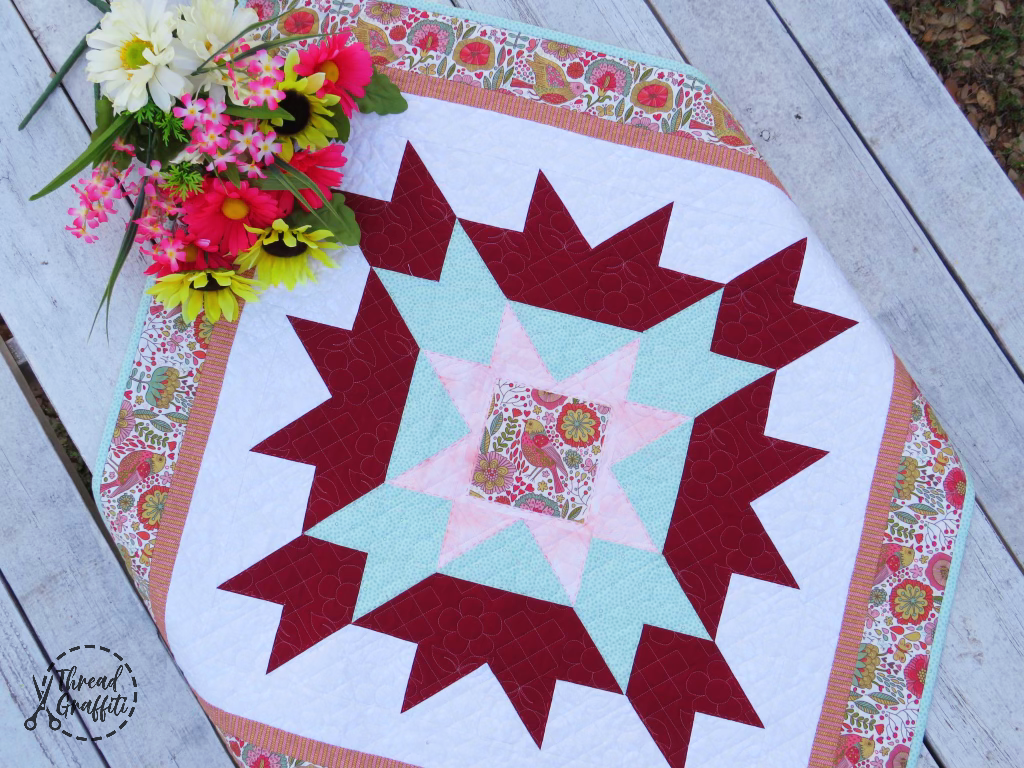
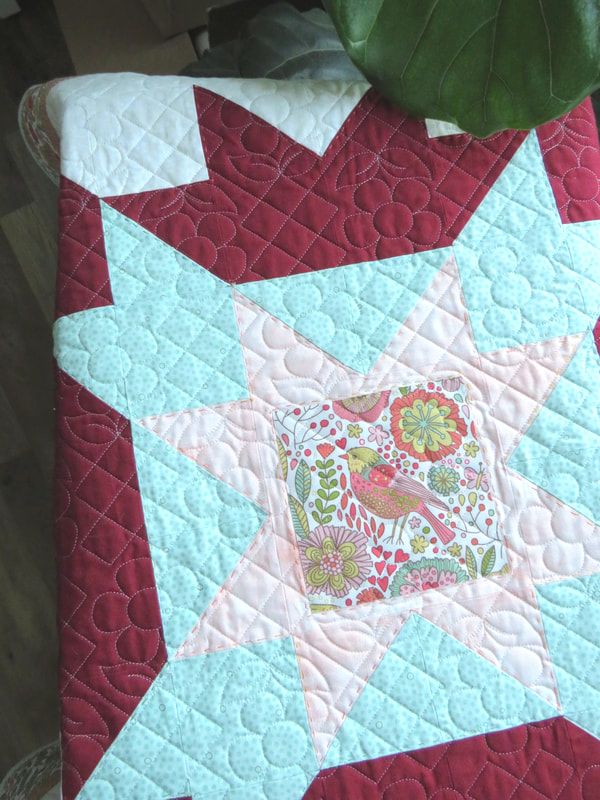
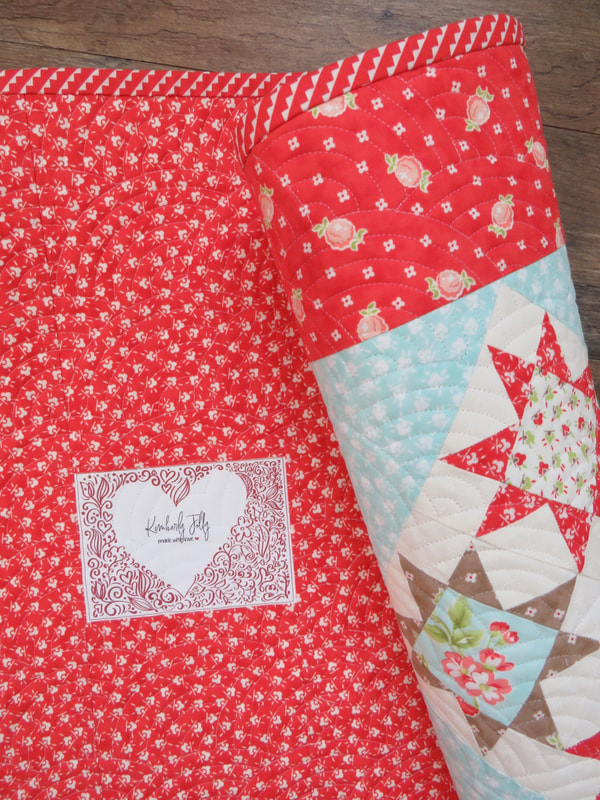
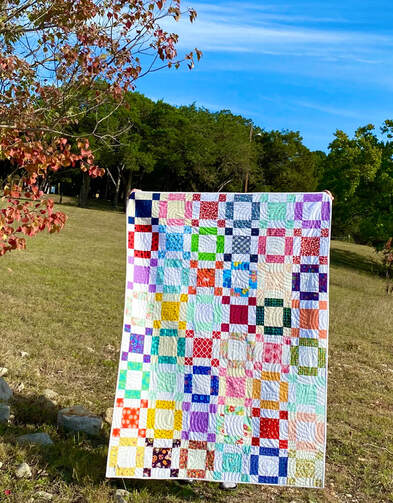
  Oh, say, do you see… it's another fun quilt along! So I have been doing quilt along's with Fat Quarter Shop for around 10 years now and since I am also a full time longarm quilter I don't have a ton of extra time, but when I saw this quilt I knew I had to make time!! There is just something super striking about that ring of stars and I really needed a new Red, White, and Blue quilt to go with my patriotic table runner. I made the table runner below back in 2021 using a free Fat Quarter Shop pattern called "Wave your Flag" so some of the fabrics are no longer available, but I pulled some new ones that really work well for my new Heart of America Quilt. Wait until you see both of them together!! 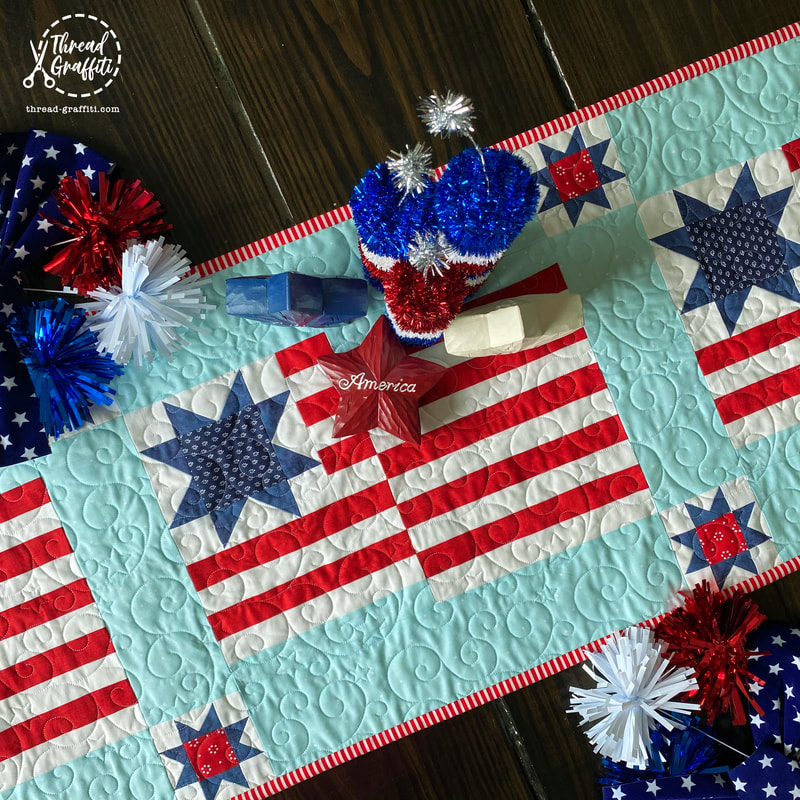 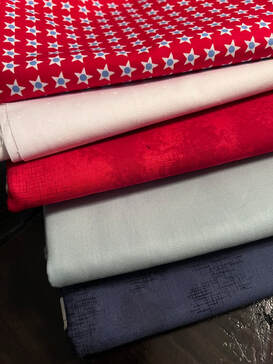 Here are the fabrics that I am using for my quilt: Background: 3 yards Confetti Cotton Songbird White Stars: 1 yard Dapple Dot White Yardage Navy: 2 yards Shabby Navy Red: 2 yards Shabby Cherry Binding: 1 yard Star Spangled Red Star Free Pattern: Heart of America Pattern Please keep in mind as you order fabric. Mine is 60x60 since I left off the final top and bottom borders shown in the pattern. 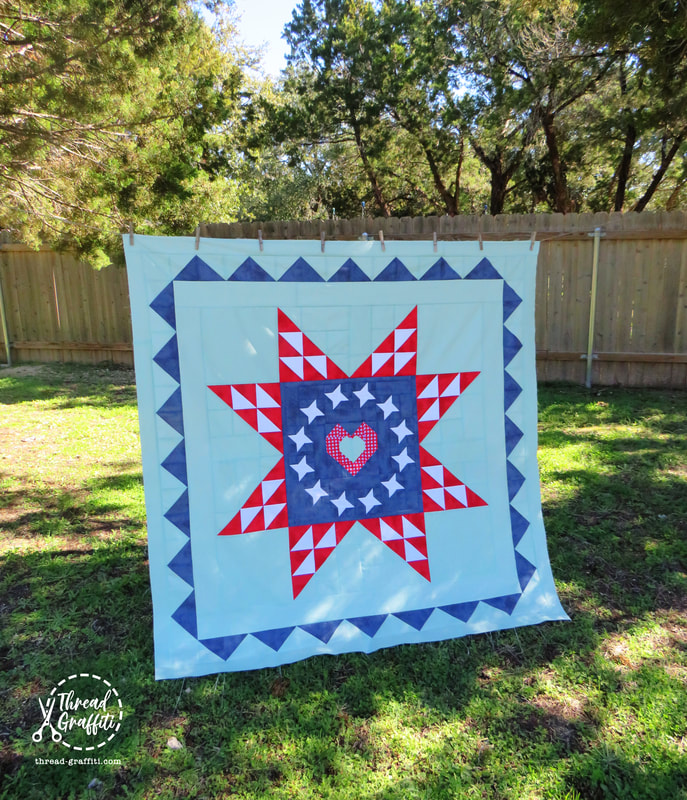 The Heart of America four-part quilt along pays homage to the land we love and as a bonus, the pattern meets the size and design requirements to be a Quilt of Valor finishing at 60.5" x 70.5". The Heart of America Quilt was designed by Fat Quarter Shop featuring the Old Glory Collection by Lella Boutique for Moda Fabrics shown below, so you grab the full fabric kit and backing available on the Fat Quarter Shop website if you would like your quilt to match the one Kimberly made. Although the Heart of America Quilt Kit and Backing Set sold out at Fat Quarter Shop, there are still Fat Eighth bundles of Old Glory in stock, and lots of other patriotic collections that would look great!
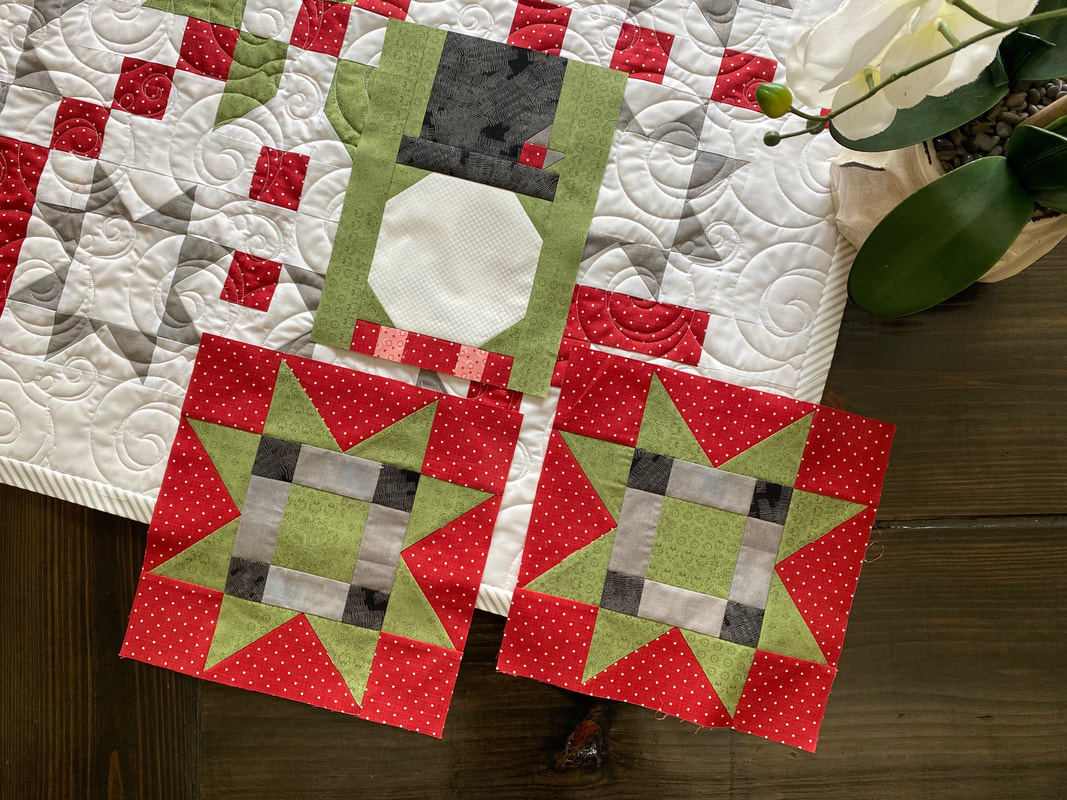
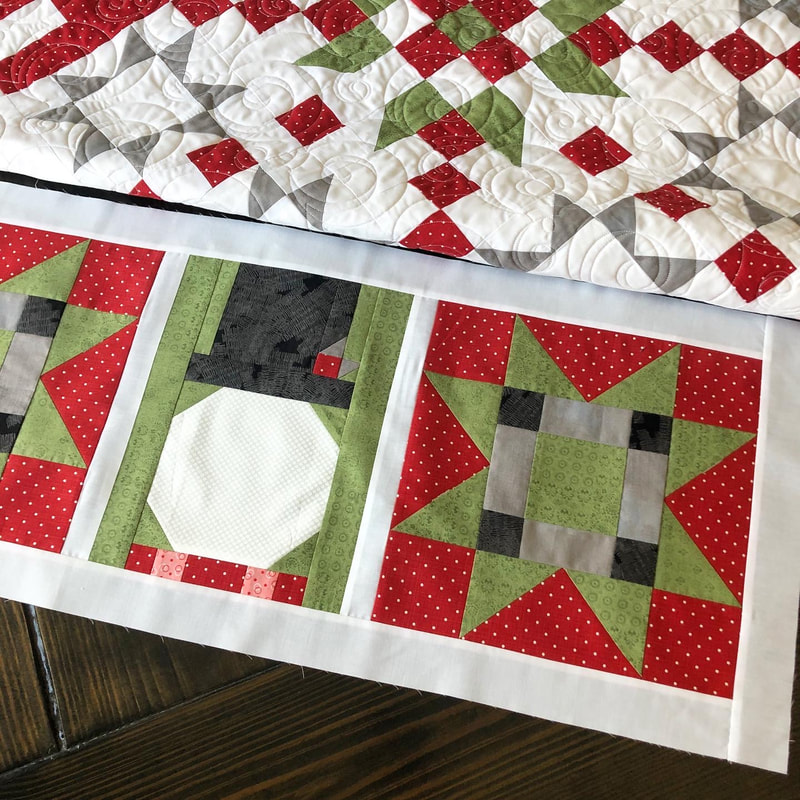
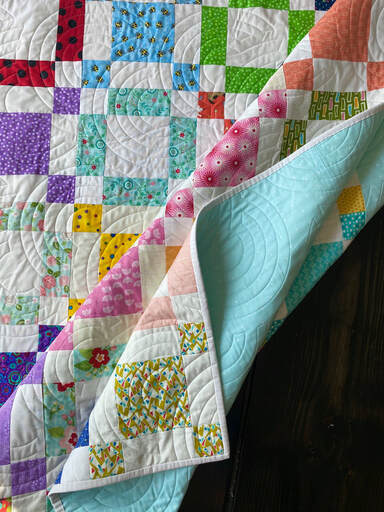
  Right-click the badge above to download and share to show you’re participating in The Heart of America Quilt Along. #HeartofAmericaQAL Week 1 - Star & Heart block I decided I wanted my heart to have my aqua background fabric in the center to tie everything together so I changed the pattern a little, if you would like to do this too here are the cutting instructions: 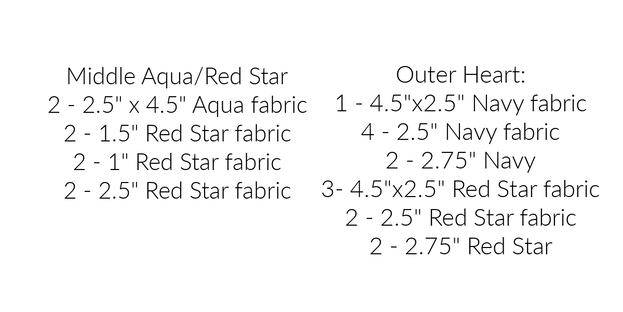 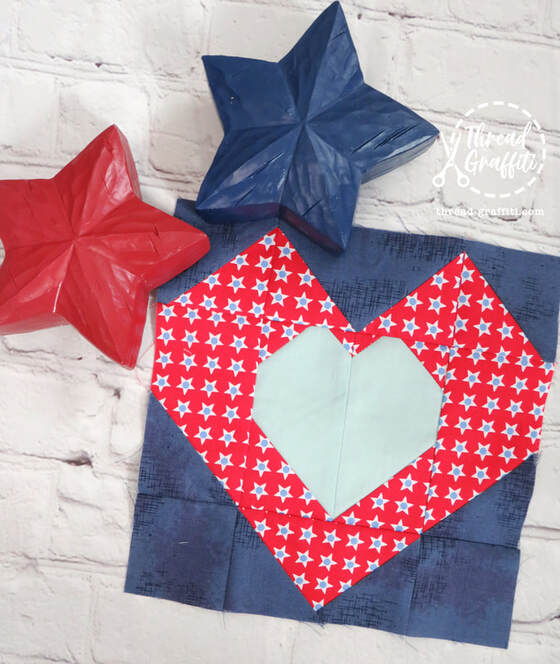 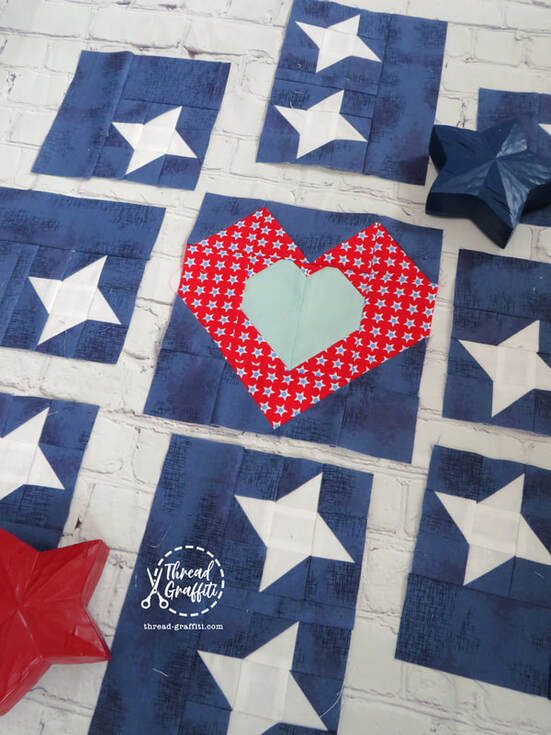 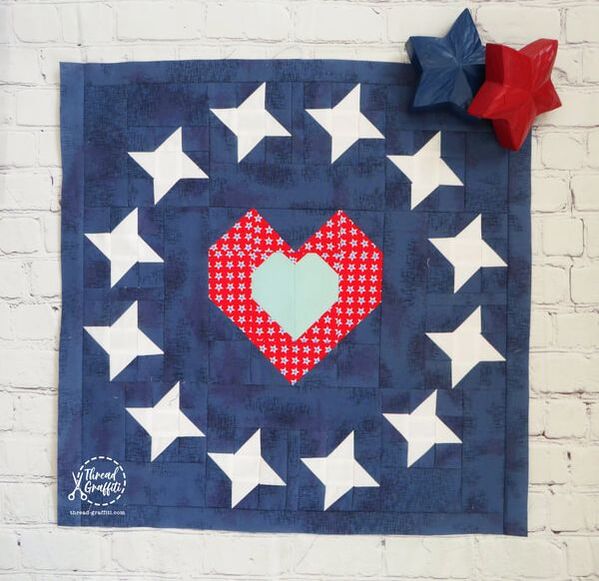 Week 2 - Quilt Center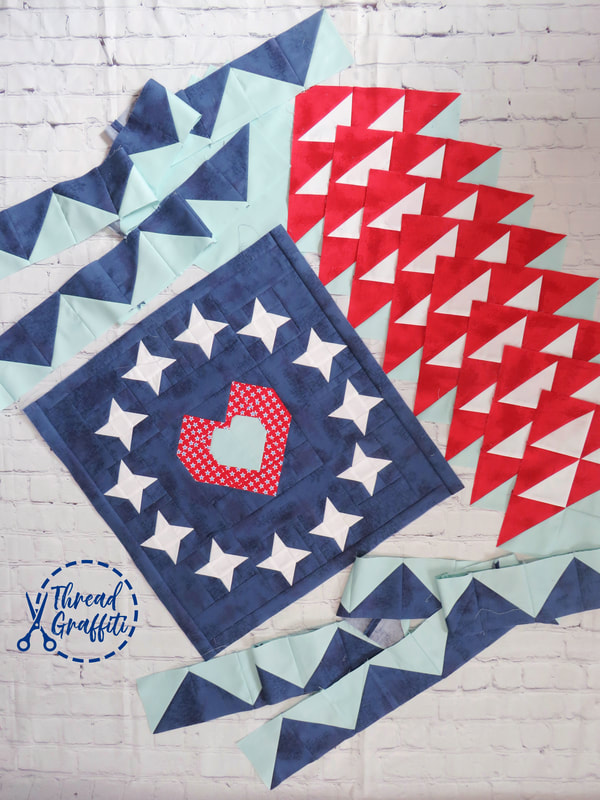 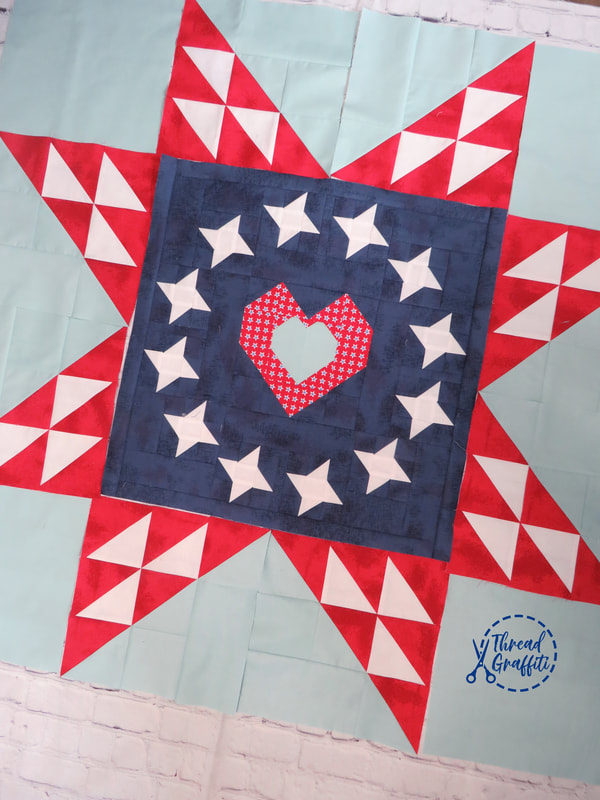 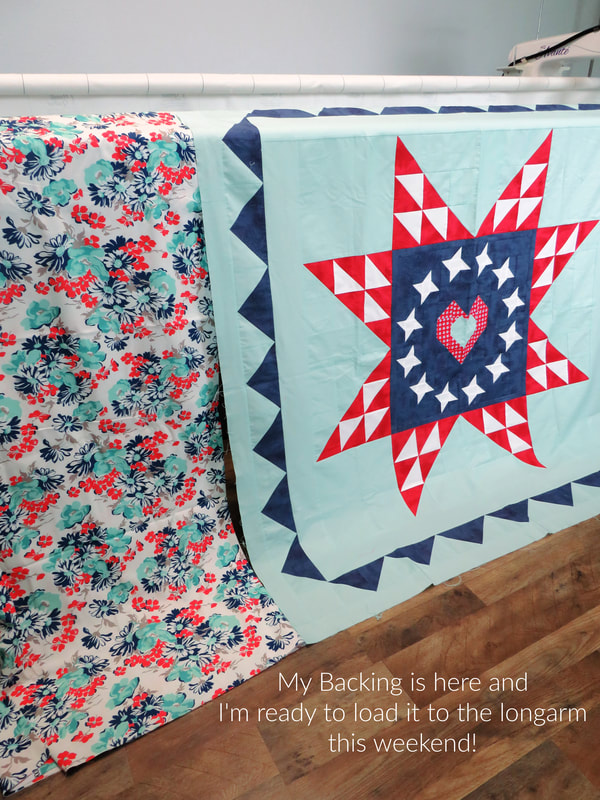 The backing fabric that I picked out has been out of stock for a few weeks, so I got a little behind, but the Cook Book Denim 108" was just perfect for my quilt so I had to wait. If you are interested in checking out this great wide backing here is the link 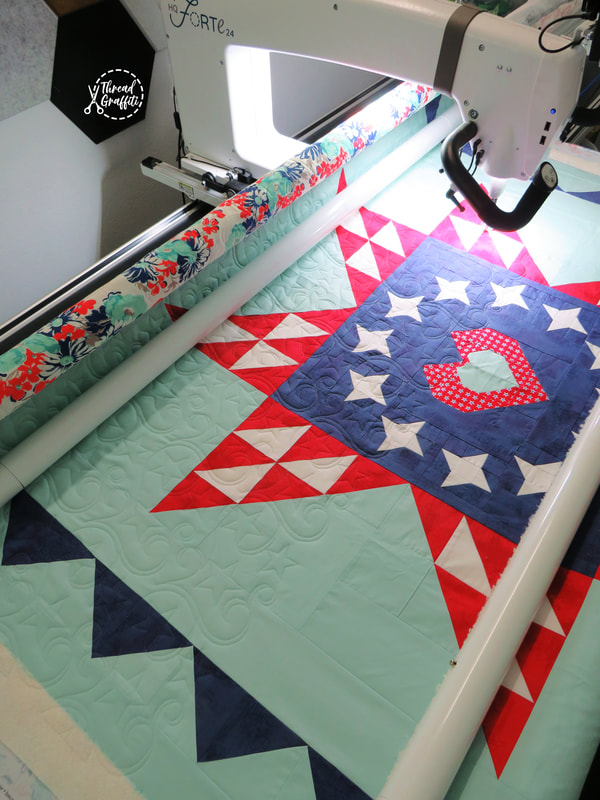 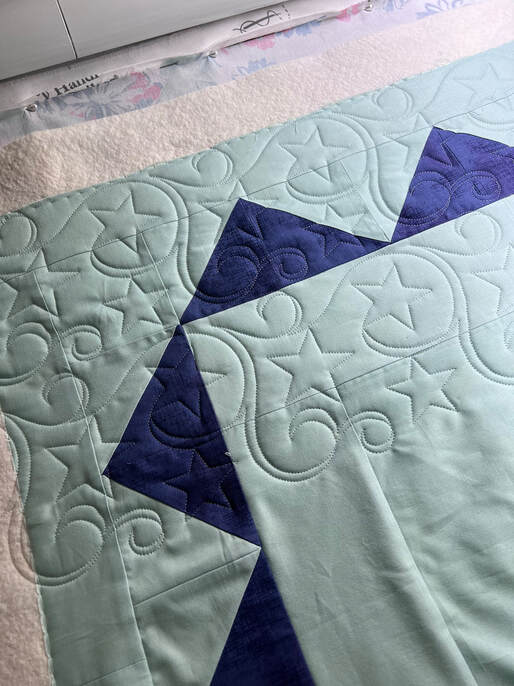    I loaded my quilt on the Handi Quilter Forte and got myself a new panto called Star Swirls and had such a fun Saturday! I used Glide 60wt White thread with Pellon 80/20 batting and I totally love how it turned out! What do you think? To participate all you have to do is gather your supplies, download the FREE pattern, and follow the order of the pattern to stay on schedule! You can find all the instructions for the blocks in the pattern, and comment here on the blog if you have any questions.
#HeartOfAmericaQAL #GinaTell #ThreadGraffiti Here are some friends sewing along too, tap for inspiration:
Stars and Heart Block Week 1, March 5 Quilt Center Week 2, March 12 Inner and Middle Borders Week 3, March 19 Outer Border, Rectangle Border, and Finishing Week 4, March 26 Thanks SEW much! Gina
3 Comments
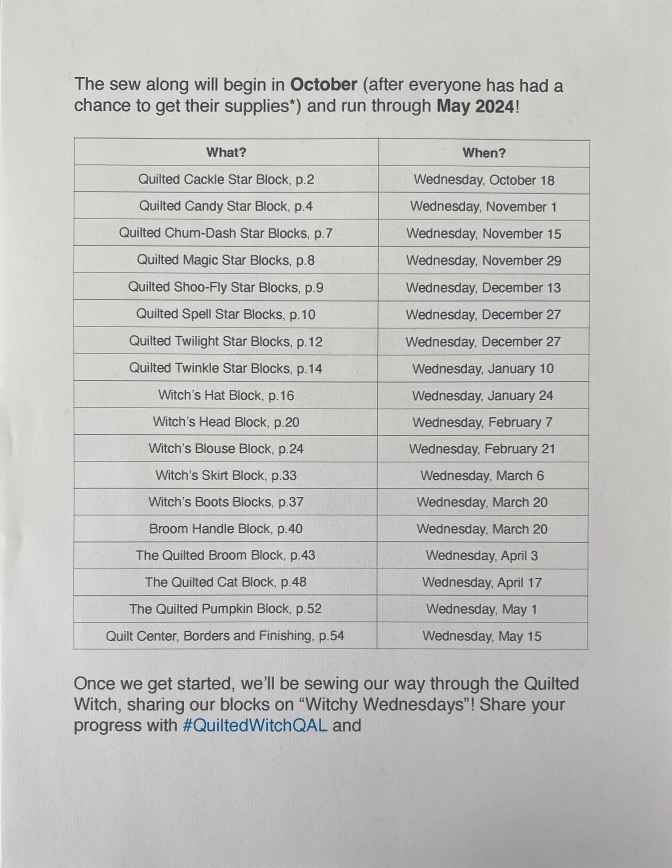
 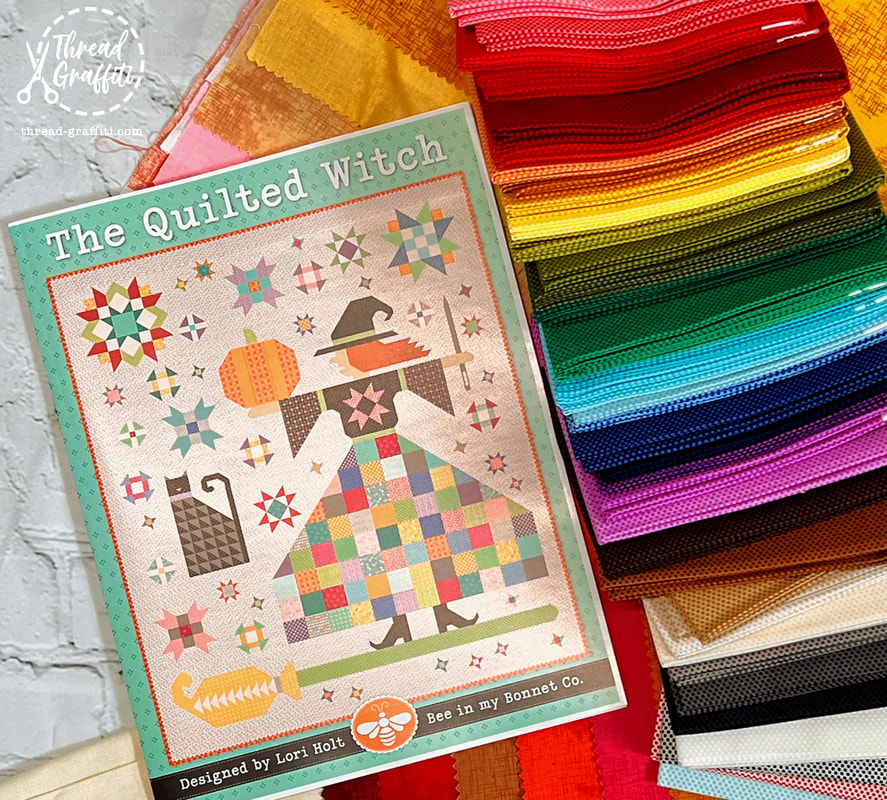 I dream of being your favorite witch this fall as I fly through the night sky waving my magic needle wand and making all your quilty dreams come true! Let celebrate fall with The Quilted Witch Quilt Pattern and sew along together! This super cute design was created by by Lori Holt and measures 76.5″ x 89.5″. The Quilted Witch Sew Along Schedule: The Quilted Witch Sew Along runs for nine months from October 18, 2023 to May 1, 2024. We’ll be sharing our progress on “Witchy Wednesdays” and invite you to share as you sew along as well. The Quilted Witch Sew Along is for EVERYONE! To participate, all you have to do is gather your supplies and follow along with us stitching the schedule listed HERE. Let's Talk Fabric: When I sign up to do sew alongs I never use the same fabric as the designer or Fat Quarter Shop, I love to get crazy and use a variety of fabrics, and today is no different! You can click HERE for the fabric requirements for this quilt along, don't think you have to use the kit, get creative and make your quilt unique to you! Here is what I am using for my Quilted Witch: Riley Blake - POParazzi Fat Quarter Bundle Riley Blake Lori Holt - Warm Shabby Fat Quarter Bundle Riley Blake - Confetti Cottons Pina Colada & Black Yardage Riley Blake - Small Cotton Gingham Black Yardage Riley Blake - Black Tie Black Pinstripes Yardage Plus lots of Lori Holt fabrics from my stash! My First witchy BlocK!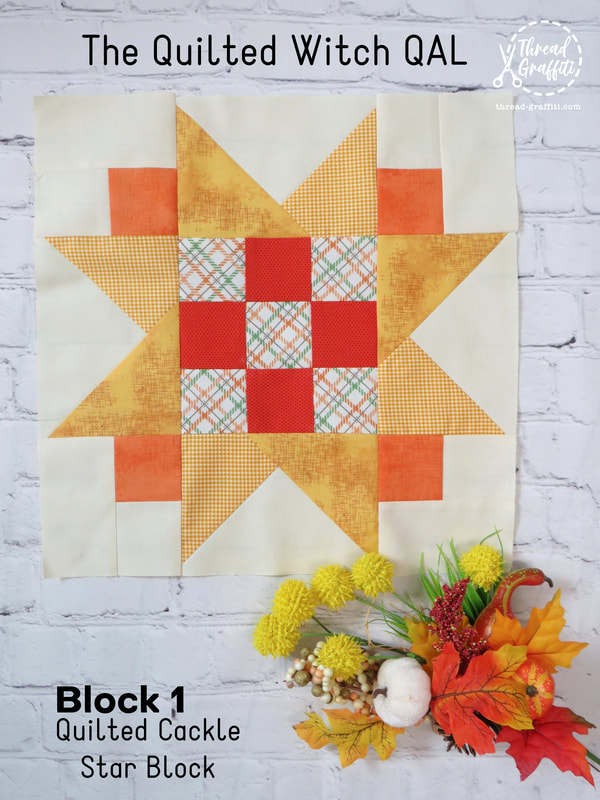 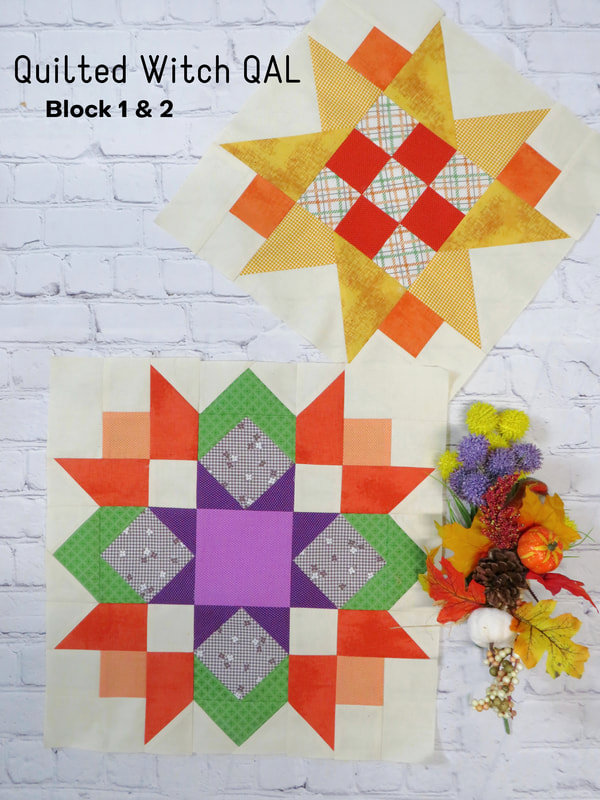 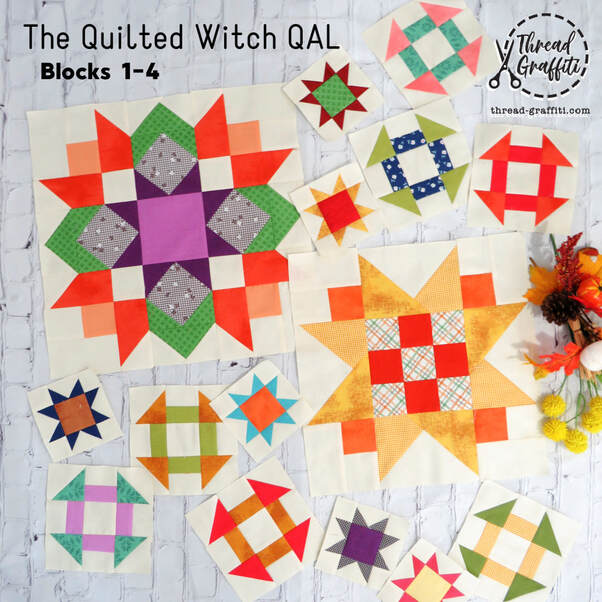 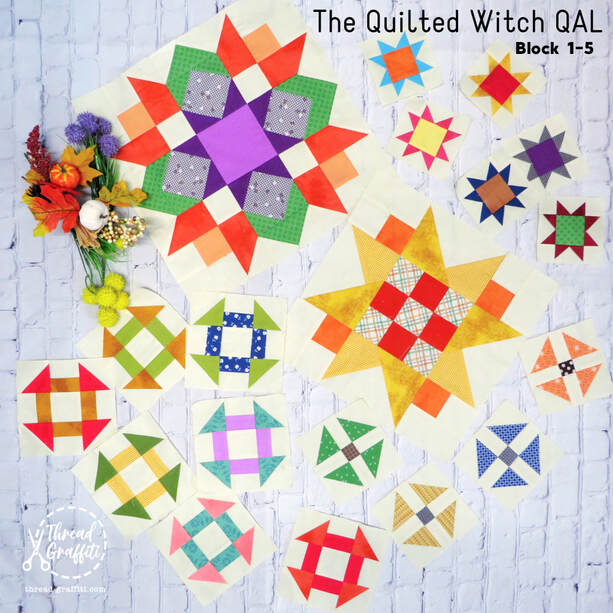 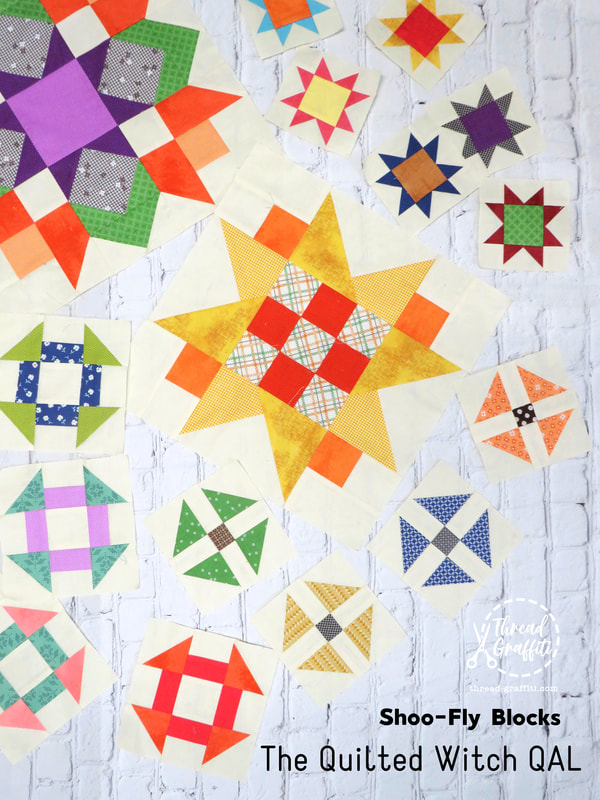 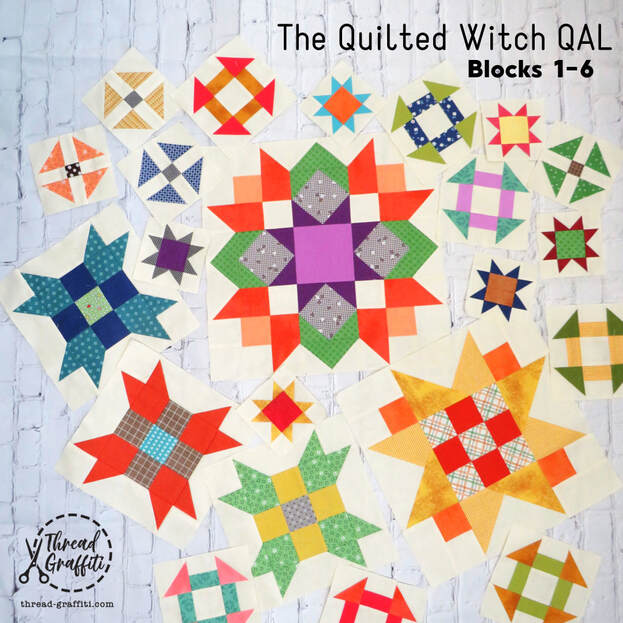 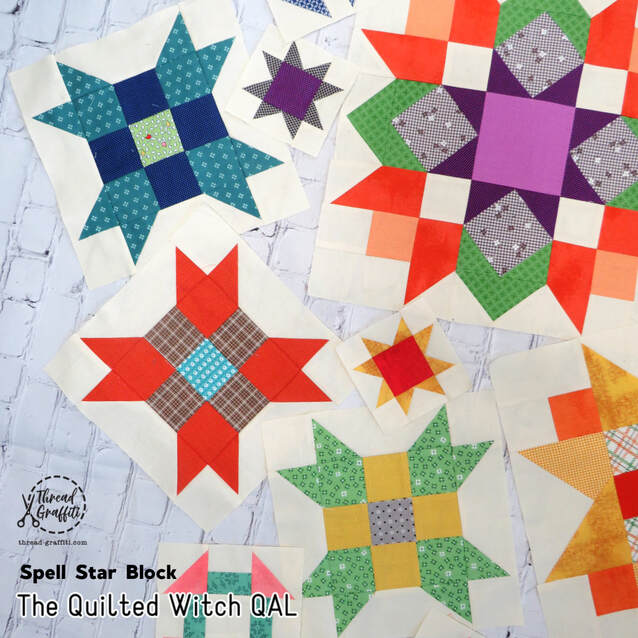 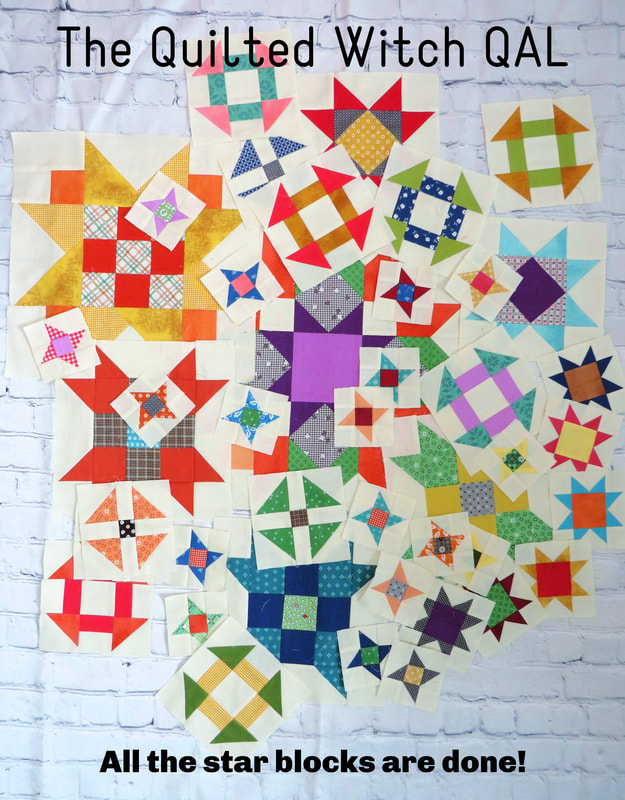 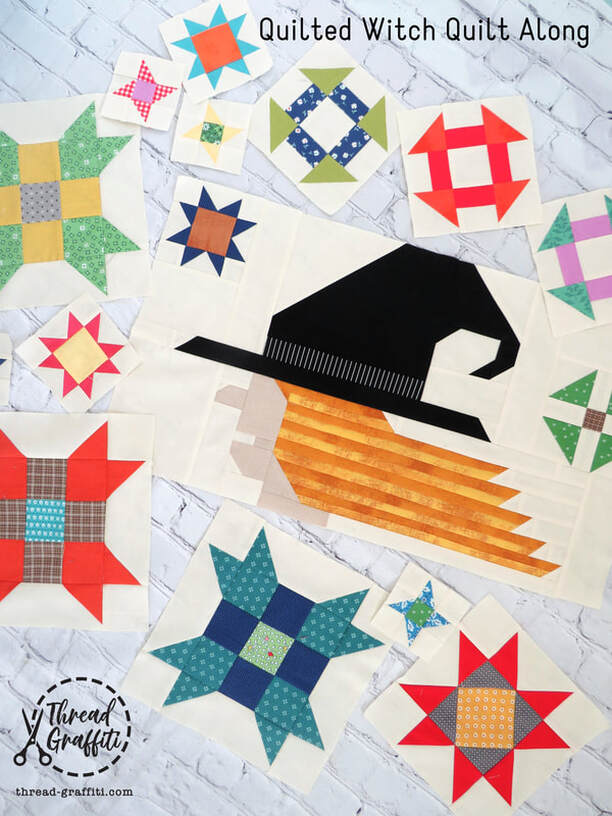 I have to admit, it feels a little bit strange to share a head on my social media ha ha (body coming soon) My witch is blonde, with highlights of course, because some of the Witchiest people I know are blonde..... just me being silly, I love blondes! I am happy to announce for our February share my witch has a body with some very stylish clothes! I skipped ahead a little and made her dress because I just couldn't stop myself! 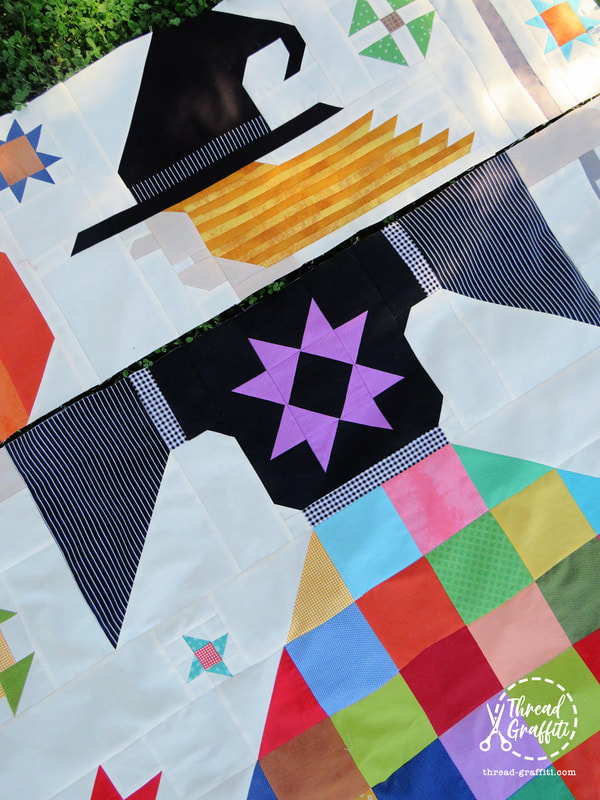  My WITCH is now officially dressed and ready for a night out on her broom! 🧙 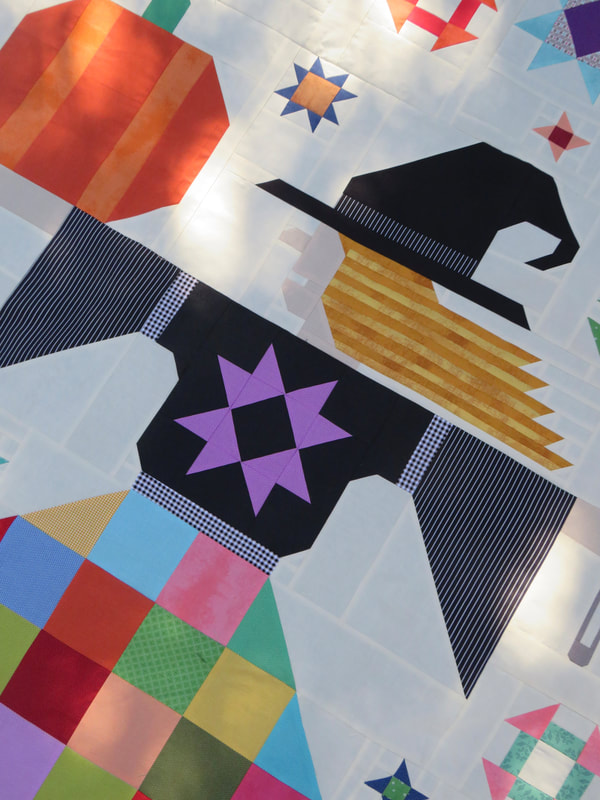 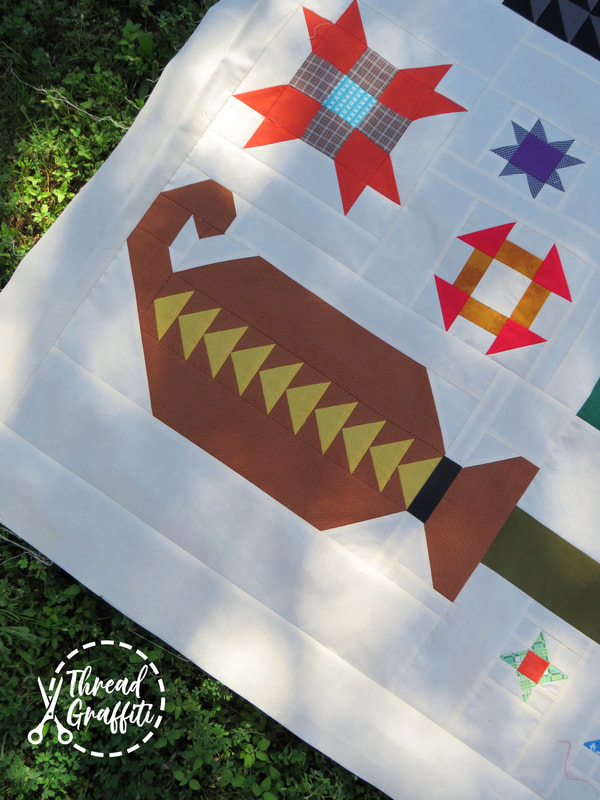 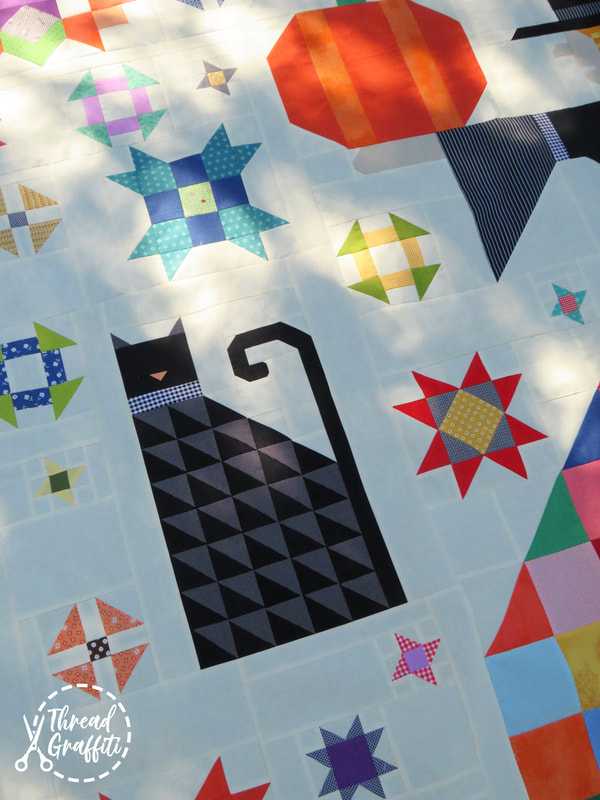 Some morning shadows create a stained glass look...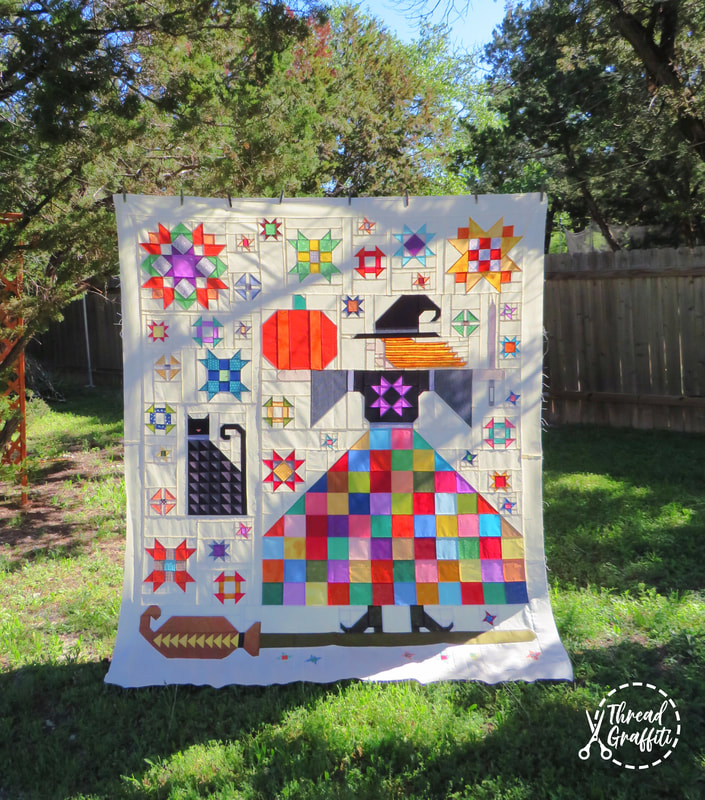  Right-click the badge images to download and share them to show you’re participating in The Quilted Witch Sew and Stitch Along. Keep up with us by following the hashtags #QuiltedWitchQAL on Instagram to see and share work from your fellow quilters and stitchers, and tag me if you want me to see what you are working on, I love seeing them! #ginatell witchy Giveaway is closed!WINNERS!! RITA HILL & MARY DURHAM 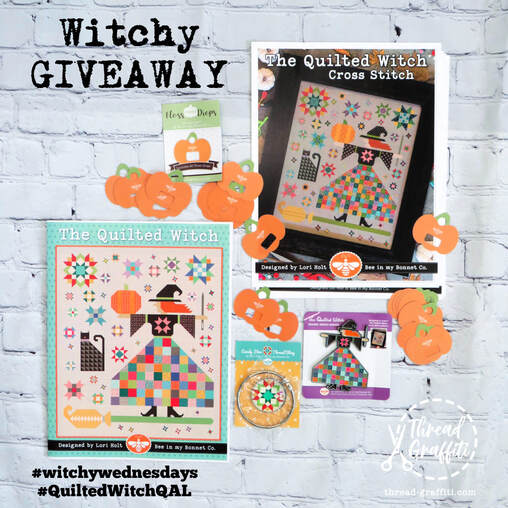 TO ENTER THE WITCHY GIVEAWAY:
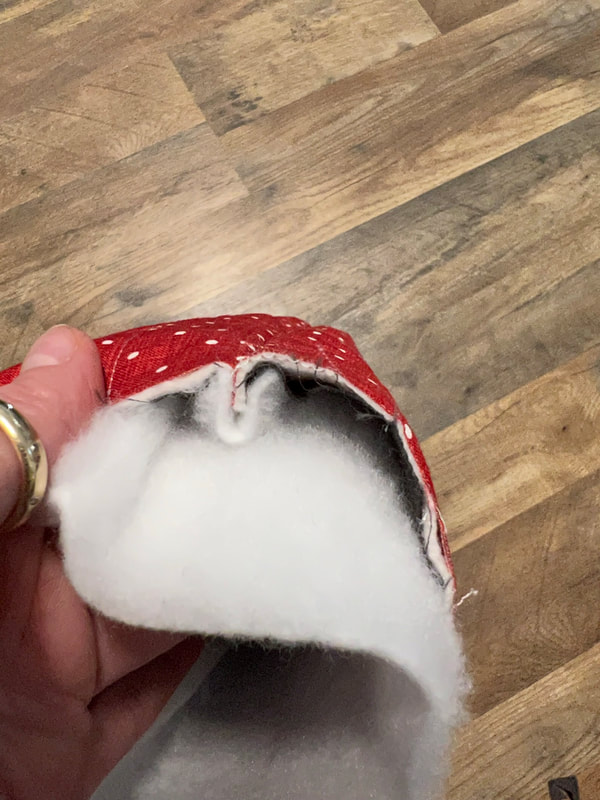
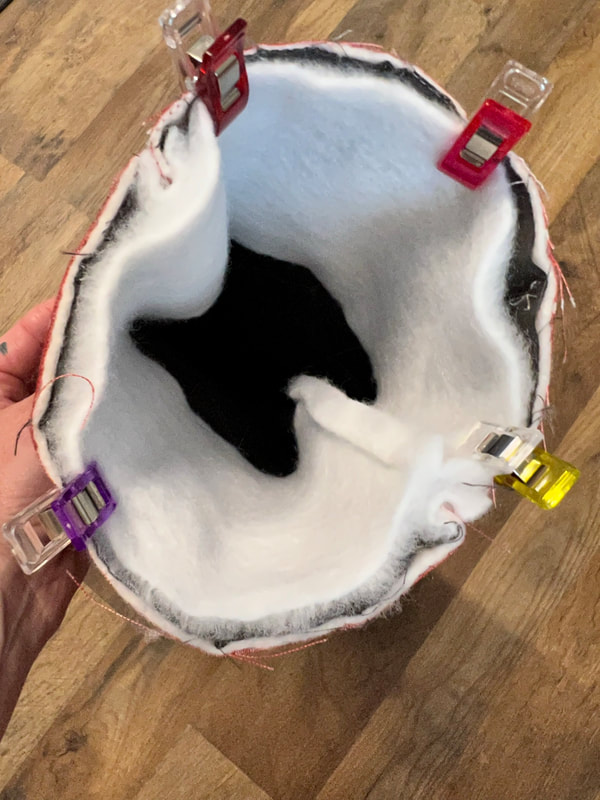
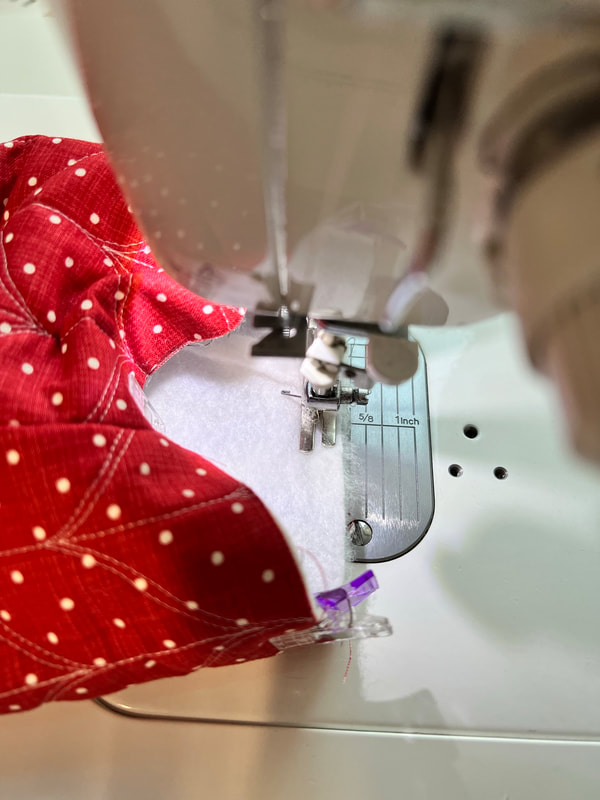
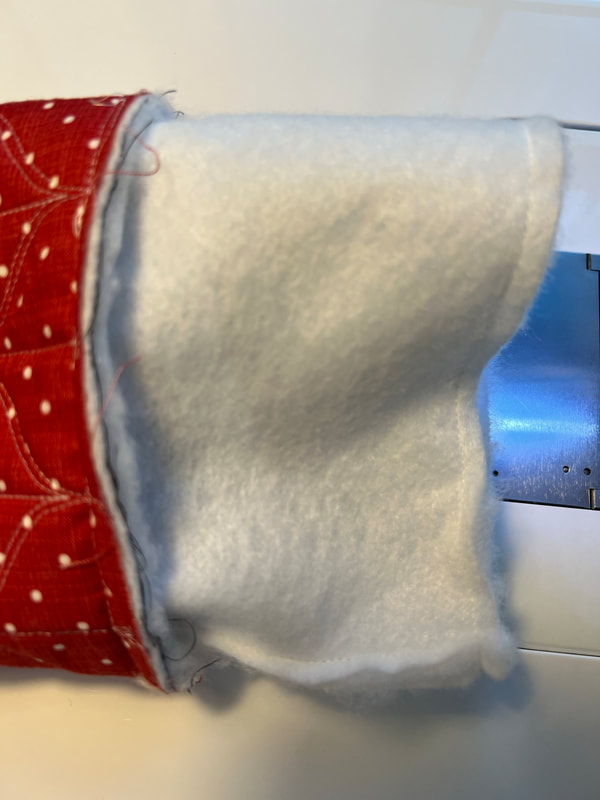
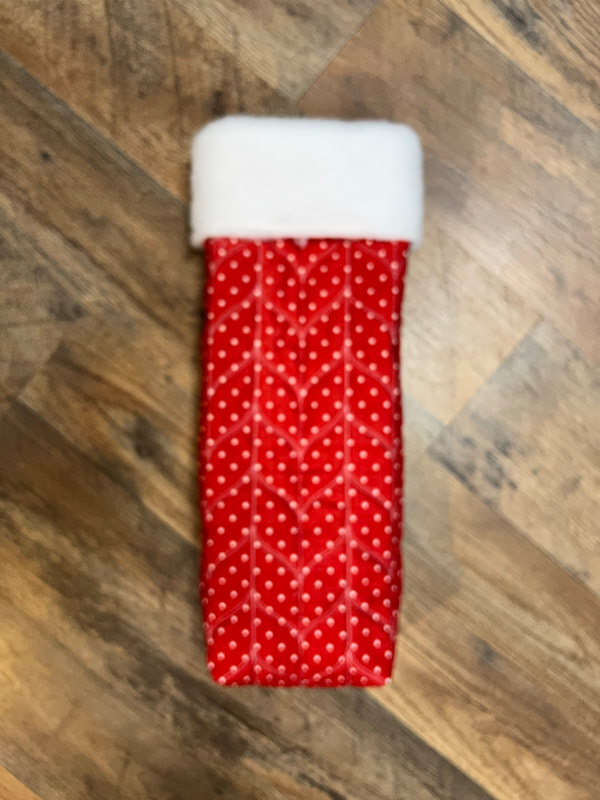
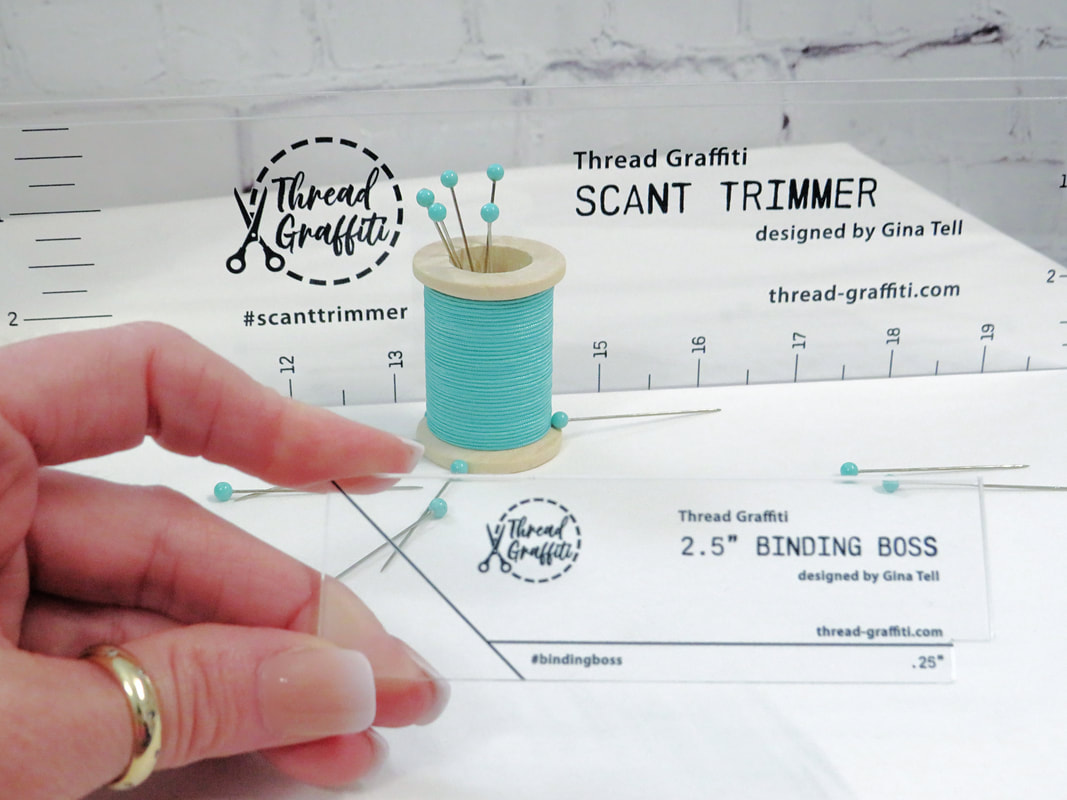
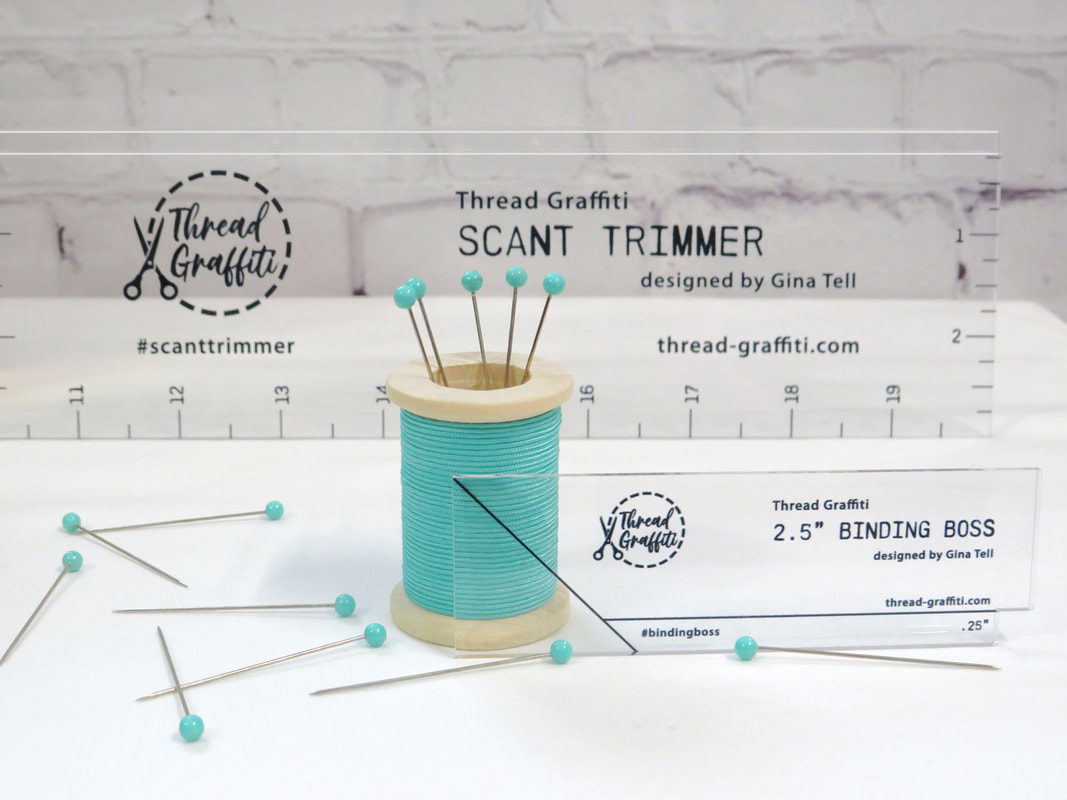
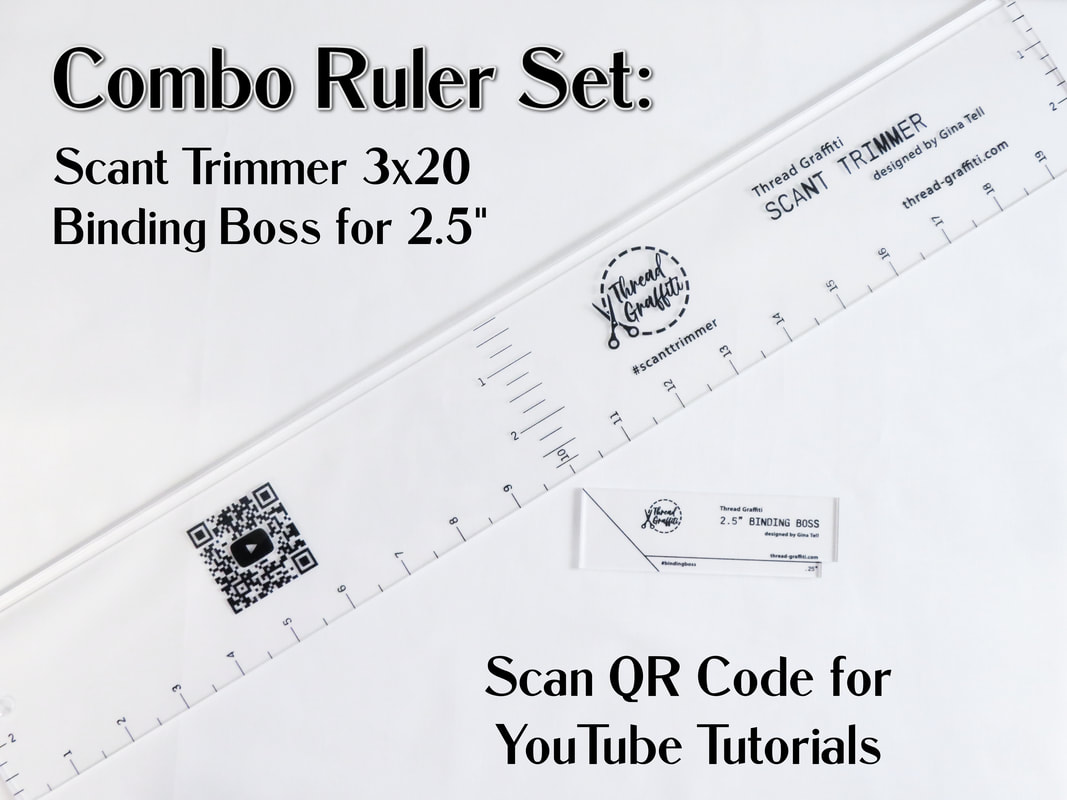
GOOD LUCK! Thanks for stopping by my blog, I would also like to invite you to check out my new online shop where you can purchase my new Binding Boss Rulers I designed, as well as some fun quilty shirts me and my friend Jody designed! Tap to SHOP my online store! Oh and make sure you stop by my YouTube Channel and Instagram, it's almost time for my Week of Giving surprises, subscribe and follow so you don't miss them! 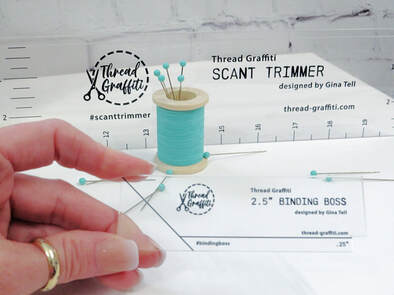 Happy Quilting!  Wine gift bags make great gifts for friends!I'm updating an old blog I made in 2021 to share. Come make some quilted wine totes with me! My husband has a white elephant holiday party at work each year, so I am always thinking of new gift ideas to make. This year I have been much more into wine tasting than previous years because we have a lot of beautiful wineries near our home. I am not a big drinker, never have been, but a nice glass of wine while sitting outside in the Texas Hill Country with my hubby can really be relaxing and fun. We usually buy a bottle or two to take home and I thought it would be really nice to give some local wine as gifts this year to some of our friends close by. Well you can't give a bottle of wine without a cute little gift bag, right? So this is what I came up with.... 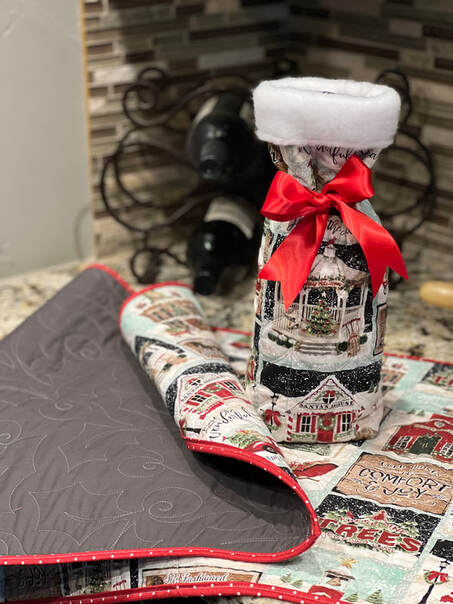 I guess I should back up and tell you how this started.... It's no secret all crafty people love Hobby Lobby, the store has everything, and I could spend hours in there, and hundreds of dollars too. So as I was walking around the other day I found some cute holiday fabric on sale for $6 per yard, it was so cute so I got a couple yards. I decided to cut some of it into small table runners and quilt it on my long arm and then add a quick machine binding that I had in my stash and poof, it's adorable. Then came the idea for wine bags. I just recently made Christmas stockings for a friend out of state and I had some white fluffy stocking fabric left over, I thought oh how cute would that be on the top of the wine gift bag? I also use it as a binding on the inside of the bag to cover the raw edges, it made a fluffy protector for the wine, it was easy and adorable. I actually made one, and couldn't stop, I started pulling out fabric left overs from my stash and going a little crazy, I am going to need more wine drinking friends LOL! 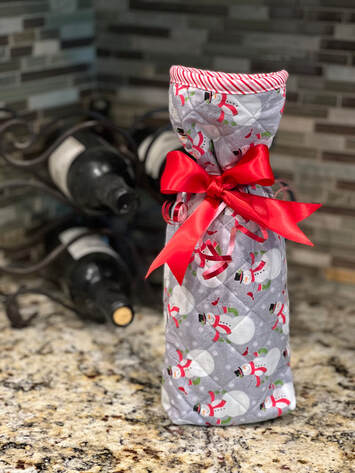 This fabric was leftover from my Jelly Snowflake quilt I made a couple years ago, it was a FREE Christmas in July project hosted by the Fat Quarter Shop so I got this for the backing. I just did a simple crosshatch quilting, added a quick binding, and tied a bow. If you are wondering about the Jelly Snowflake pattern, I will link it here, and show photos below. Oh and Jelly Rolls are on sale right now, check them all out!  Oh and while we are talking holiday gifts, check out this adorable Mr. Frosty table runner I made to match my Jelly Snowflake. The pattern is also FREE made by Christopher Thompson aka. "The Tattooed Quilter" and really, really cute! Click the green above for his blog post with the pattern!  Ok, sorry I got sidetracked with all the fun holiday stuff, now lets talk about how to make the wine gift bags... 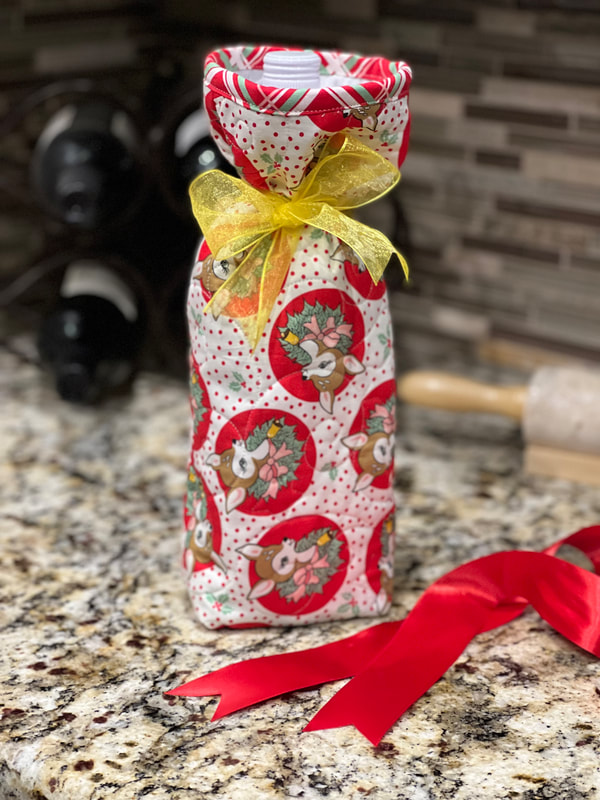 Since I have a long arm, I cut out one big piece of backing and loaded it to the frame, used some leftover batting and then placed each piece of fabric I had cut out for the wine bags on top. I cut my main bag piece 7"x30" and did simple quilting, below is what it looks like from the back side for 3 bags. If you don't have a long arm, this is a great time to practice FMQ or straight line quilting on your standard machine.  Trim each one down so you have a 7x30" piece, you can actually get away with probably 25" if you want the top of the wine bottle to show (insert personal preference here) 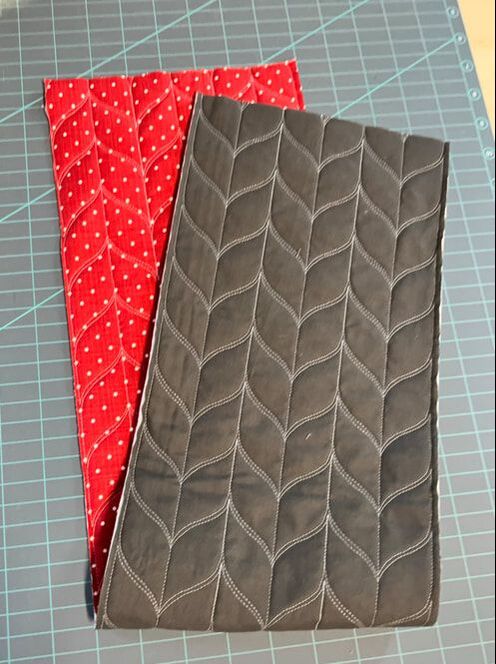 Ok, now fold it so the right sides are together on the inside and sew both sides, the bottom is your fold so you wont have to sew that part, see pic below... 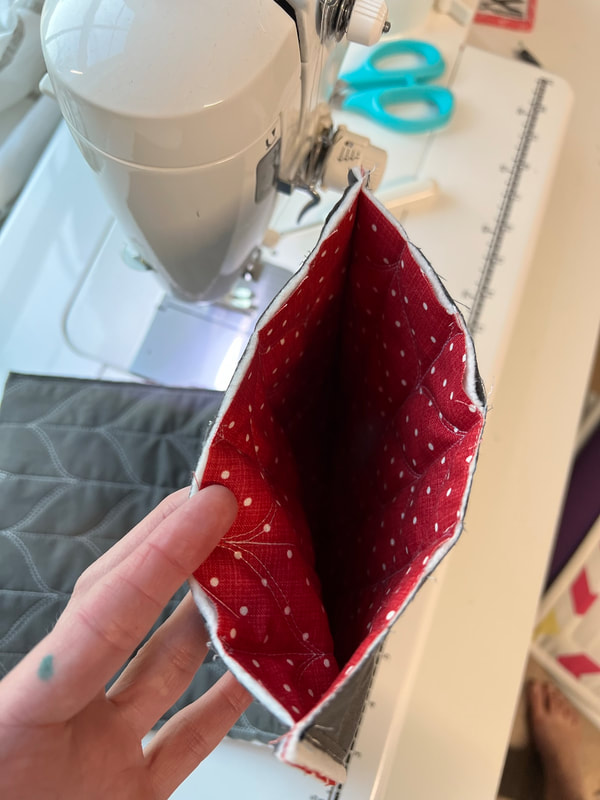 Now lets square off the bottom. That means I marked 1" in from each side of the bottom with a frixon pen (pic 1 below), and then stitched down the line (pic 2 below), then cut off the excess (pic 3 below) I used a 1" strip of the white fluffy santa fabric to cover the inside seam, (pic below) I just folded it over the raw edge and stitched it down, very simple & it looks cute, and it will add some extra cushion for your wine bottle. Or you can do a few other things here. You can leave it alone and let the raw edges show, you can use a serger to put a serged edge on it, you can make matching cotton binding, or you can make a quick liner to put in it. If you pick the liner option you will want to cut it just a tiny bit smaller than your exterior cut (6.75x30) 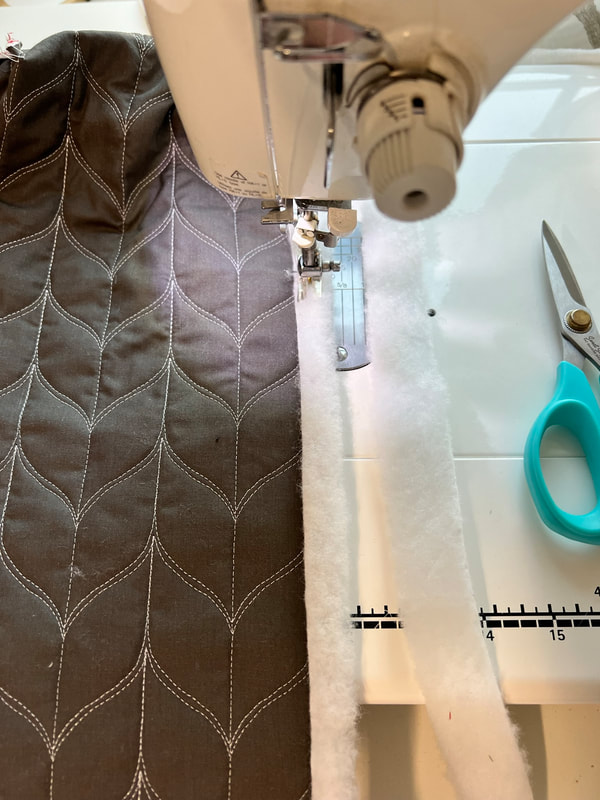 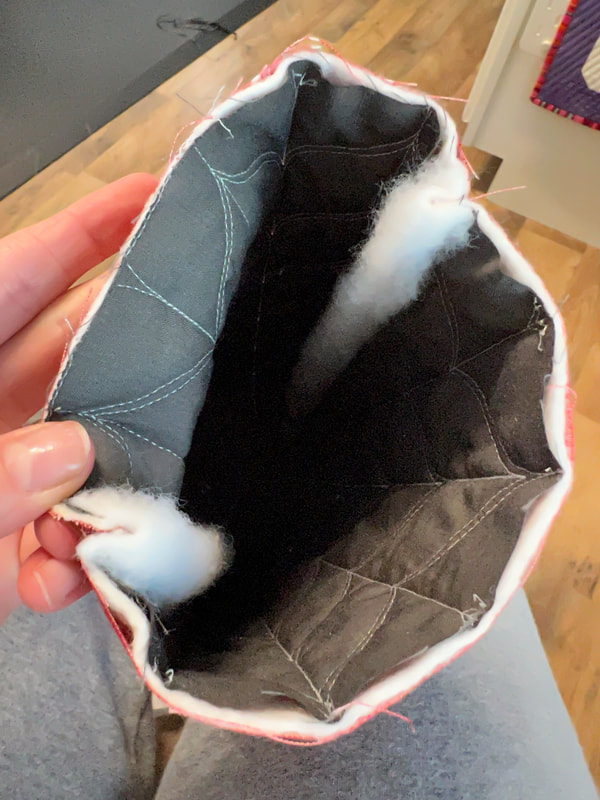 Flip it so you can see your work, it's cute! Lets make the fluffy part for the top now... 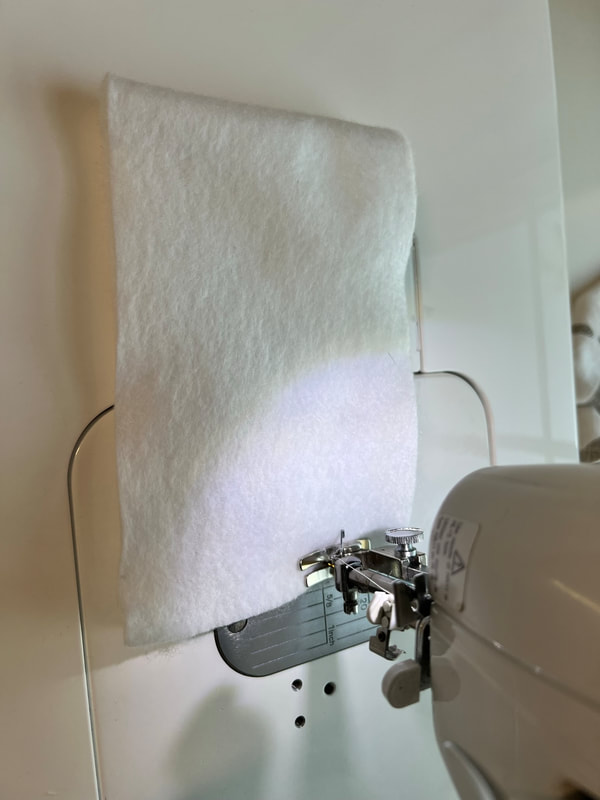 Cut a 3x12" piece of fluff, with good sides facing together sew the fluffy white Santa fabric on the short side (pic above). Then make sure your bag is right side out, & put your fluffy piece inside the bag top with the fluffy side facing in like the first pic below, then use clover pins to hold it in place, take it to the machine and stitch down... Then fold it over the top of the bag and poof you made an adorable bag! I like to put my wine bottle inside and then tie a ribbon around the top to tighten. Or you can stick a handle strap on it in this last step. 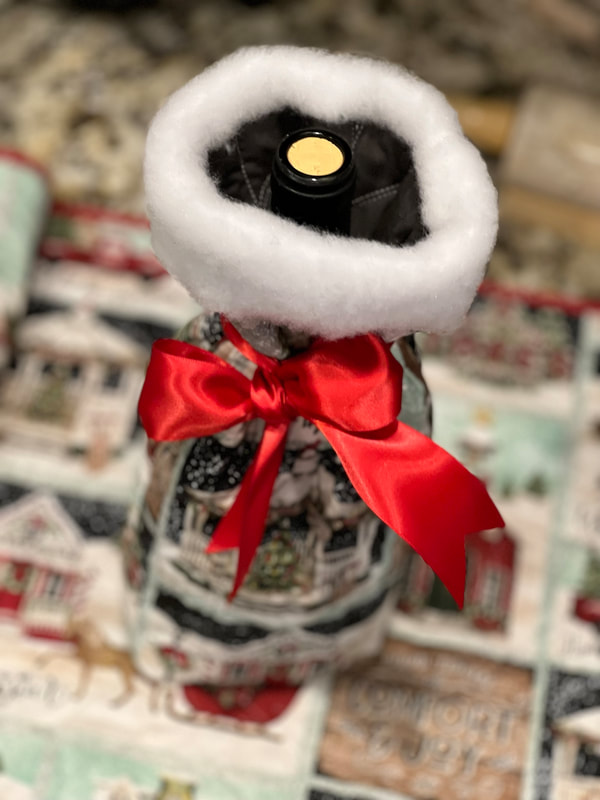 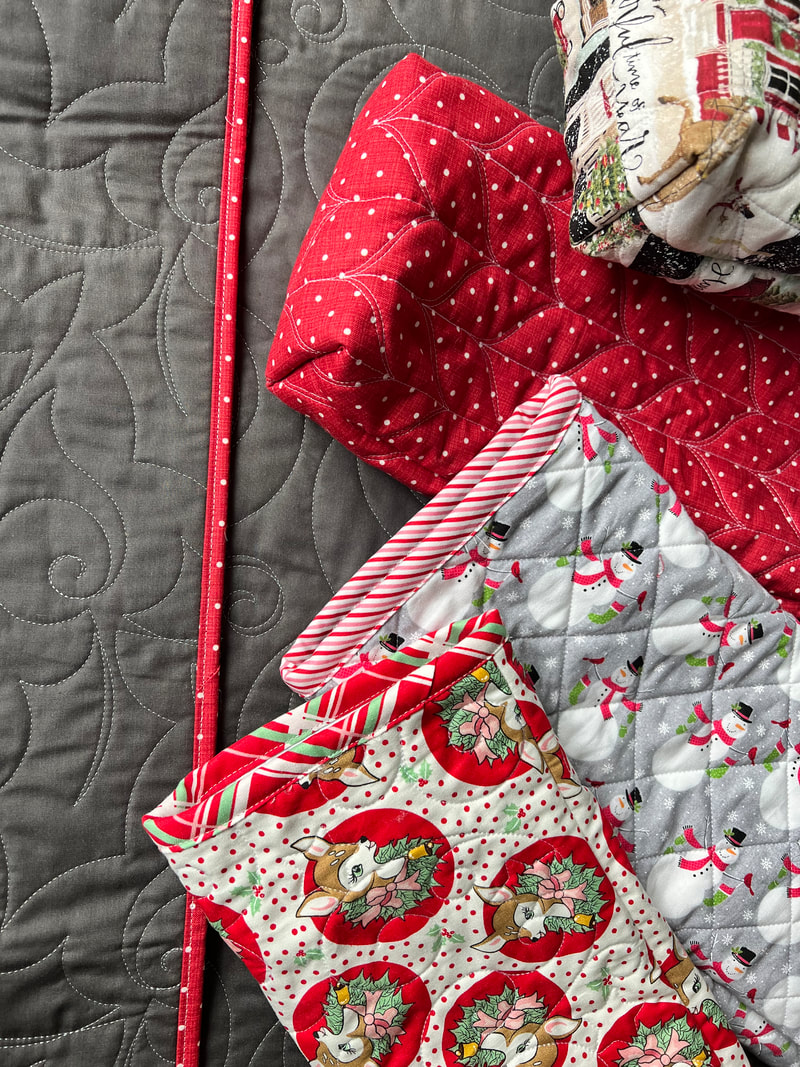 If you don't want to use the white Santa fluff on the top, you can also just add binding. I made mine 2" and stitched it down with the machine, I didn't have time for hand biding, but if you do that would be really great too. Don't worry about being perfect either, they are adorable handmade gifts even if your stitches are not perfect! Just have fun with them, and do what works best for you! 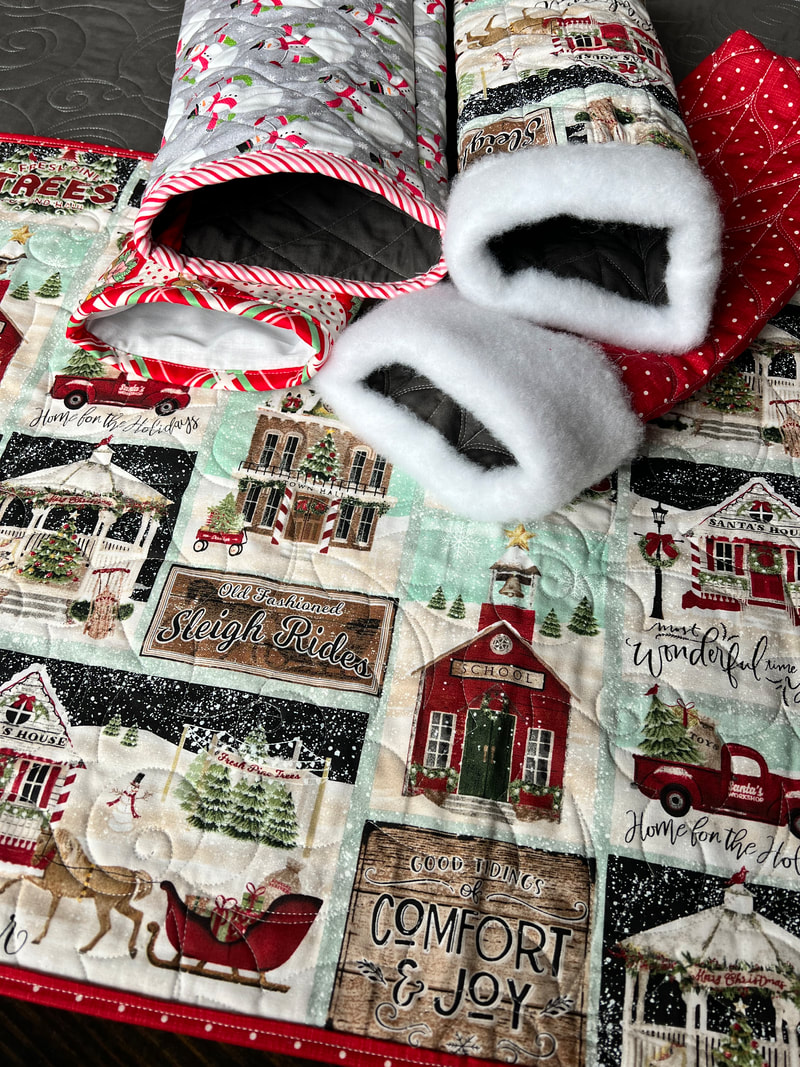 They are just too cute! Make sure you share them on your social media and tag me so I can see what you made #ginatell #threadgraffiti #ginaswinebag I would also love for you to subscribe to my NEW YouTube channel I just started, I have 2 new videos if you have time to watch. Happy Holidays and Lots of Love, Gina I have had this Barn Star Sampler quilt on my to-do list in my mind since I first saw it, so I was really excited when Fat Quarter Shop asked me to join in and sew along with them! The Barn Star Sampler Quilt book was designed by Shelley Cavanna and it has sold like crazy, so the hard copy books have been on backorder, but should be available in March, in the meantime you can still buy the EBook and sew along with us, that's what I am doing. I just printed my book out and put it into a binder, or you can cut and sew right from the screen of your favorite device. Now let's talk about the fun stuff... Tula Pink FABRIC!! 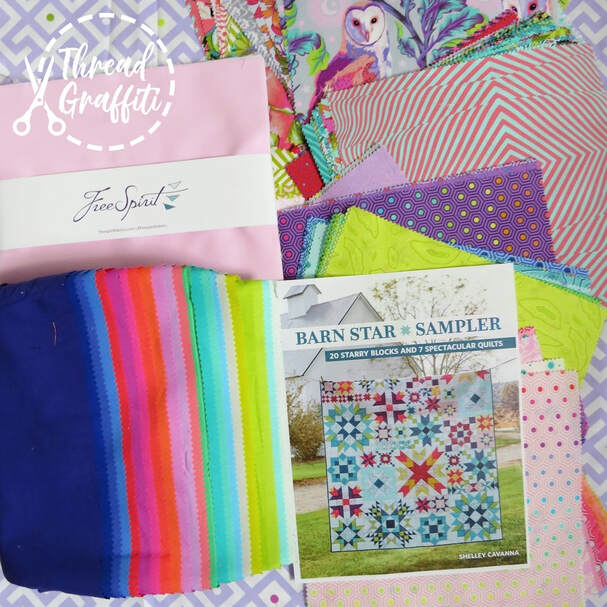 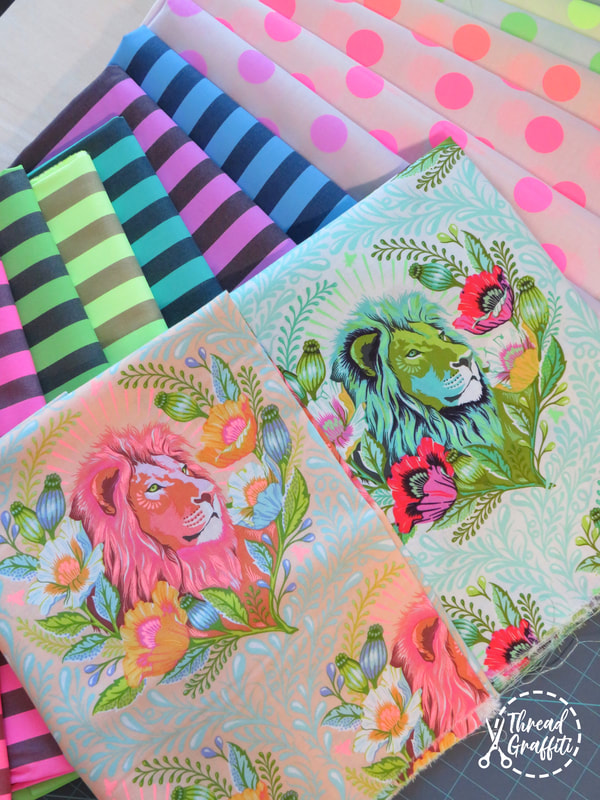 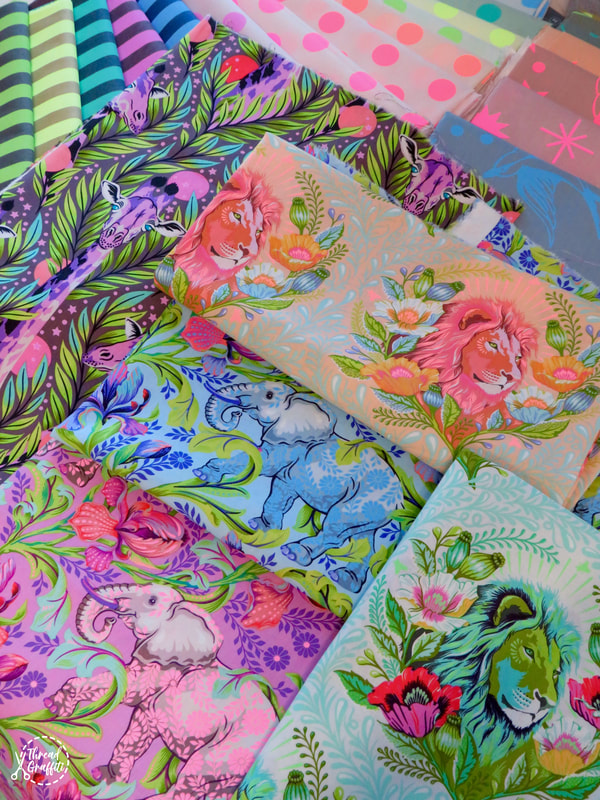 This sampler pattern is just so fun, I felt like it was totally necessary to use Tula Pink fabrics to give it that bold and modern look I always love! So I have pulled a variety of Tula Pink fabrics from my stash (I love Tula solids!) Plus, I just got my sample fabric from Free Spirit the NEW Everglow is as amazing as I had imagined! It's a neon rainbow Y'all!! Tap the image above to reserve your bundle, it will begin shipping early April! Plus Besties by Tula Pink will release in the Fall and I hope I can all some of that in too. Here are my blocks for January, February and March we made 2 blocks from the first 3 patterns in the book, I am totally in love with them! These blocks are huge, and such fun to make, I shared a couple reels to my Instagram with my bad hair #behindtheseams while I did the sewing on block two. I decided to use a black and white feature in the centers, because I am planning to incorporate some black and white within the rest of the quilt later, Oh... I used Kona Dove for the background and then a variety of Tula prints and solids. Throughout the year, we'll been sewing all the Barn Star Sampler Quilt blocks in the same order as they appear in the book, but you can piece them in any way. This Queen-sized quilt finishes at 80.5" x 100.5" and is written for traditional piecing techniques, but if you would like to use foundation papers, Fat Quarter Shop has created a collection of Triangles on a Roll for you to use. 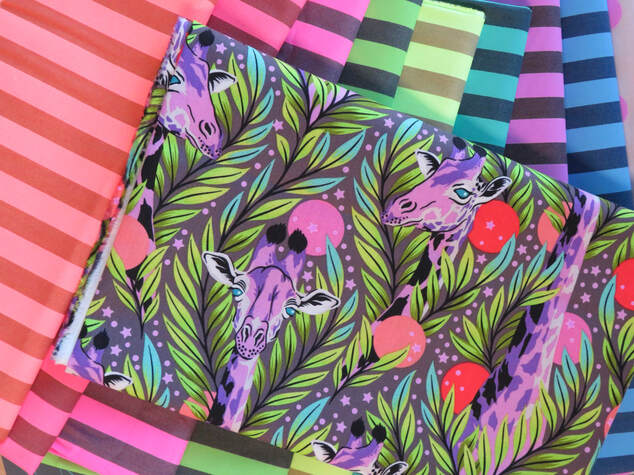 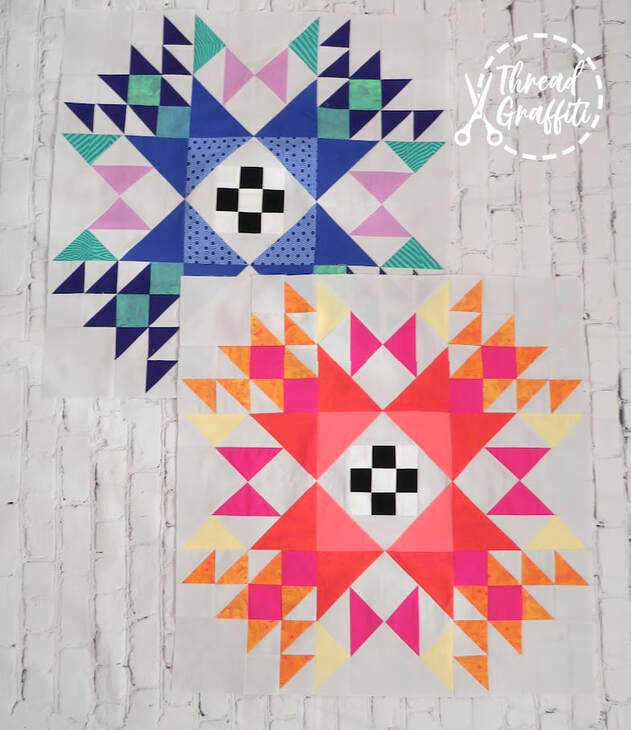 Block #1 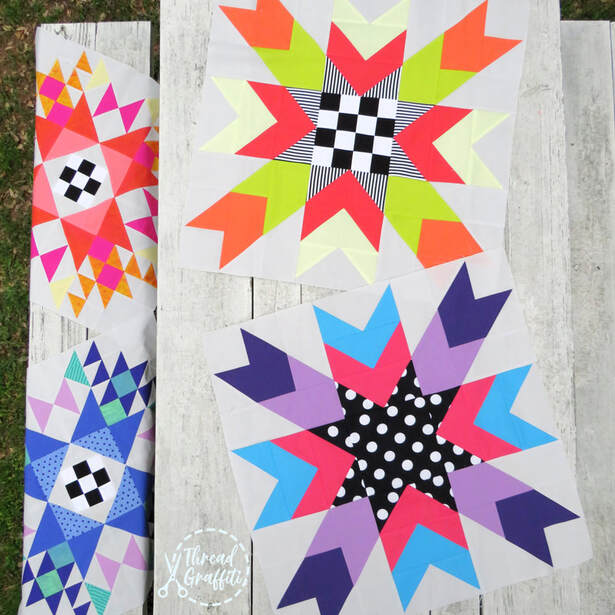 Block 2 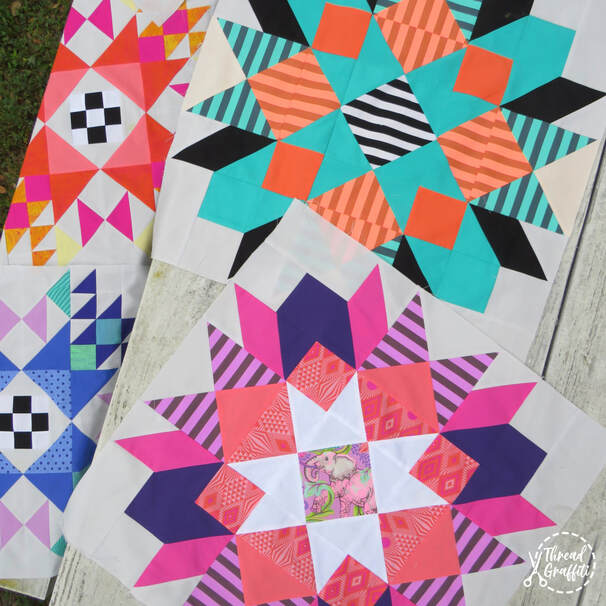 Block 3 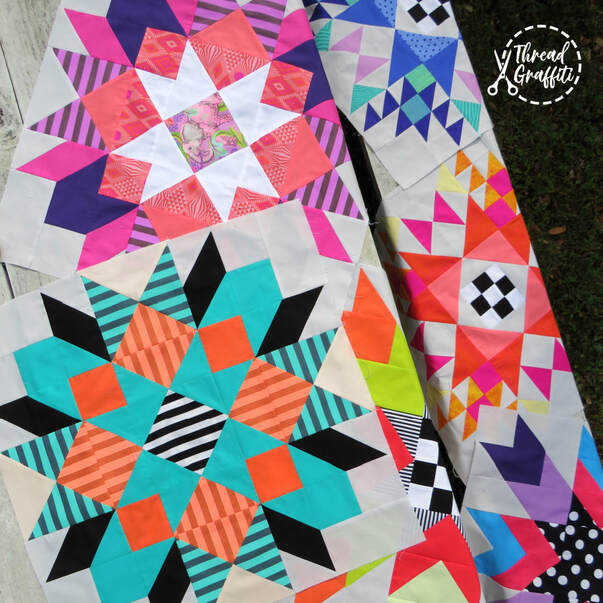 Jan-Feb-Mar Blocks  Block 4  Block 4  Jan - April Blocks 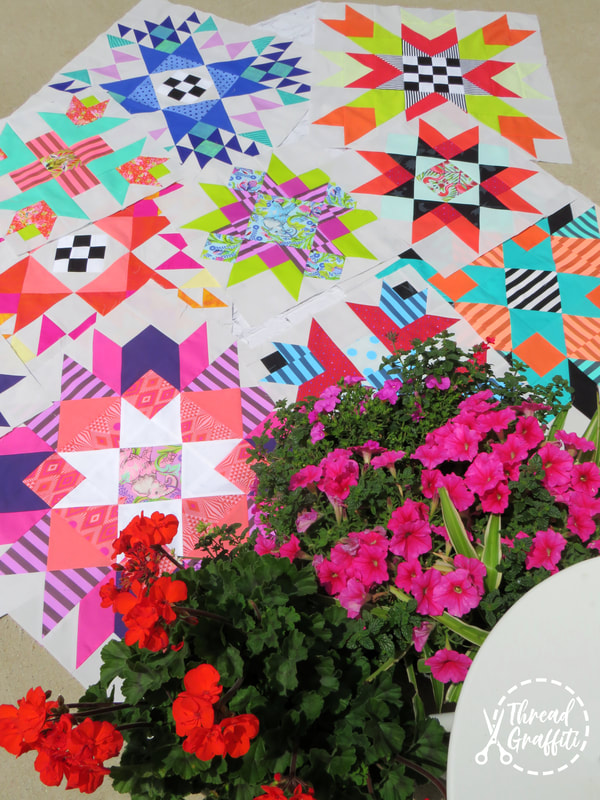 Blocks 1-5 January - May 2023 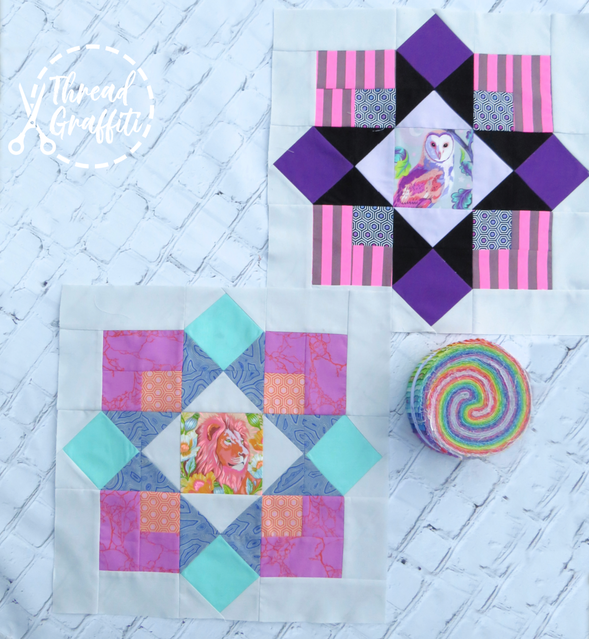 June Blocks 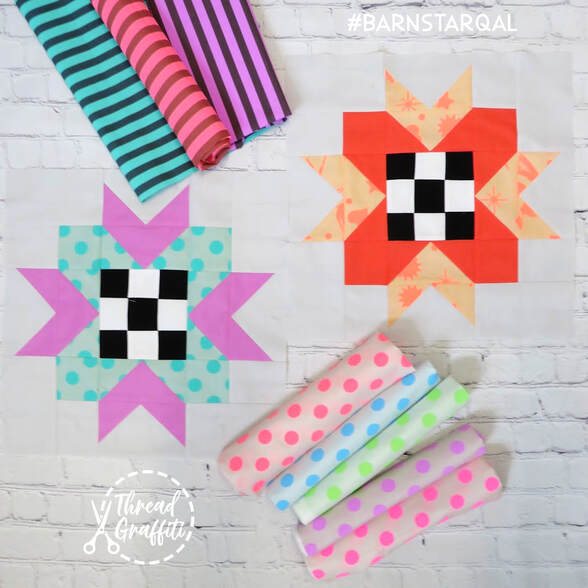 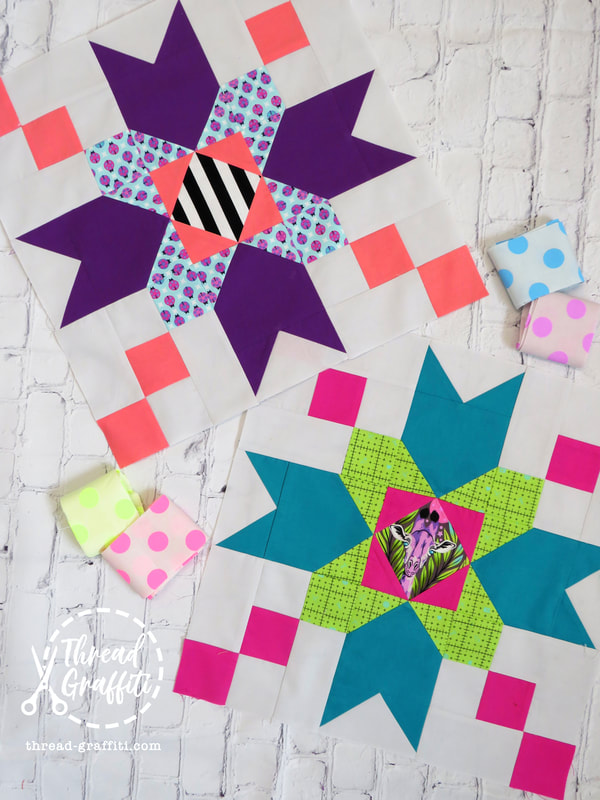 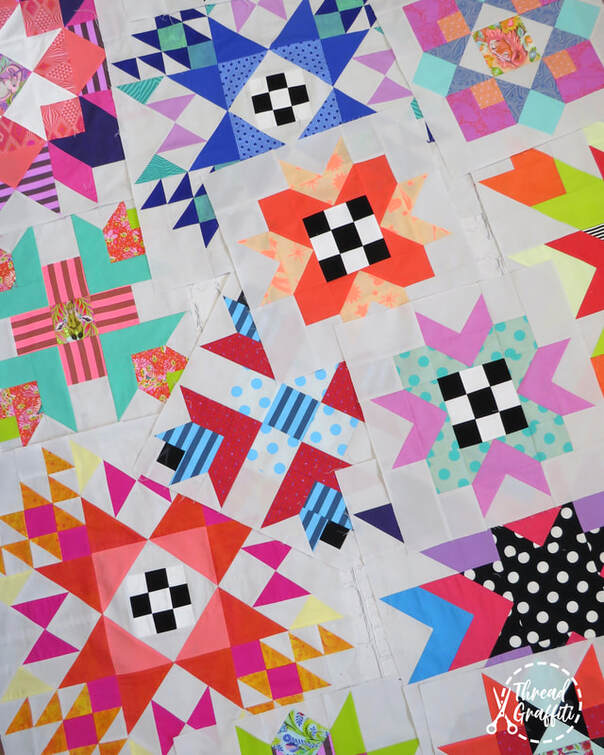 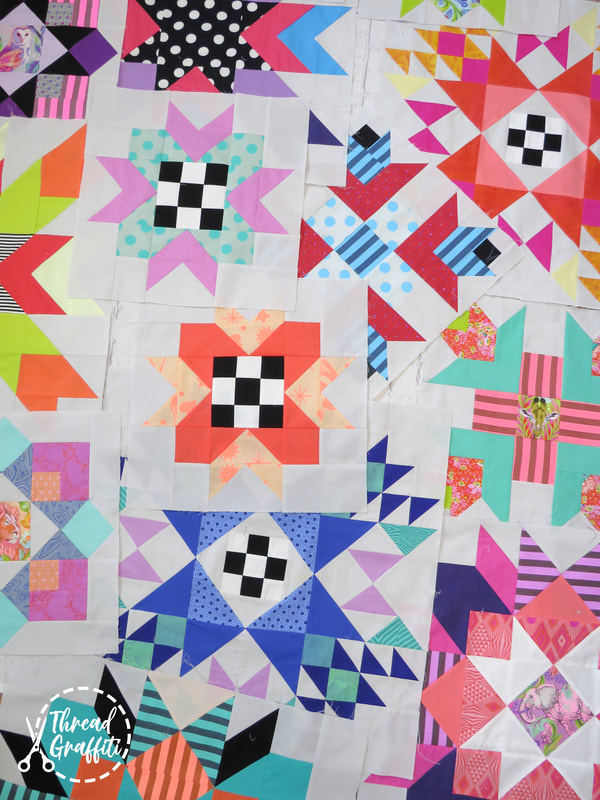 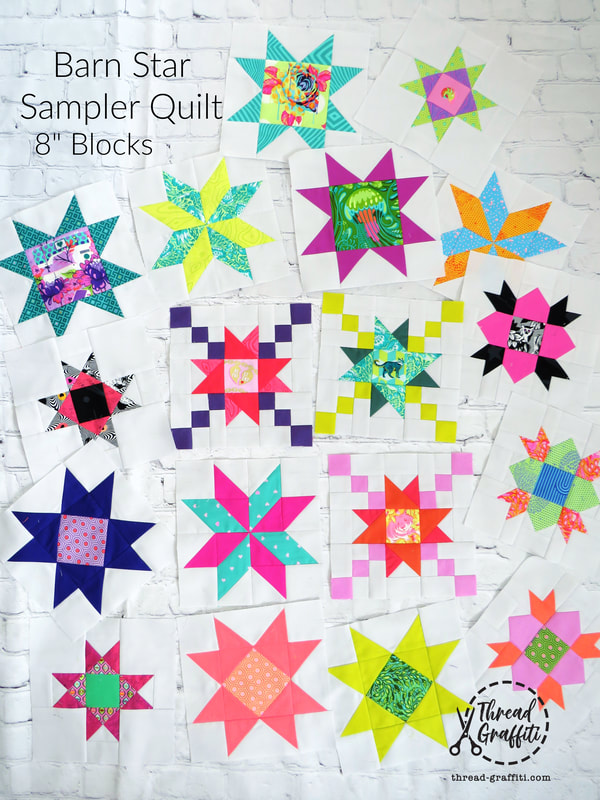 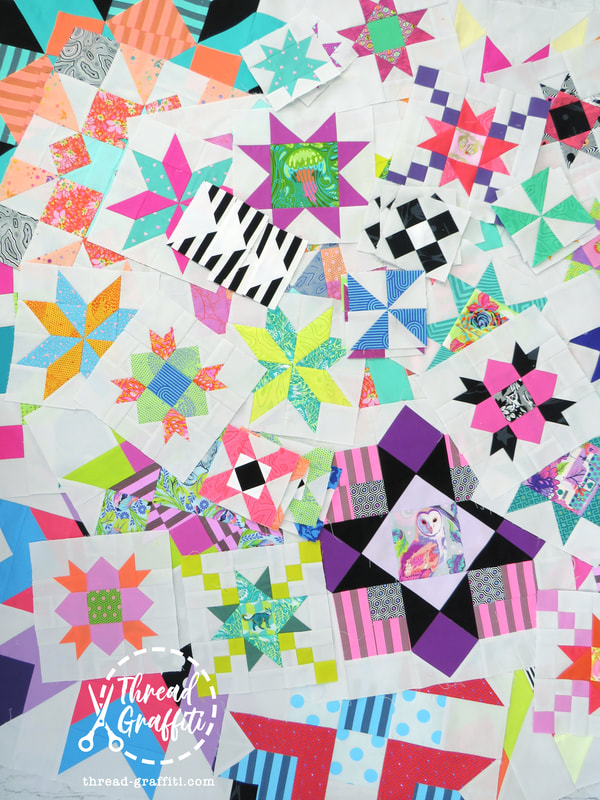 As we near the end of 2023 we are finishing our Barn Star Sampler, here are the last of my blocks before I start sewing all of them together then we will be ready for longarm quilting, I am so excited to see this one finished! 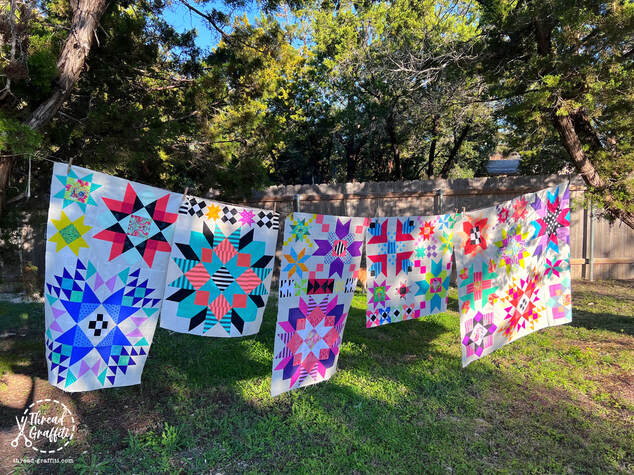 The end is here, the calendar says December 15th, 2023 and it’s Barn Star Quilt Along Day!! That means we finally share out finished quilt!! I’m not sure I have ever made a quilt that took me an entire year to finish. Sure, I have started them and tucked them away for a year or so and then finished them, but never have I made a block or two each month for this long, it sure was fun!! Also, notice my Texas barn in my background, it has no door just stone steps to look inside, I believe it’s some kind of cellar from many years ago, the walls are prob 24” thick with stone and mud. Me and the teenagers went out on a walk near our house in the #texashillcountry to get this picture, it’s always fun when they hang out with me!   I decided to use the Propel Pantograph by my friend Jess from the Longarm League, this quilt finished at 80x100 so it stitched out forever, but it was perfect, great panto! I shared some of these blocks on the YouTube video below, tap to watch... Quilt Along Schedule I'll be following this FQS schedule when I share my blocks to social media. There won’t be a tutorial for these blocks, as all of the instructions are in the book, but I will have YouTube tutorials for the quilting, trimming and binding portion later in the year! Month/Blocks/Date January Make two of Block 1- January 27 February Make two of Block 2 - February 24 March Make two of Block 3 - March 31 April Make two of Block 4 - April 28 May Make two of Block 5 - May 26 June Make two of Block 6 - June 30 July Make two of Block 7 - July 28 August Make two of Block 8 - August 25 September Make two of Block 9 - September 29 October Make three of Blocks 10-15 - October 27 November Make four of Blocks 16-20 - November 17 December Backing and Finishing December 15 I can't wait for the finishing, it's my favorite part!  Who’s Sewing Along? You can follow all the makers on social media for inspiration and tips.
 Thanks for stopping by my blog, I would love for you to check out my new online store while you are here, I have a brand new ruler design that I just released to help you get perfect binding and if you have a pile of quilt tops laying around you really should consider getting them quilted, I love long arm quilting! Keep up with my progress by following @gina_tell_threadgraffiti on Instagram and don’t forget to use #BarnStarSamplerQAL to share your progress on social media, so we don’t miss seeing your quilts! Happy quilting!
Gina Blog Posts may contain Affiliate Links - thanks for your support. I can't believe the day has finally come |


 | 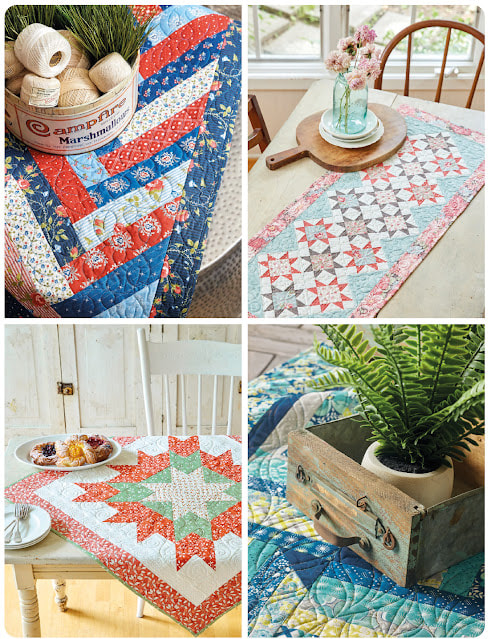 |
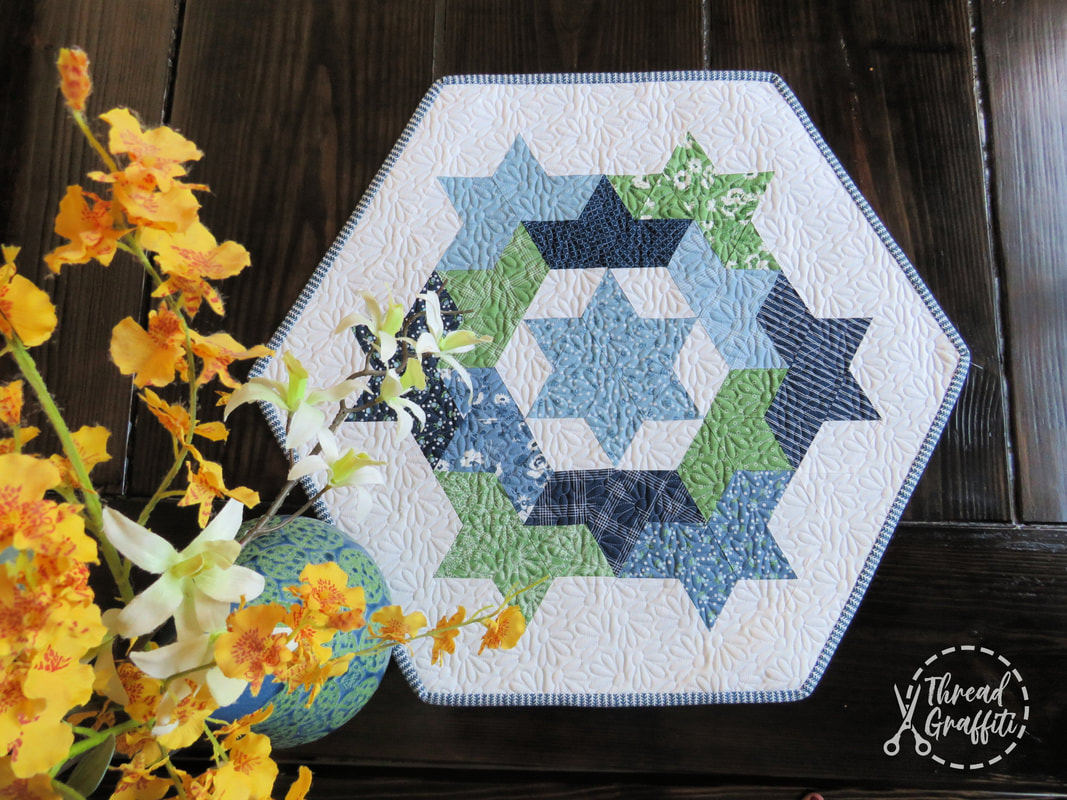
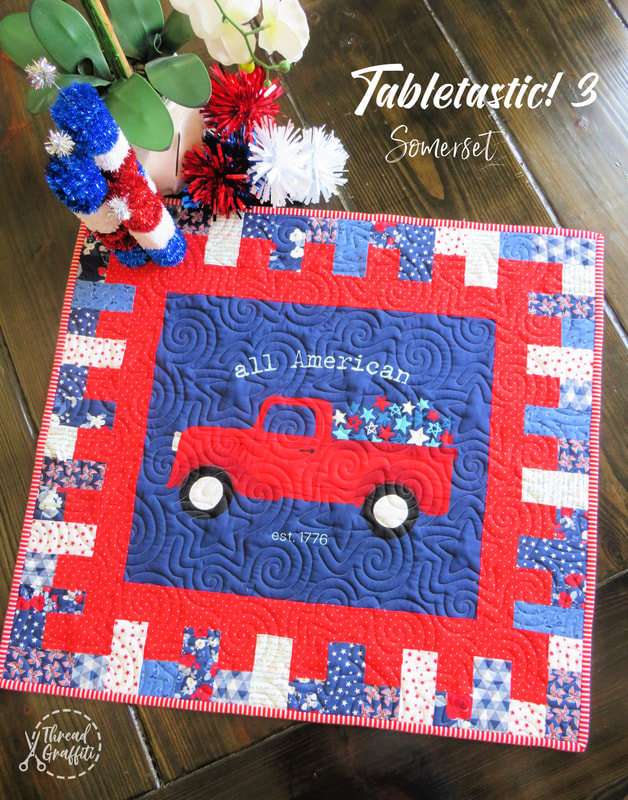
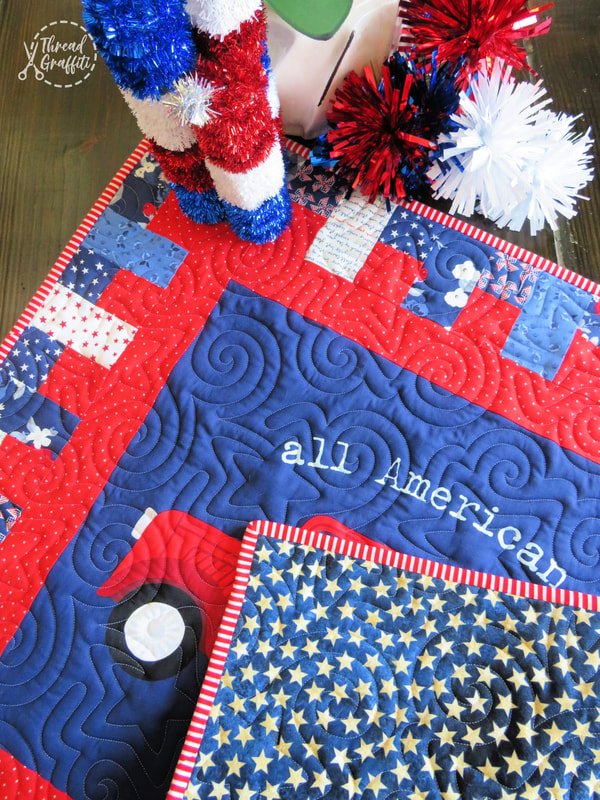
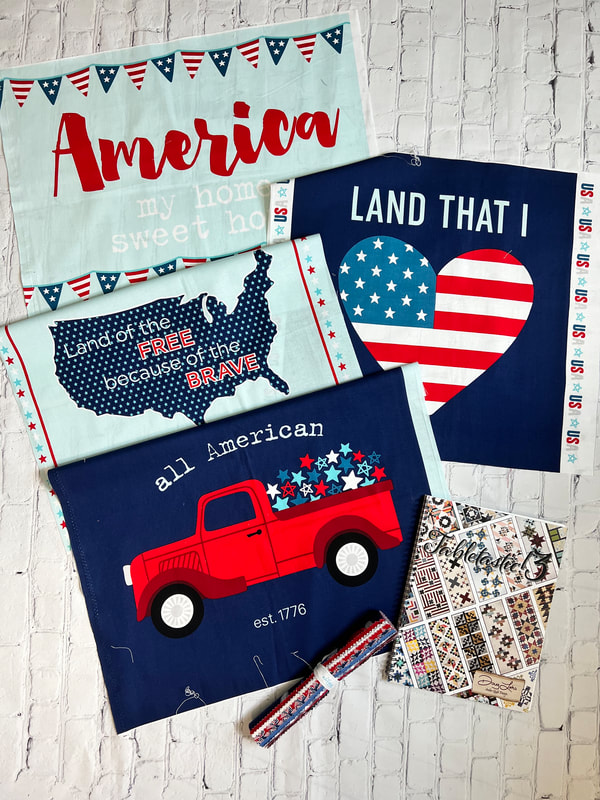
If you'd like to see more of the projects in Pat's book, follow along on the book tour to see what several designers have made for their tables this week!
(each day will also have a chance to win a copy of the book.)
May 23
(each day will also have a chance to win a copy of the book.)
May 23
- Martingale, Martingale Blog
- Bonnie Hunter, Quiltville
- Andy Knowlton (that's me!) A Bright Corner
- Becky Thompson, Power Tools With Thread
- Beverly McCullough, Flamingo Toes
- Carolina Asmussen, CarolinaAsmussen.com
- Jane Davidson, Quilt Jane
- Aurifil, Aurifil Blog
- Pam Vieira-McGinnis, Pam Kitty Morning
- Kristin Esser, KristinEsser.com
- Melissa Mortenson, Polka Dot Chair
- Gina Tell, Thread Graffiti
- Kimberly Jolly, Fat Quarter Shop
- Pat Sloan, Pat's blog
Now for the giveaway!
Pat & Martingale have generously providing a copy
of the book for me to give away to one of you!
To enter the giveaway simply leave a comment below letting me know if you have a table topper displayed in your house right now, or if you need to make one from this new book!
Pat & Martingale have generously providing a copy
of the book for me to give away to one of you!
To enter the giveaway simply leave a comment below letting me know if you have a table topper displayed in your house right now, or if you need to make one from this new book!
- Leave a comment below on this post to enter
- Giveaway ends on June 01, 2022
- Open to all - both US and international (US residents will receive a printed copy of the book, E-book (PDF) for international)
- I will notify winner by email so be sure to include your email address in your comment.
Good Luck, and thanks to all who have stopped to check out what I have been making with Pat Sloan!
I would love for you to come follow me on Instagram and Subscribe to my new YouTube channel too, lots of fun new stuff planned this fall....
Thanks SEW much!
Gina Tell
Thanks SEW much!
Gina Tell
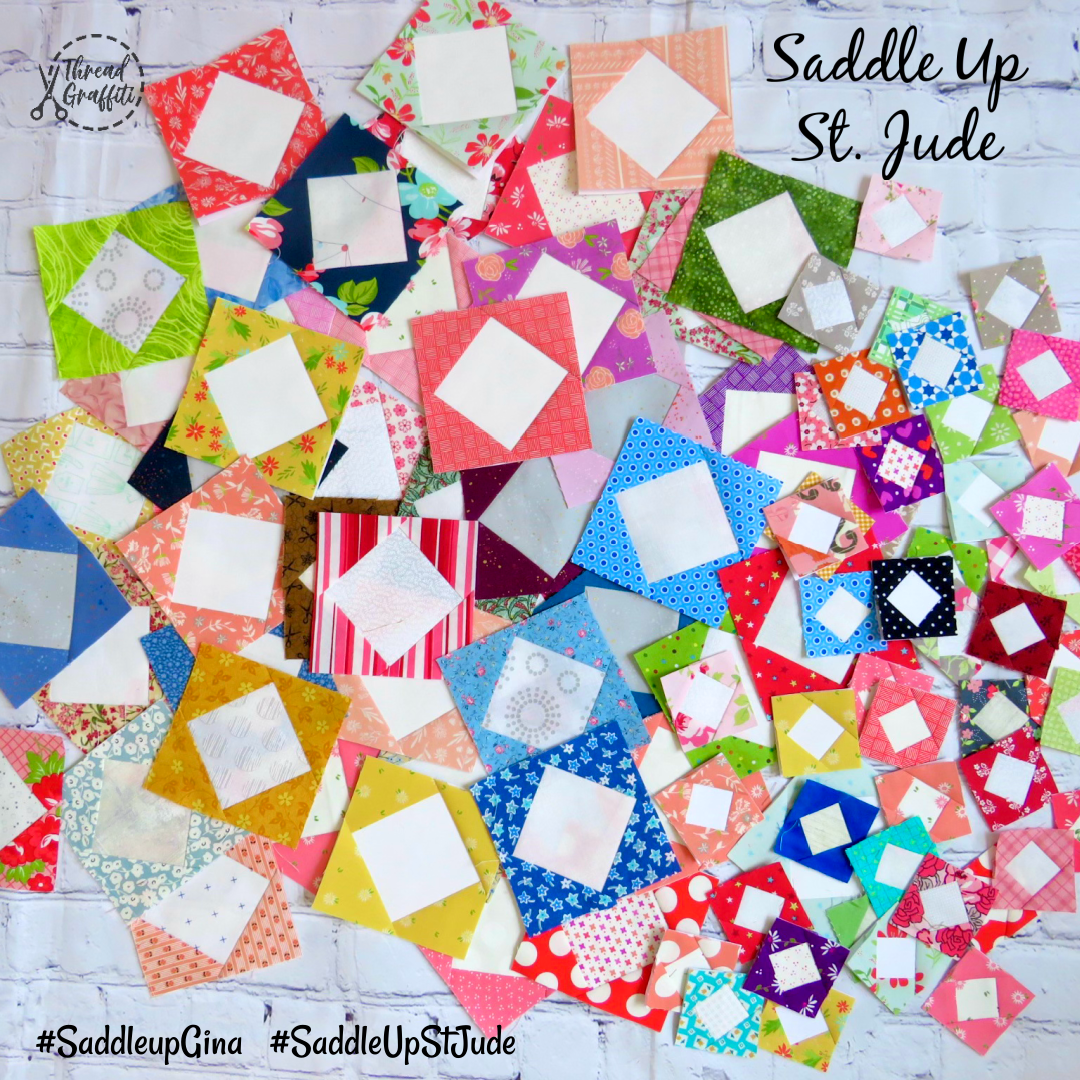
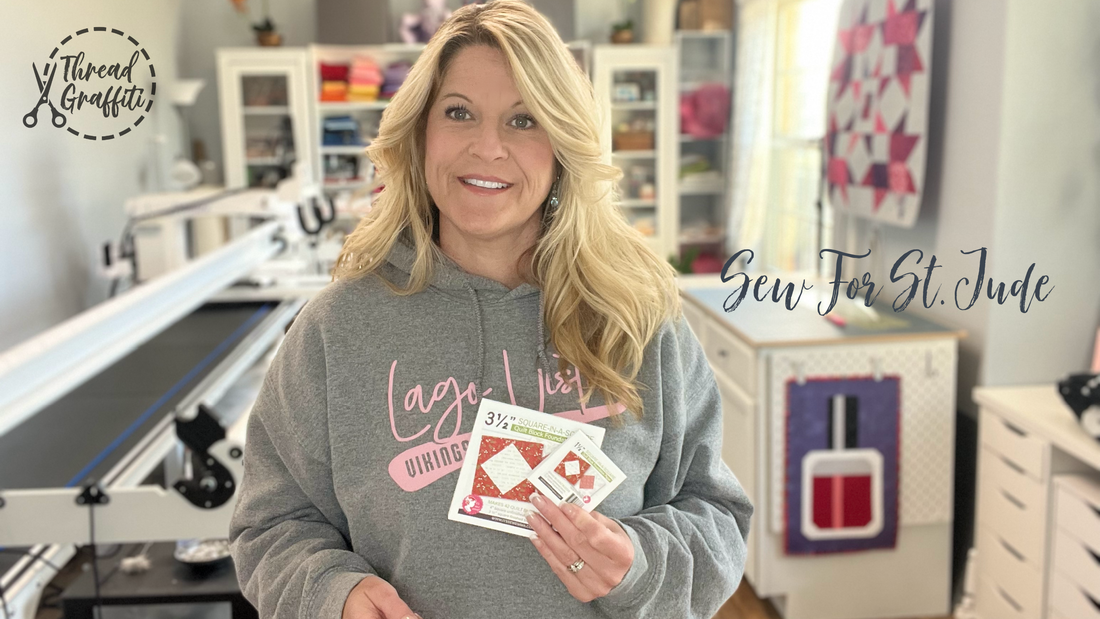
Saddle Up St. Jude, we are starting a group quilt and it's going to be FABULOUS!
A couple years ago I organized a group fundraiser quilt to be made by lots of my quilty friends that went back to my hometown area in Illinois to raise money for St. Jude. The charity organization is called "Saddle Up for St. Jude" and each year in November they hold a big auction to raise money to help childhood cancer and this year I would like to do the same thing, only bigger!
Ok y'all, this is how it is all going to work...
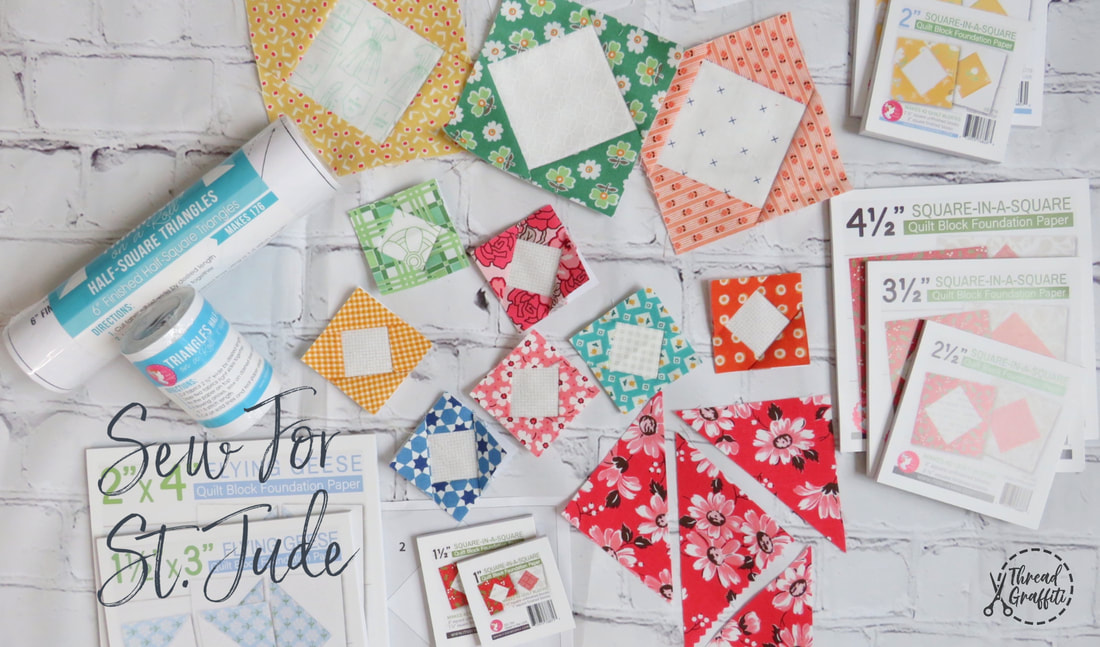
I have created a YouTube video to share some tips on making scrappy square-in-a-square quilt blocks so that we can each make a couple blocks and they will all come out exactly the same. The papers will make it much easier for me to put all the blocks together since so they will be super square and perfect and I can't wait to see all the big scrappy quilts they will create for St. Jude! My goal is to try to make two quilts, one with the 3.5" papers and a second quilt with tiny 1.5" papers.
**The only RULE is to keep the center blocks all light in color (white, linen, cream, light grey) while the 4 corner pieces are all the same color fabric, any color is great, I want lots of color variety, use whatever you have in your scrap bin!
**It is ok if you leave the papers on, or take them off, whatever you prefer.
Dont have the foundation papers yet? Click HERE
UPDATE: We have all the blocks we need for this charity, but make sure you join my Charity Facebook Group so you don't miss out on the next group quilt!
Join my chairy Facebook group to post pictures and meet new friends!
I will be sharing the finished quilts on my YouTube Channel the end of October 2022 just before the auction, I would love for you to Subscribe so you don't miss the auction!
Here is some information about the Southern Illinois Saddle Up For St. Jude charity, you can follow their Facebook page, and each year in the fall they will post more details on the auction items. The annual auction takes place the first Saturday in November and in the last 11 years the action has raised $294,253.12 total, which includes private donors and the auction. 100% of the proceeds from this benefit go to St. Jude Children Hospital, let's keep that number growing!!
Check out the quilt we made for the
November 2020 Auction!
You can click the links to check out my 2020 Instagram post for more photos, and to download the Rainbow Taffy free pattern. Our quilt made by around 50 people and was included with many other auction items to help raise $37,500 to be sent to St. Jude in the 2020 benefit!
Feel free to share this blog post with friends, and please share pictures on social media with the hashtag #SaddleUpGina #SaddleUpStJude
I am so excited to do this charity together, thanks so much for stopping by!
I am so excited to do this charity together, thanks so much for stopping by!
This post contains affiliate links, but I only share links for products I love!
Have more questions?
Tap the links below to contact me.
Thanks SEW much!
What was your favorite board game
when you were a kid?
Board games were a big part of my life when I was a kid, because I am old (lol) we didn't have phones and video games to entertain us, we had game night. I used to love to play Monopoly, UNO, Yahtzee, Scrabble and of course Checkers and Tic Tac Toe. I can remember my brother and I with a pen and paper and a zillion little X's and O's on the long car rides, so I decided it would be the perfect gift for his daughter birthday coming up, maybe he will remember to tell her about the good times he had with his big sister...
Probably not, but it's worth a shot.
Probably not, but it's worth a shot.
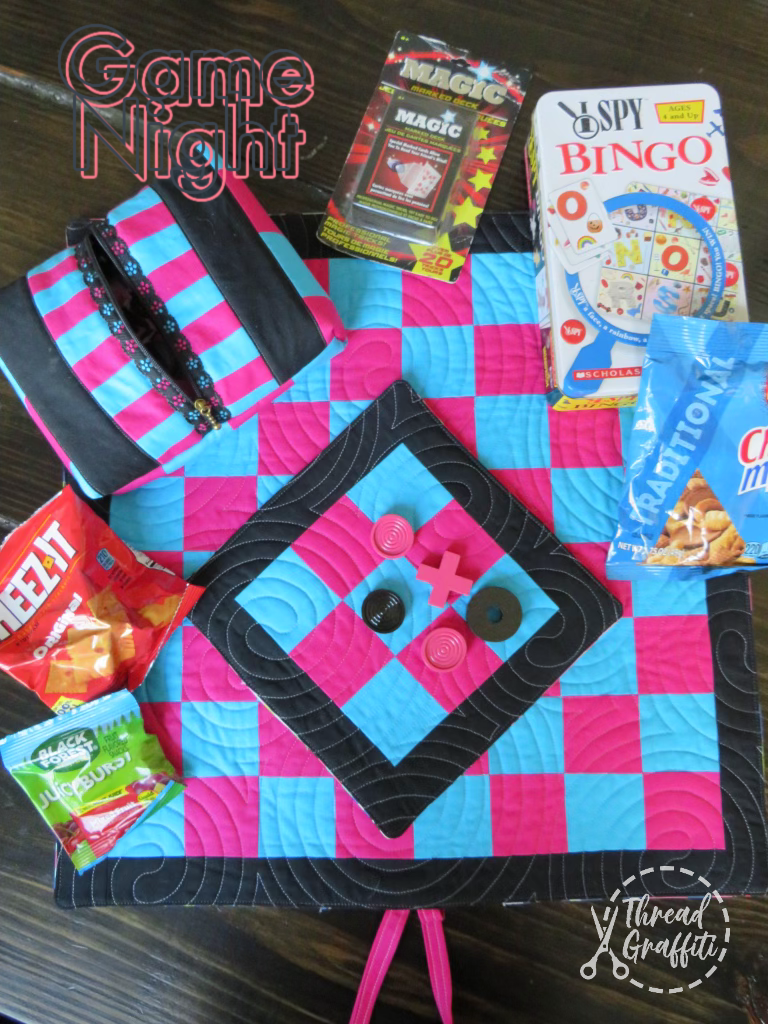
I made this entire game set with fabric from my stash, it doesn't require much fabric so it's a super simple little handmade gift that you can do in any colors.
First, I decided that I wanted to use some graffiti fabric that I had for the back side of the checker board since I had a few yards and she and I both love art! It is full of fun bright colors so I picked pink and aqua for the front.
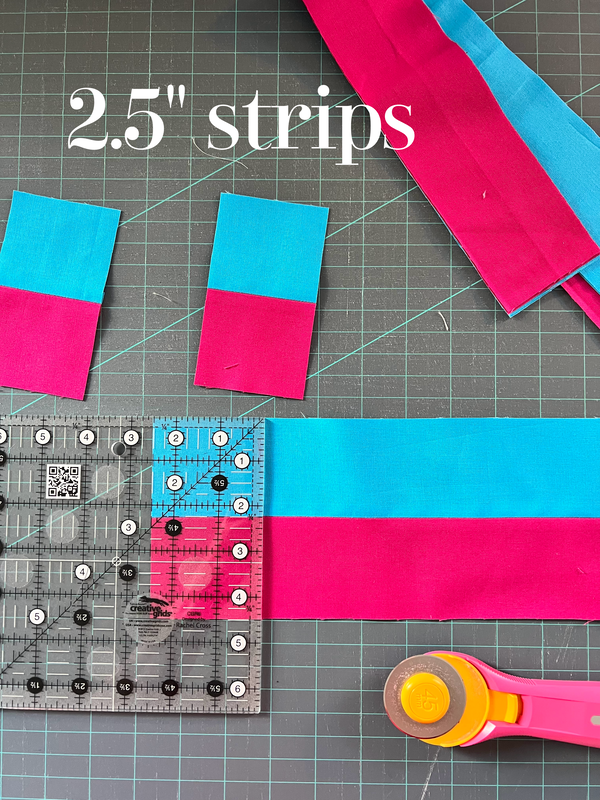
I cut 2.5" strips from the solid pink and aqua fabric and sewed them into strip sets and then trimmed them down to 2.5" - this made it super fast and easy. Or you can cut 2.5" squares and piece them all together, as long as your board is 8 rows of squares across x 8 rows of squares down, it will work!
You'll need 64 total squares for Checker Board:
32 of one color
32 of another color
You will need 9 - 2.5" for the Tic Tac Toe Board:
3 of one color
3 of another color
First, I decided that I wanted to use some graffiti fabric that I had for the back side of the checker board since I had a few yards and she and I both love art! It is full of fun bright colors so I picked pink and aqua for the front.
I cut 2.5" strips from the solid pink and aqua fabric and sewed them into strip sets and then trimmed them down to 2.5" - this made it super fast and easy. Or you can cut 2.5" squares and piece them all together, as long as your board is 8 rows of squares across x 8 rows of squares down, it will work!
You'll need 64 total squares for Checker Board:
32 of one color
32 of another color
You will need 9 - 2.5" for the Tic Tac Toe Board:
3 of one color
3 of another color
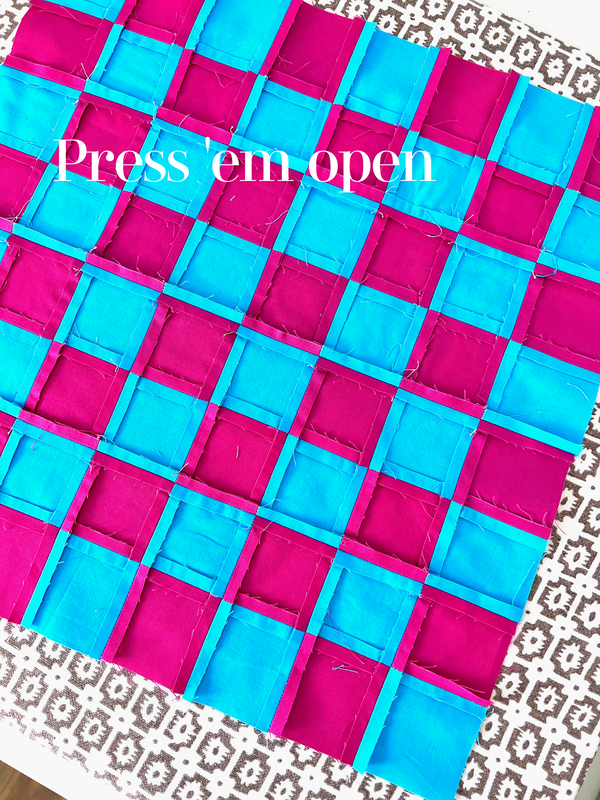
I wanted to make sure the board was as flat at possible so I pressed all my seams open and used my clapper to keep them super flat while I did my pressing! I have the Riley Blake Clappers but I have heard great things about all the brands Fat Quarter Shop stocks.
**(If you see green letters, that means I link what I used and love)
**(If you see green letters, that means I link what I used and love)
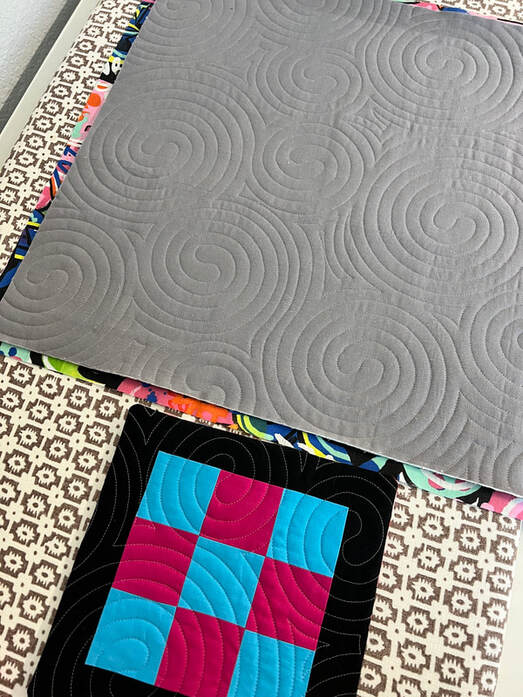
Next, I added a black border, I cut it out 2.5" and then trimmed it down perfectly square after I did the long arm quilting on it. I picked a panto that stitched out pretty dense so the board would not be flat in some areas and puffy in others, you could also do small diagonal crosshatch on your home machine.
When I loaded it onto the long arm I used some scrap grey fabric for the backing because it would be covered up by my graffiti focus fabric anyway. I picked out the "Dizzy Izzy" digital pantograph with 80/20 batting, & Glide 60wt thread so it would blend in and be super skinny!
When I loaded it onto the long arm I used some scrap grey fabric for the backing because it would be covered up by my graffiti focus fabric anyway. I picked out the "Dizzy Izzy" digital pantograph with 80/20 batting, & Glide 60wt thread so it would blend in and be super skinny!
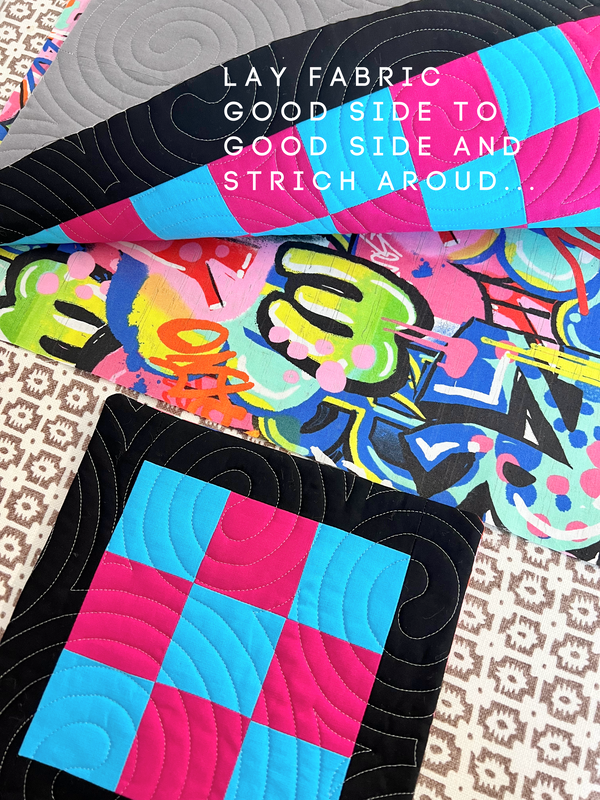
After the quilting, trim both pieces down to the size you like best, then lay your backing piece and your quilted piece good side to good side and stitch all 4 sides down with 1/4 seam and then leave a 4" hole on one side so you can flip it inside out. This is also the hole you will tuck your straps inside if you want to be able to fold it and tie it closed for storage when you are done playing.
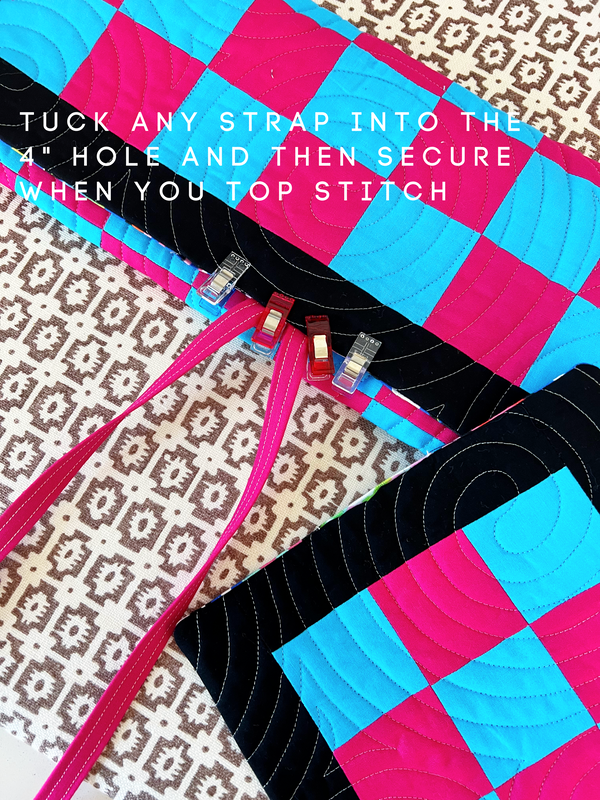
It's now time to tuck in your straps and top stitch to secure, you can use anything you have for straps, or not add any at all, totally up to you. You could used canvas straping, fancy rope, bias tape or make your own.

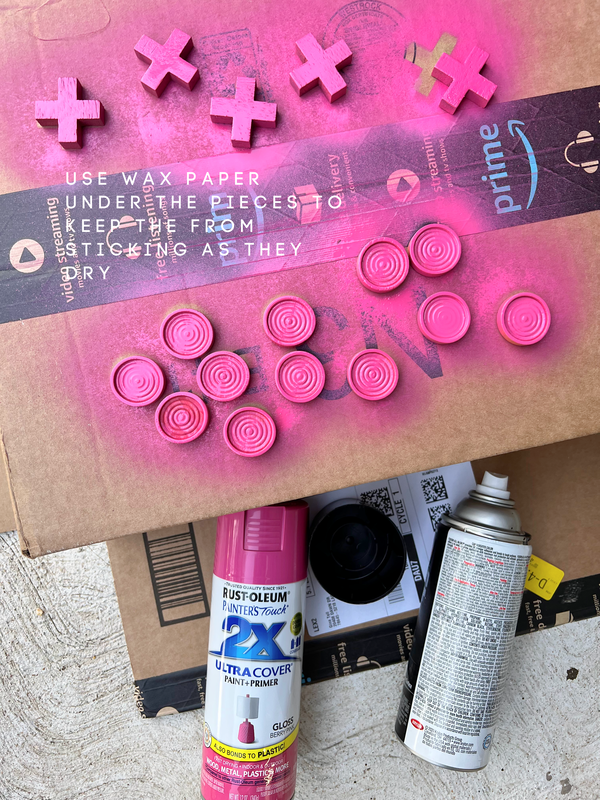
Now it's time to work on the game pieces, I found some plain wood pieces on Amazon and I painted them to match, you can do that too, or just leave them natural color, I just used spray paint that I already had.
ere is what I got:
Checker Pieces and Tic Tac Toe Pieces
ere is what I got:
Checker Pieces and Tic Tac Toe Pieces
Now you'll need a bag to hold your game pieces, right? So lets make a super simple small zipper pouch too!
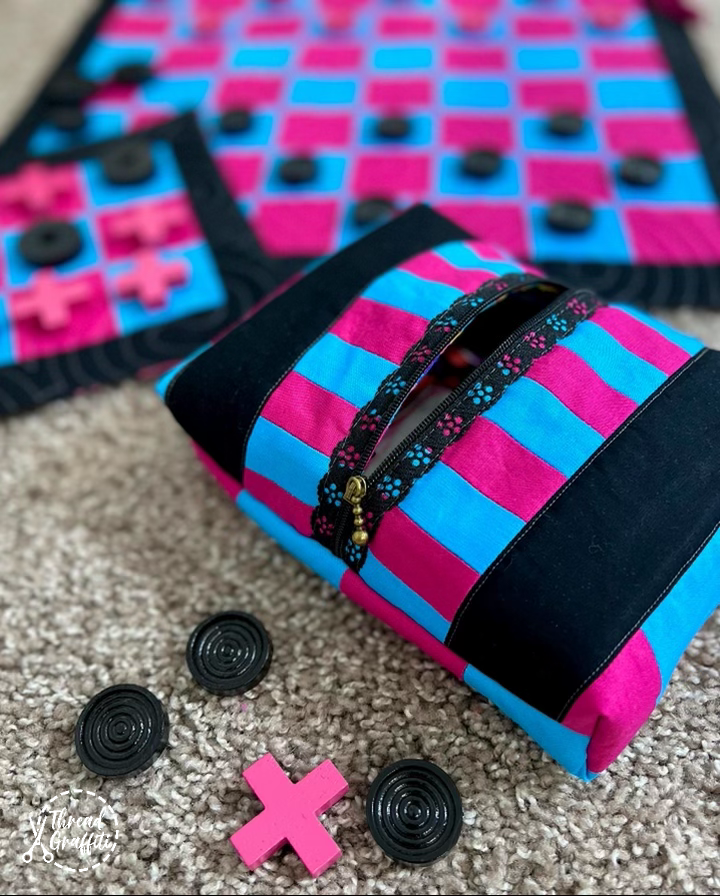
I cut extra 2.5" squares on purpose so I could make this matching bag, but I also made a YouTube video with some ideas for making one with scrappy strips, super simple with endless possibilities!
I hope you make the kiddos in your life some handmade board games, it sure is a fun little project packed with love and will make tons of memories! Share what you make on social so I can see them, I love that! #ginasgamenight
Please Subscribe to my new YouTube Channel and be sure to follow me on Instagram too!
Happy Sewing!
Gina
Please Subscribe to my new YouTube Channel and be sure to follow me on Instagram too!
Happy Sewing!
Gina

Author
Hey Y'all, I'm Gina Tell! I live on Lake Travis just North of Austin Texas. I'm a full time long arm quilter and lover of all this art and outdoors!!
