THREAD GRAFFITI
  • Home
  • Long Arm Quilting Service
  • Shopping
  • YouTube
  • Blog
  • T-Shirt Quilts
  • Personalized Teddy Bears
  • Photo Gallery
  • Contact Us

Game Night with Gina tell #ginasgamenight

4/4/2022

2 Comments


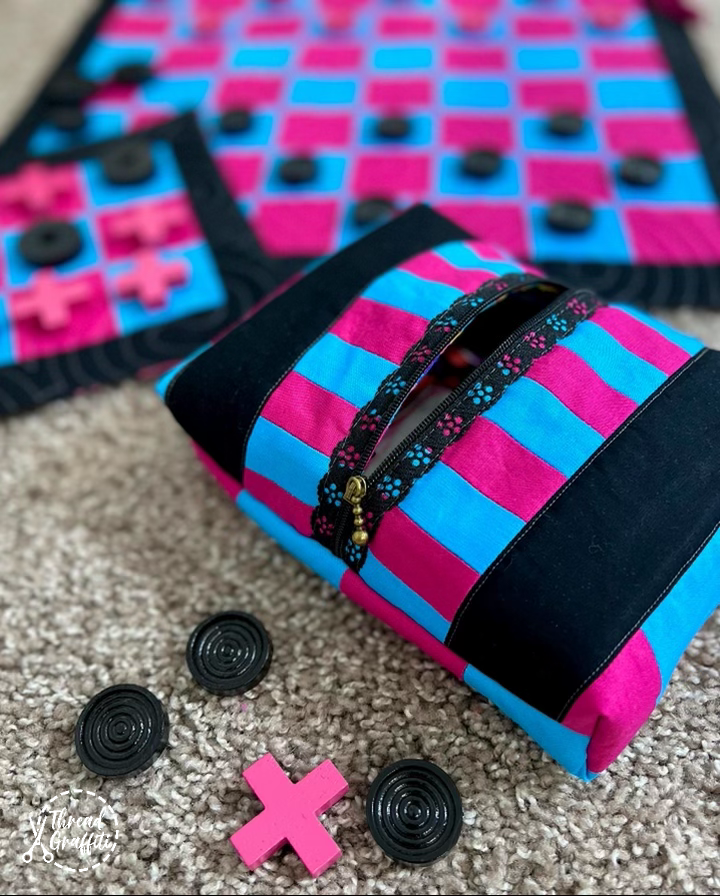
What was your favorite board game
​when you were a kid? 

Picture
Board games were a big part of my life when I was a kid, because I am old (lol) we didn't have phones and video games to entertain us, we had game night.  I used to love to play Monopoly, UNO, Yahtzee, Scrabble and of course Checkers and Tic Tac Toe.  I can remember my brother and I with a pen and paper and a zillion little X's and O's on the long car rides, so I decided it would be the perfect gift for his daughter birthday coming up, maybe he will remember to tell her about the good times he had with his big sister...
​Probably not, but it's worth a shot.  
I made this entire game set with fabric from my stash, it doesn't require much fabric so it's a super simple little handmade gift that you can do in any colors.
  
First, I decided that I wanted to use some graffiti fabric that I had for the back side of the checker board since I had a few yards and she and I both love art! It is full of fun bright colors so I picked pink and aqua for the front.  

I cut 2.5" strips from the solid pink and aqua fabric and sewed them into strip sets and then trimmed them down to 2.5" - this made it super fast and easy.  Or you can cut 2.5" squares and piece them all together, as long as your board is 8 rows of squares across x 8 rows of squares down, it will work! 
You'll need 64 total squares for Checker Board:
32 of one color  
32 of another color  
You will need 9 - 2.5" for the Tic Tac Toe Board:
3 of one color
​3 of another color 
Picture
I wanted to make sure the board was as flat at possible so I pressed all my seams open and used my clapper to keep them super flat while I did my pressing! I have the Riley Blake Clappers but I have heard great things about all the brands Fat Quarter Shop stocks.
​**(If you see green letters, that means I link what I used and love)
Picture
Next, I added a black border, I cut it out 2.5" and then trimmed it down perfectly square after I did the long arm quilting on it.  I picked a panto that stitched out pretty dense so the board would not be flat in some areas and puffy in others, you could also do small diagonal crosshatch on your home machine. 

When I loaded it onto the long arm I used some scrap grey fabric for the backing because it would be covered up by my graffiti focus fabric anyway. I picked out the "Dizzy Izzy" digital pantograph with 80/20 batting, & Glide 60wt thread so it would blend in and be super skinny! 
Picture
After the quilting, trim both pieces down to the size you like best, then lay your backing piece and your quilted piece good side to good side and stitch all 4 sides down with 1/4 seam and then leave a 4" hole on one side so you can flip it inside out.  This is also the hole you will tuck your straps inside if you want to be able to fold it and tie it closed for storage when you are done playing. 
Picture
Picture
It's now time to tuck in your straps and top stitch to secure, you can use anything you have for straps, or not add any at all, totally up to you.  You could used canvas straping, fancy rope, bias tape or make your own.  
Picture
Now it's time to work on the game pieces, I found some plain wood pieces on Amazon and I painted them to match, you can do that too, or just leave them natural color, I just used spray paint that I already had. 
ere is what I got:
Checker Pieces and Tic Tac Toe Pieces
Picture

Now you'll need a bag to hold your game pieces, right? So lets make a super simple small zipper pouch too! 

Picture
I cut extra 2.5" squares on purpose so I could make this matching bag, but I also made a YouTube video with some ideas for making one with scrappy strips, super simple with endless possibilities! 
I hope you make the kiddos in your life some handmade board games, it sure is a fun little project packed with love and will make tons of memories! Share what you make on social so I can see them, I love that! #ginasgamenight

Please Subscribe to my new YouTube Channel and be sure to follow me on Instagram too! 
Happy Sewing! 
​Gina 
2 Comments
Kayleen
4/6/2022 12:47:30 pm

Gina this is great I’m going to whip one of those up for my granddaughter!!

Reply
Beverly
5/28/2022 10:26:08 pm

Gina - you have a lot of IMPACT with color! Love the pink game pieces!

Reply


Leave a Reply.

    Picture
    ​

    Author

    ​Hey Y'all, I'm Gina Tell! I live on Lake Travis just North of Austin Texas.  I'm a full time long arm quilter and lover of all this art and outdoors!! 

    Fat Quarter Shop Quilting Fabrics and Supplies

    Archives

    February 2023
    January 2023
    October 2022
    July 2022
    May 2022
    April 2022
    February 2022
    January 2022
    December 2021
    November 2021
    October 2021
    June 2021
    May 2021
    April 2021
    January 2021
    October 2020
    August 2020
    March 2020
    February 2020
    January 2020
    October 2019
    July 2019
    May 2019
    March 2019
    February 2019
    December 2018
    November 2018
    October 2018
    September 2018
    August 2018
    July 2018
    June 2018
    May 2018
    April 2018
    March 2018
    February 2018
    January 2018
    November 2017
    October 2017
    July 2017
    March 2017

My content may contain affiliate links for the products I use and love.
​ If you make a purchase after clicking one of these links, I'll earn some extra sewing money, at no additional cost to you.
​
Thank you SEW much, Happy Quilting!!!!
  • Home
  • Long Arm Quilting Service
  • Shopping
  • YouTube
  • Blog
  • T-Shirt Quilts
  • Personalized Teddy Bears
  • Photo Gallery
  • Contact Us