Happy New Year to all my quilty friends! 2020 was such a strange year, filled with uncertainties, and difficulties, but it was also filled with a lot of family, and love. During this past year I have been so blessed to build new friendships with such great people, I have welcomed many new clients and continued to work with old ones, while reminding myself during the hard days how much I love what I am able to do each day. Being a long arm quilter has brought me so much joy, having my days filled with color and design does not suck! So I just wanted to take a minute to thank all of you for being here with me!
I just uploaded all kinds of new pictures on my webisite home page from this year if you want to check them out. I am so excited, I have some big dreams for 2021, and I have some fun things that are scheduled to happen, and a lot of hope that some other things will fall into place, so please stay tuned...
I am most active on Instagram these days, so if you don't already follow me there, I'd love for you to come check it out. I share almost all of the projects that I work on there, and Instagram has some great tools to provide links so you can find things easily. Click here to follow. Once you find me (@gina_tell_threadgraffit) you can click on the link in my profile, and that will take you to images of all the things I share, and a direct link will be there to shop for those items, it's a new feature for me, so I am pretty excited!
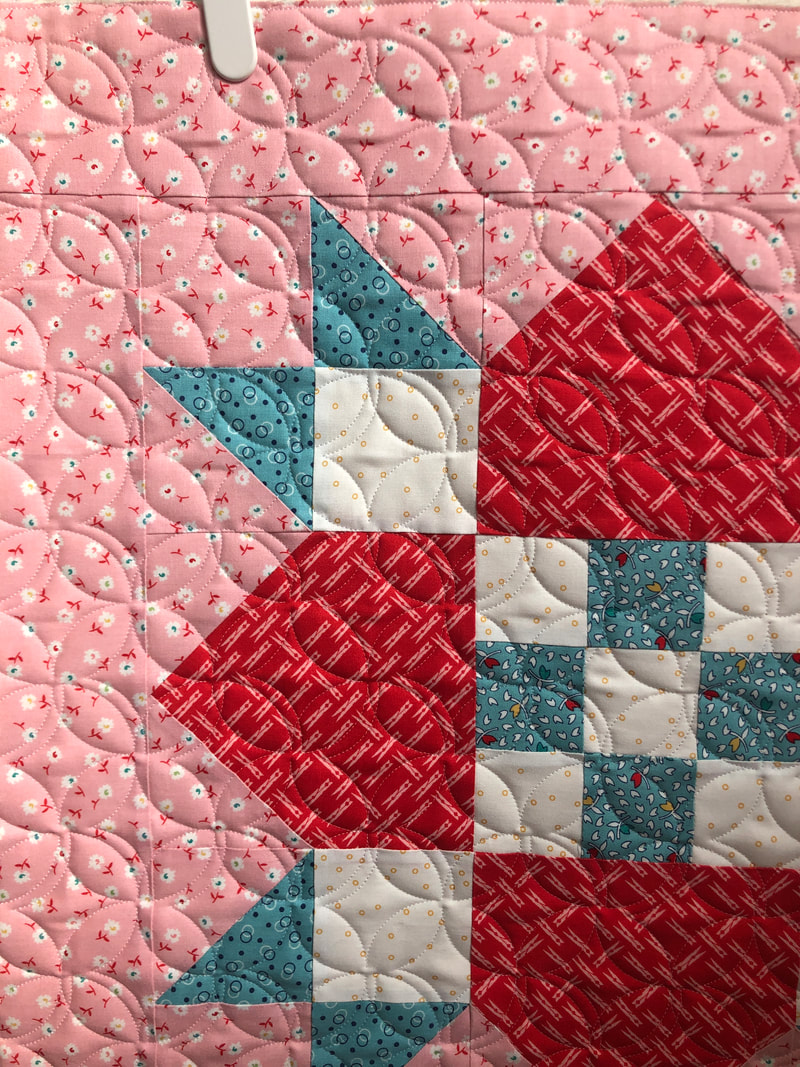
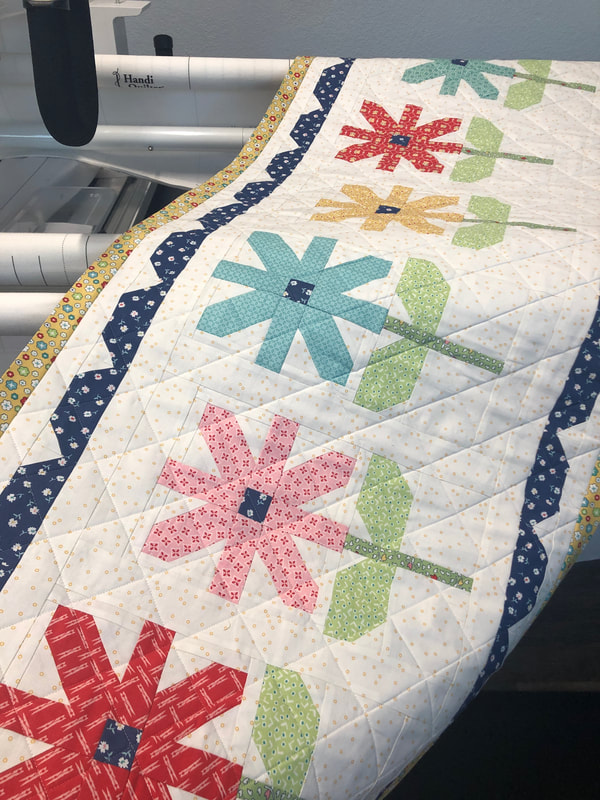
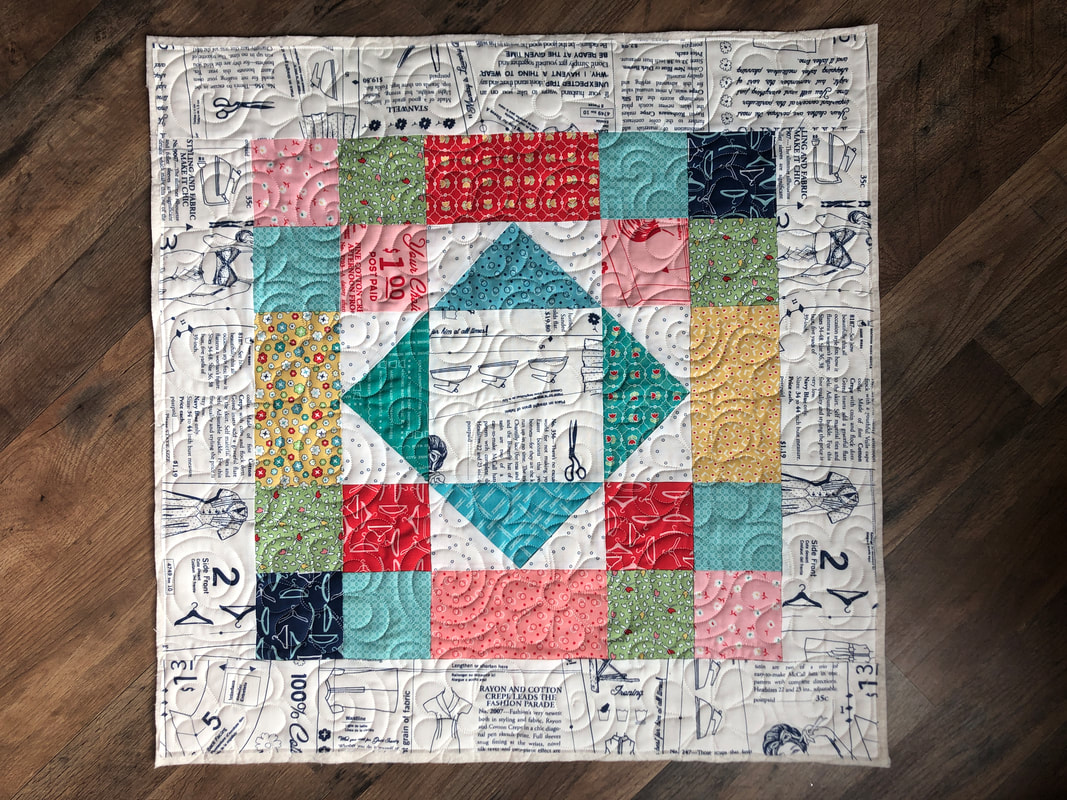
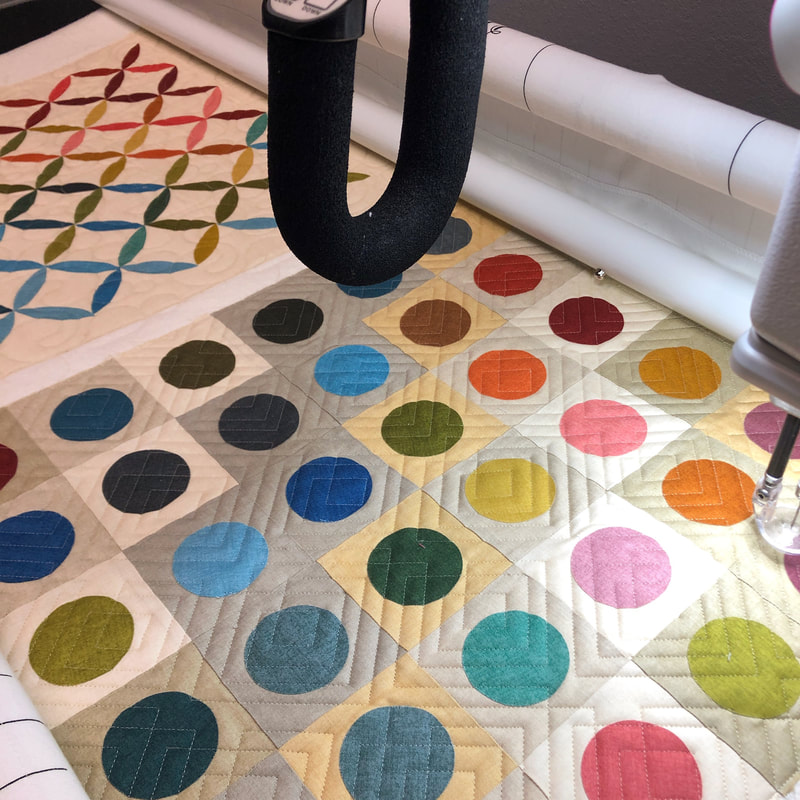
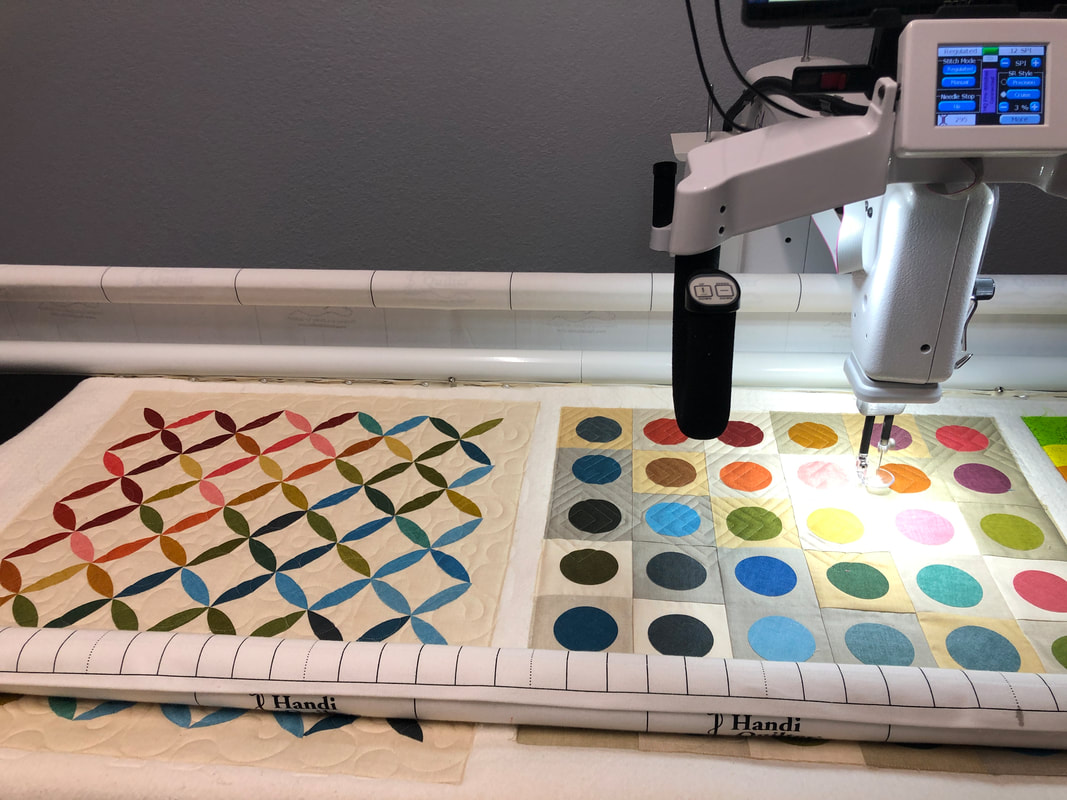
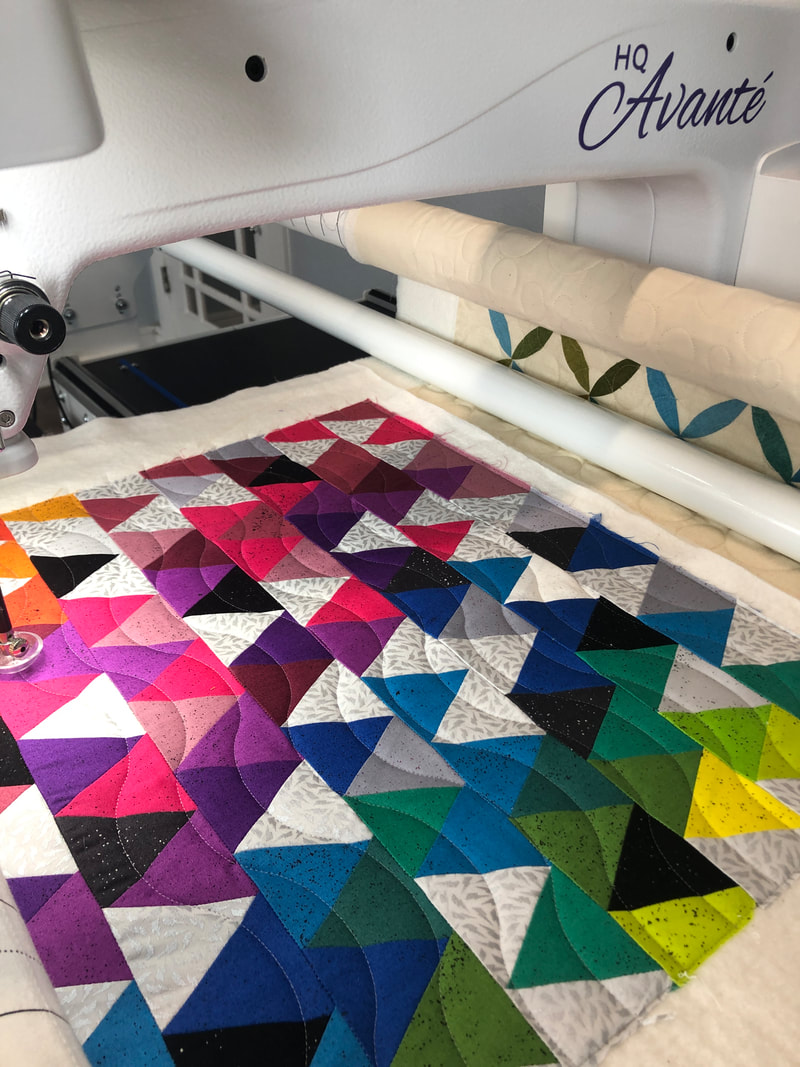
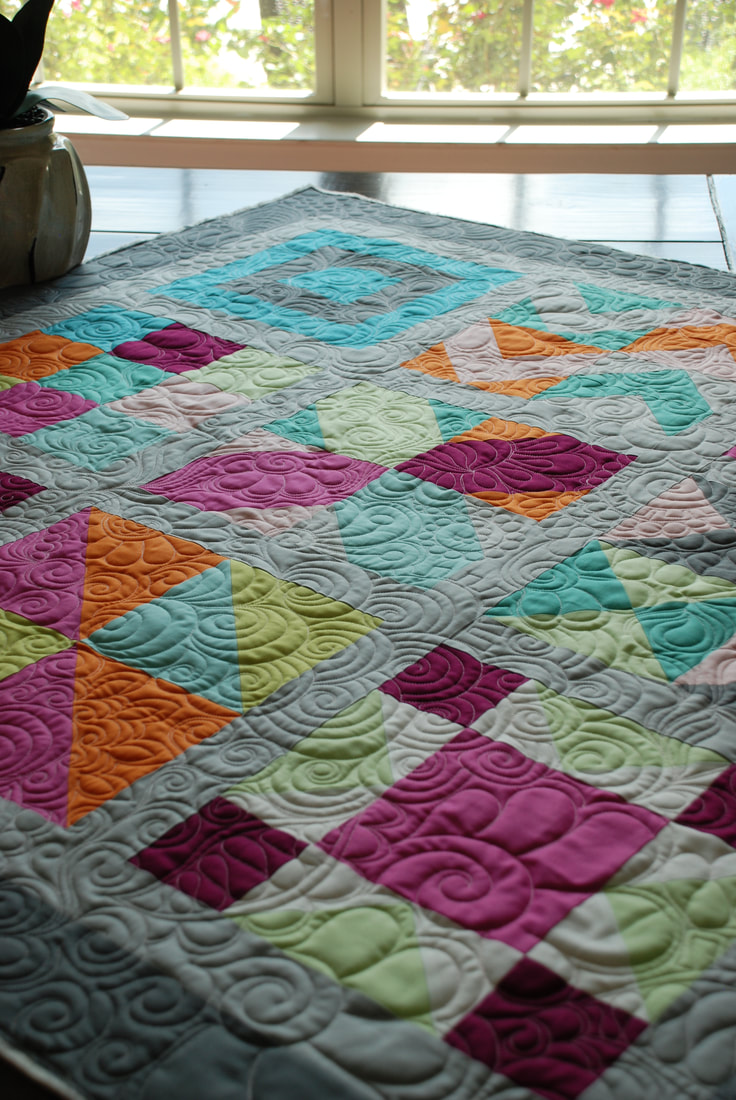
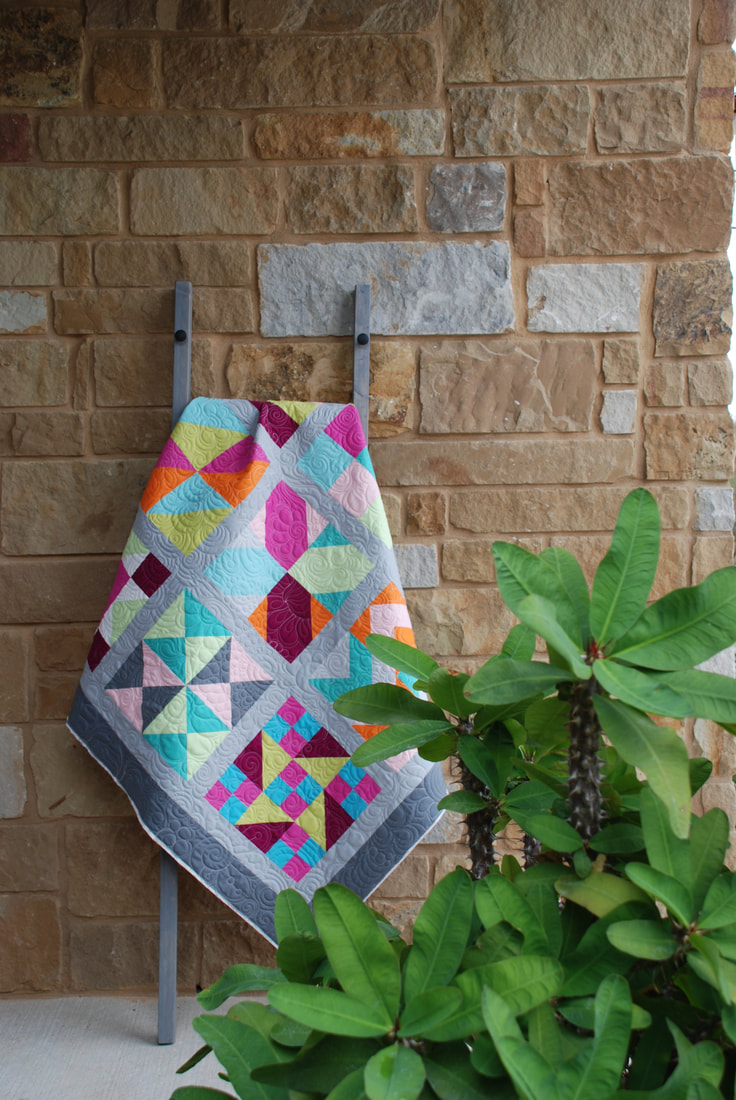
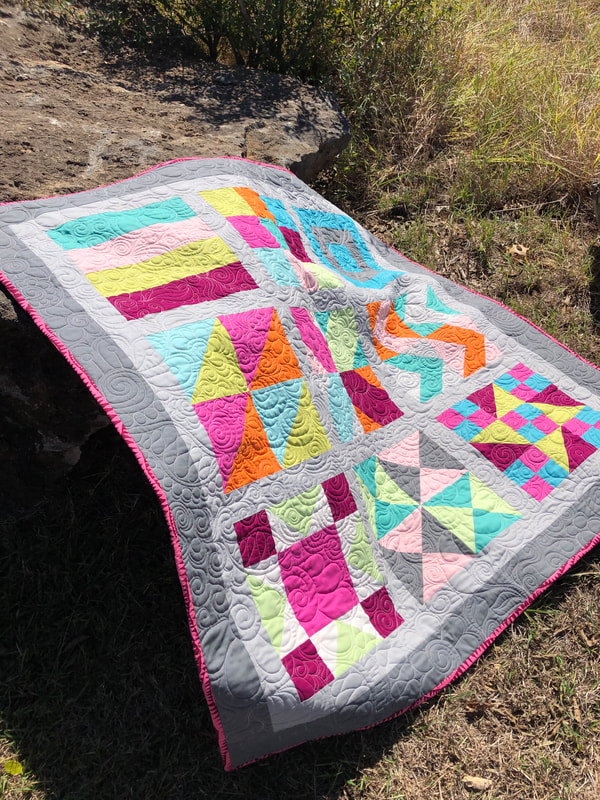
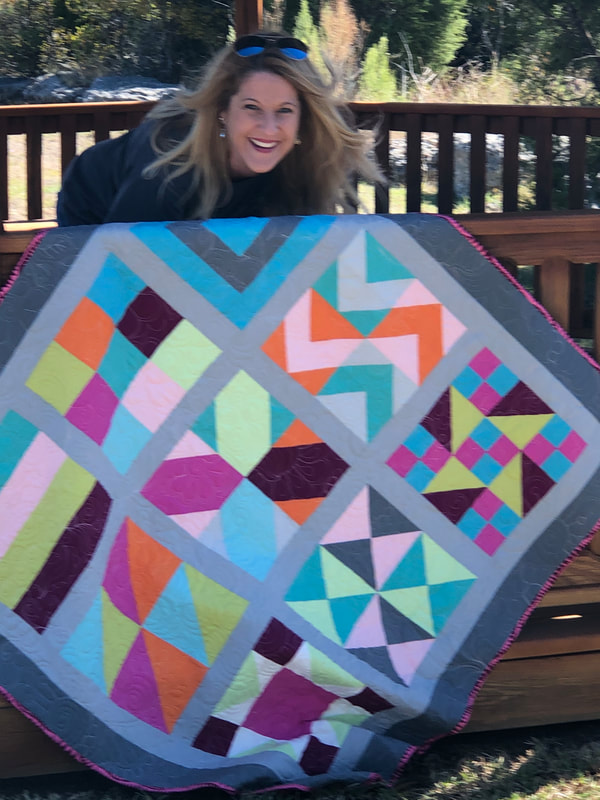
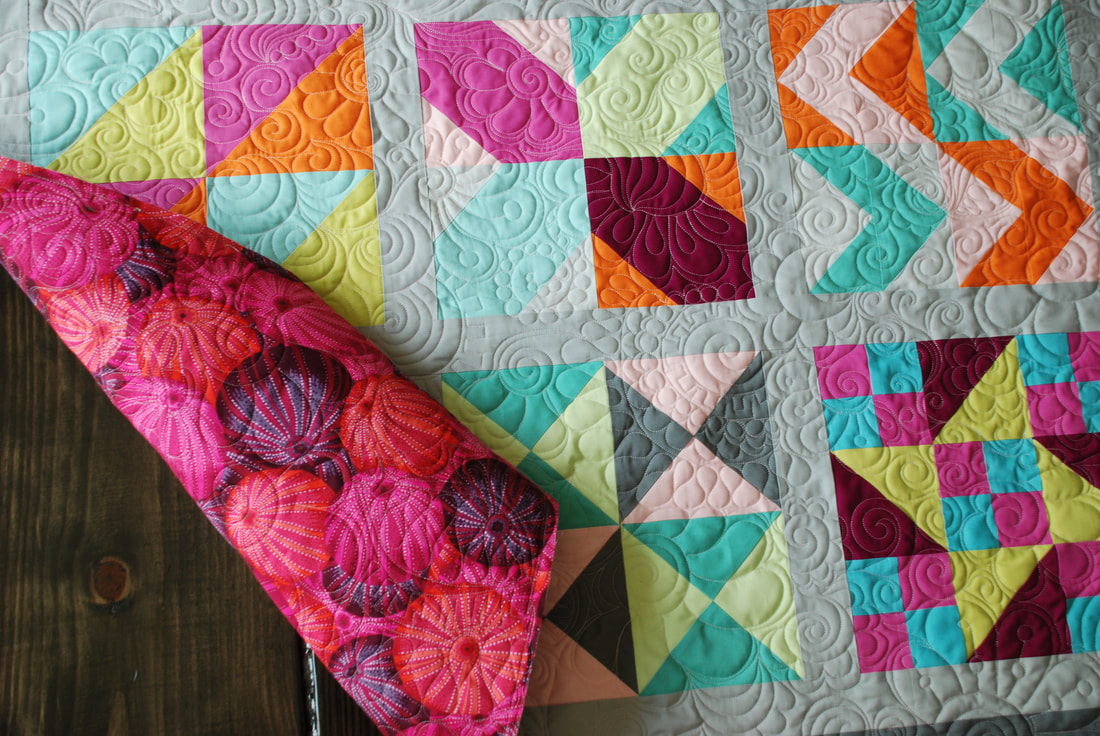
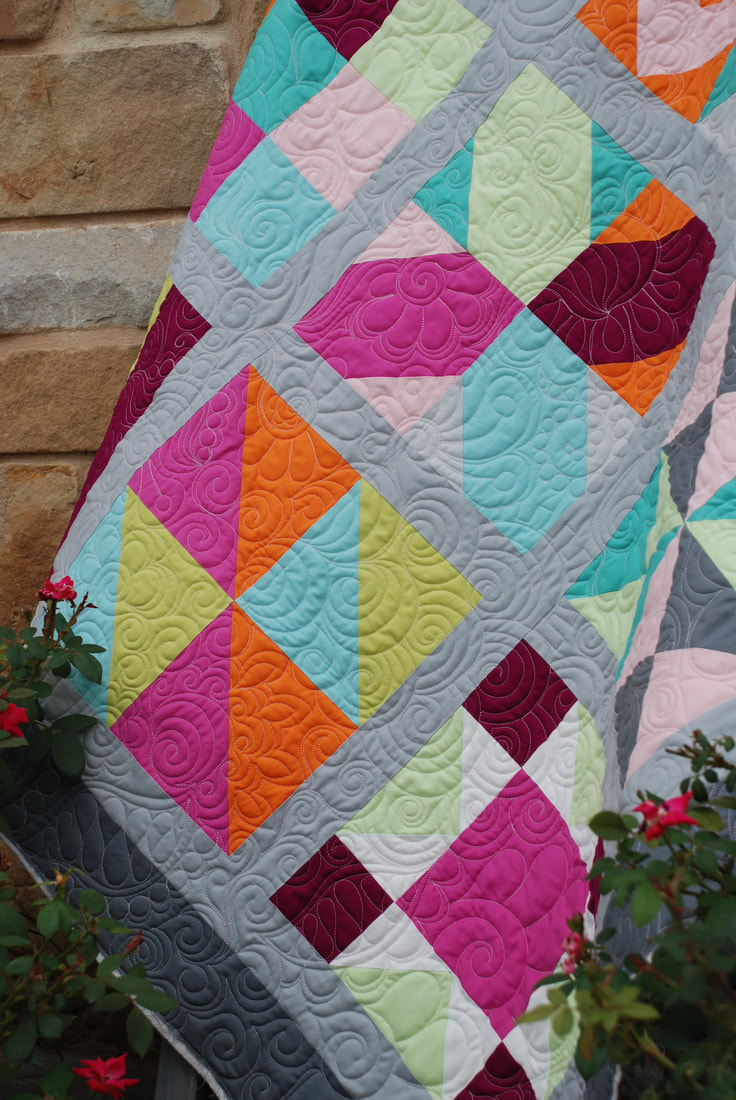
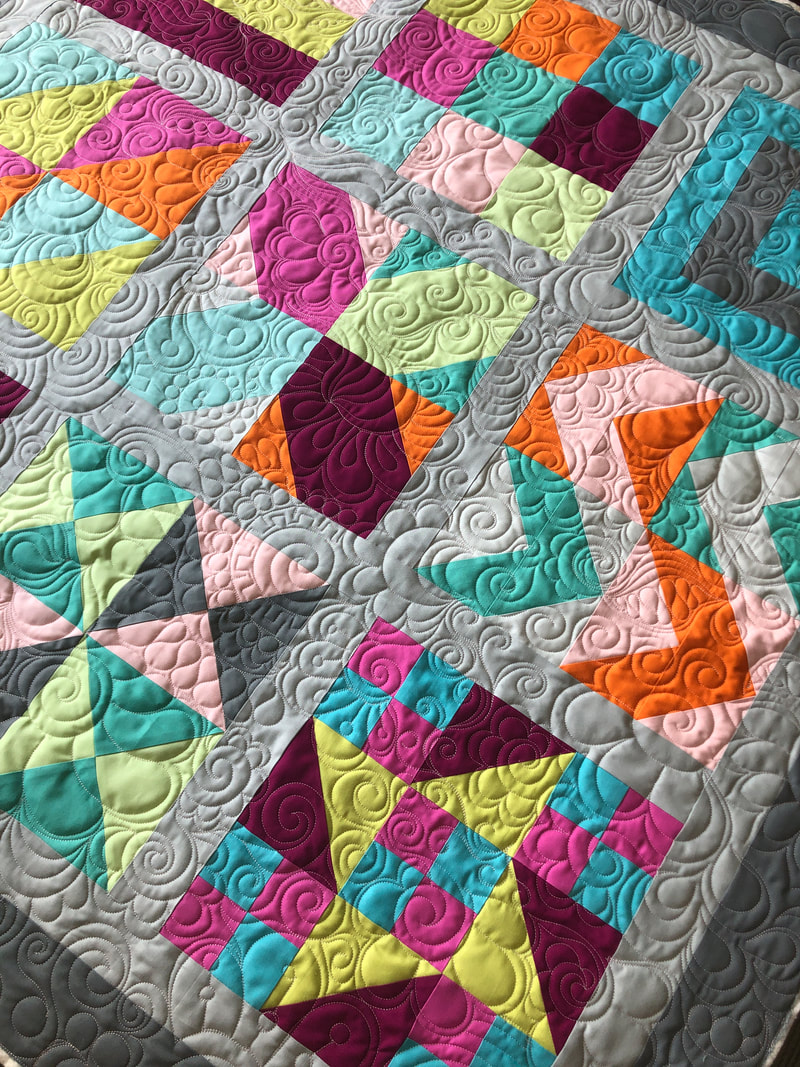
At the end of each year it's fun to compile the top 9 Instagram posts in one place to share, and these are mine from 2020, wow I had 85K likes this year, y'all rock! 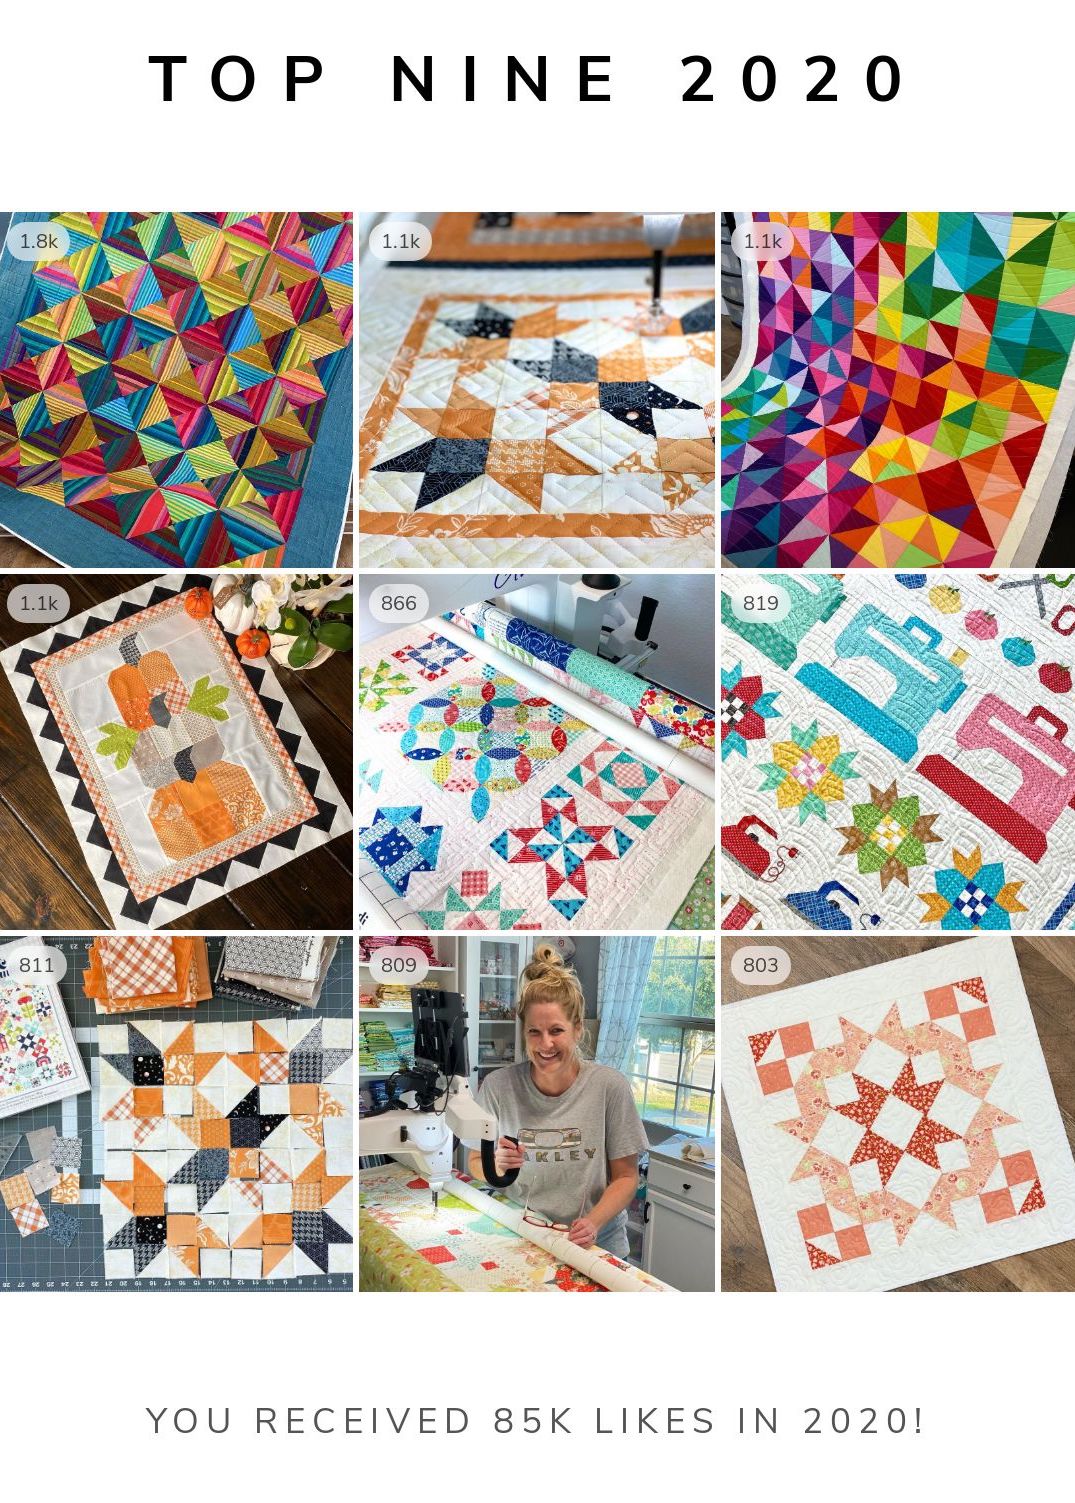
Everything here can be purchased at Fat Quarter Shop, because they are awesome and have all things quilty and fabulous, and did you know they have a flash sale every day with some great discounts on products you need!? I have truly been blessed this year to work on so many beautiful things for Kimberly and her team, and there are so many new things on the way this year too, I can hardly keep up! Click the button below to fill your cart :)

I'm really looking forward to the New Year, I dream of brighter days, happier tomorrow's, and wish all of you a safe and healthy year! Happy Quilting! :)
1 Comment
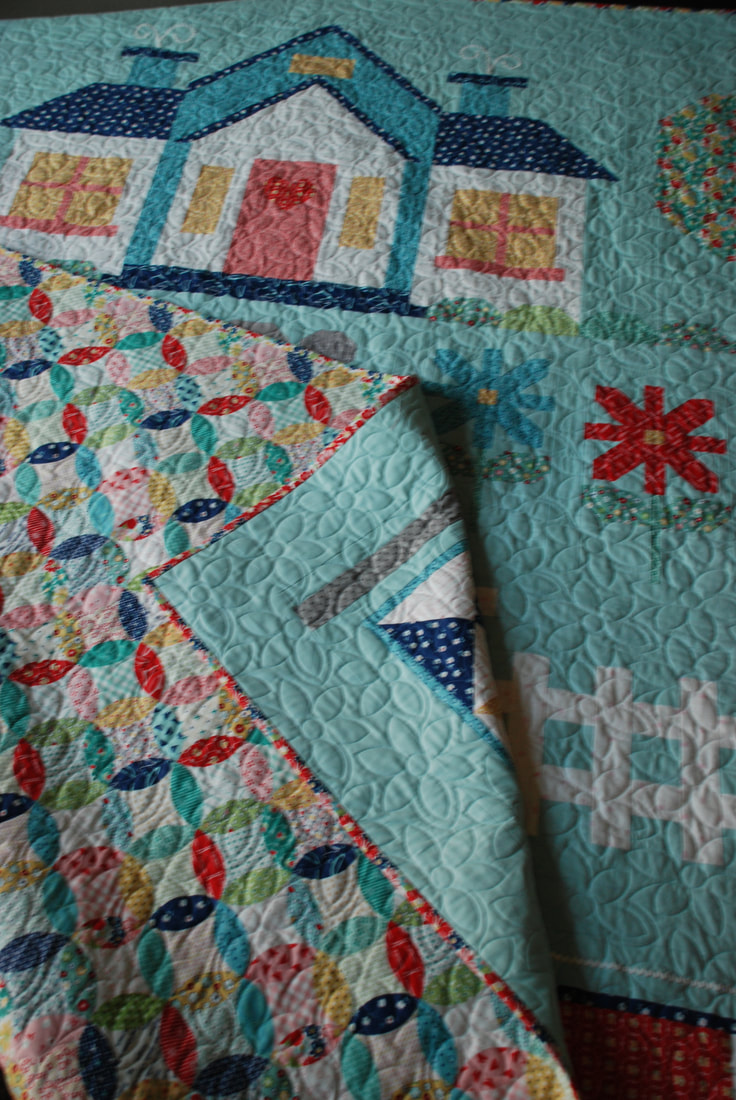
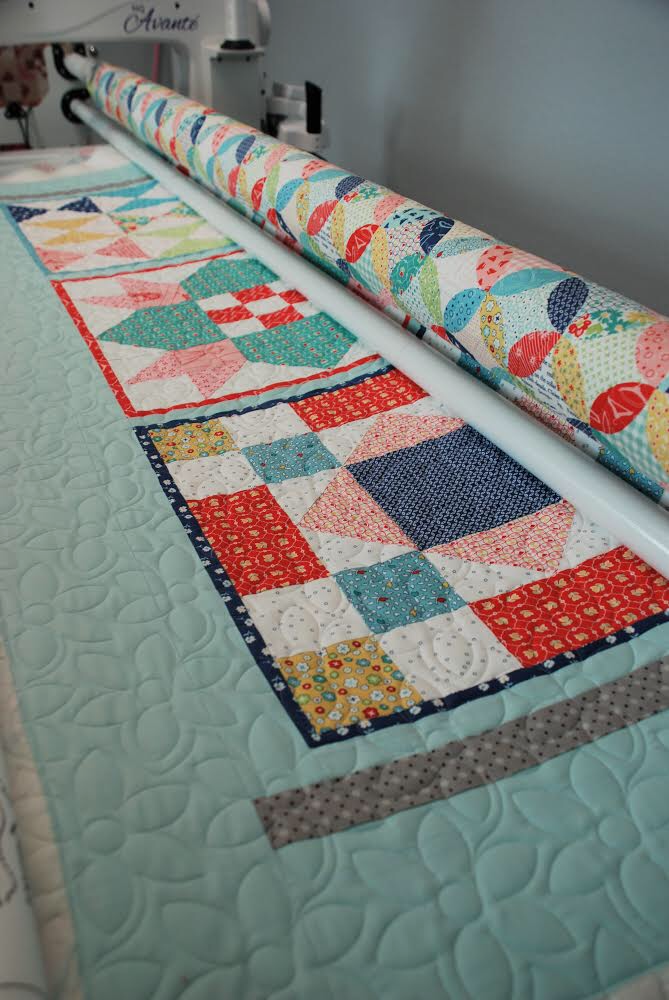
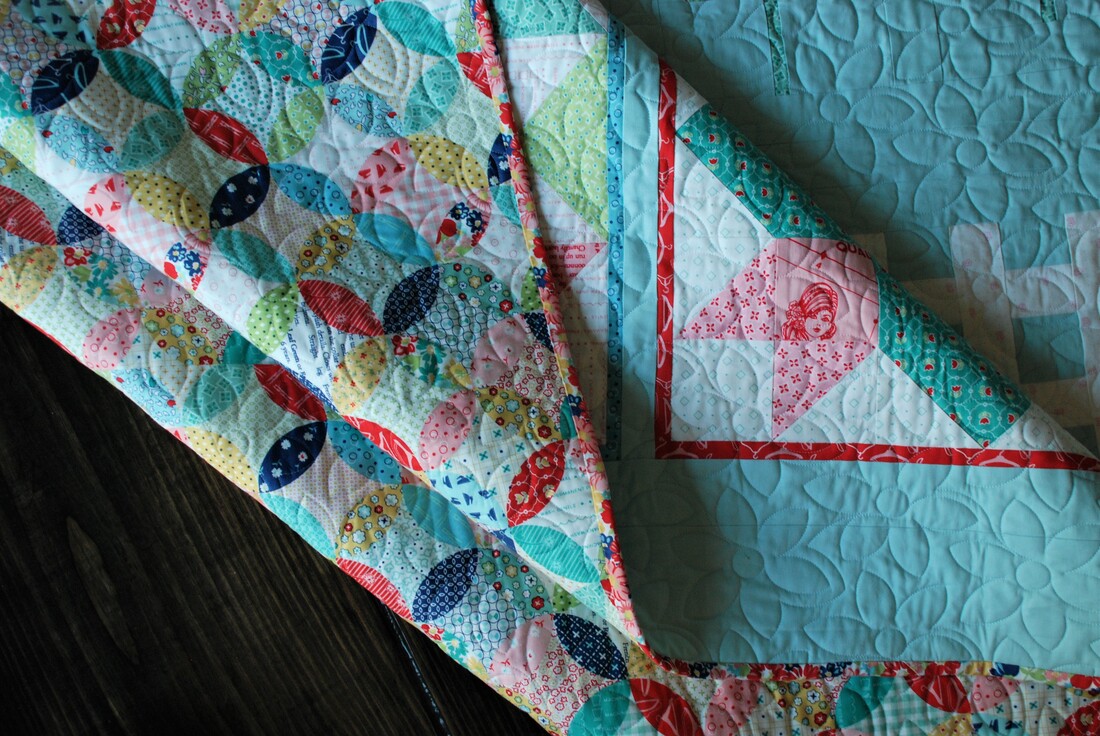
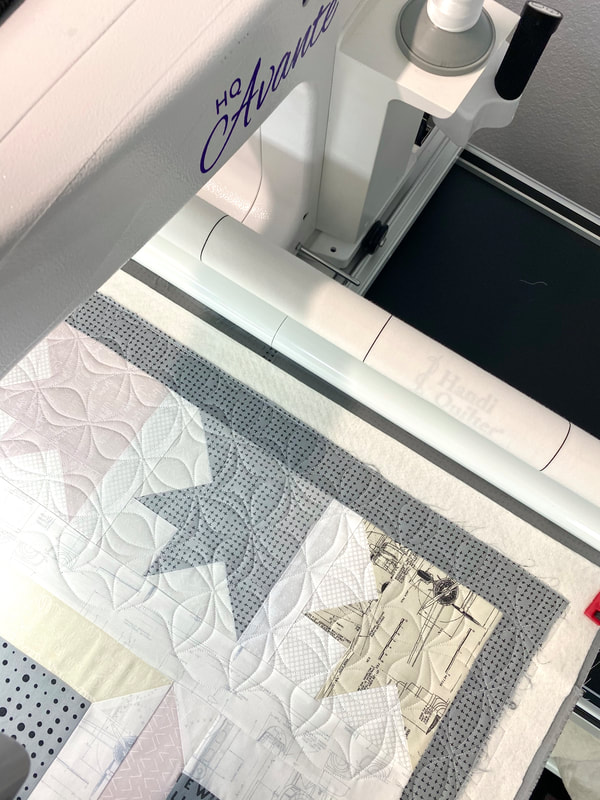
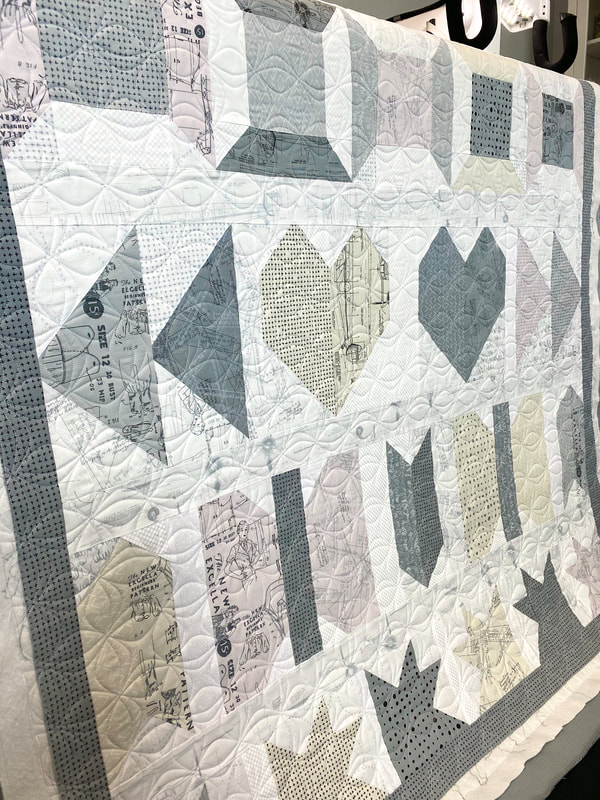
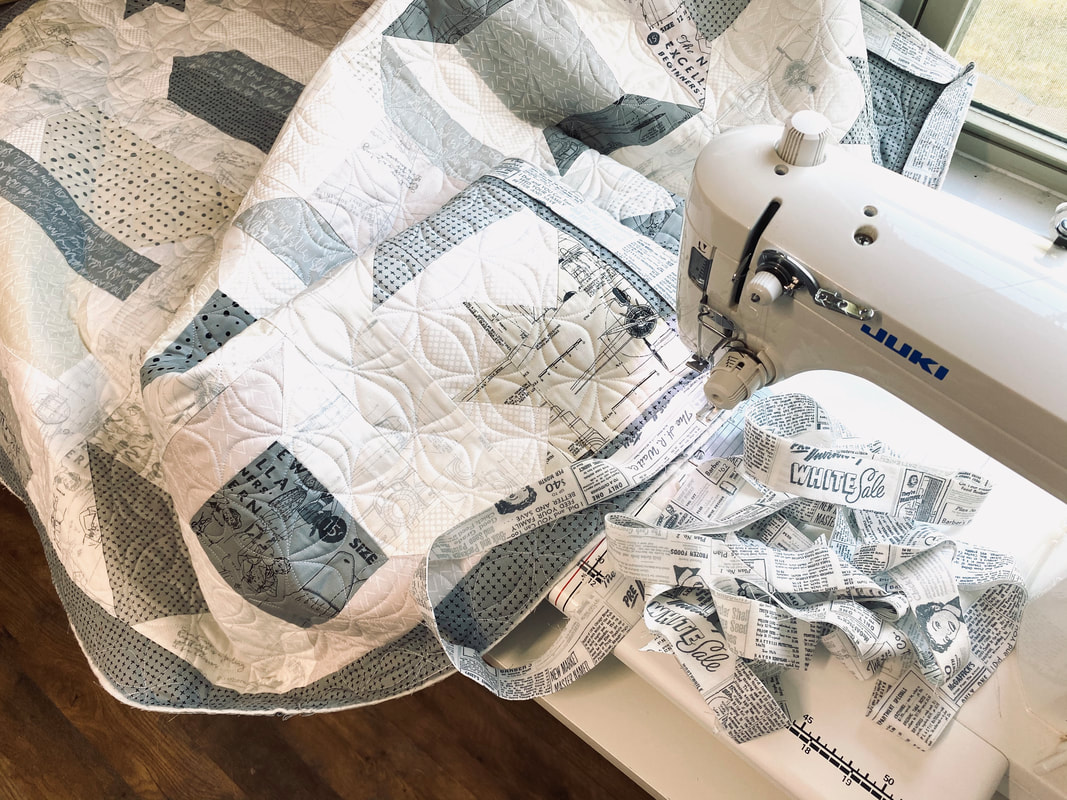
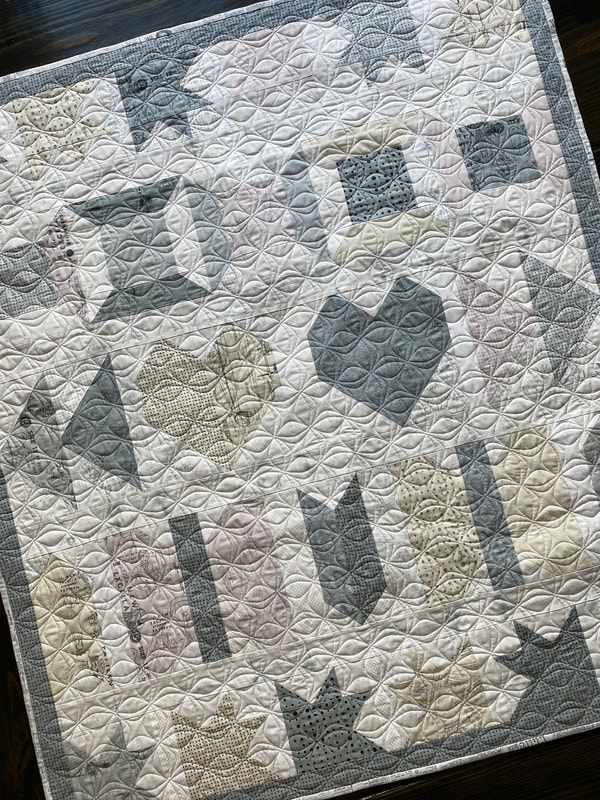
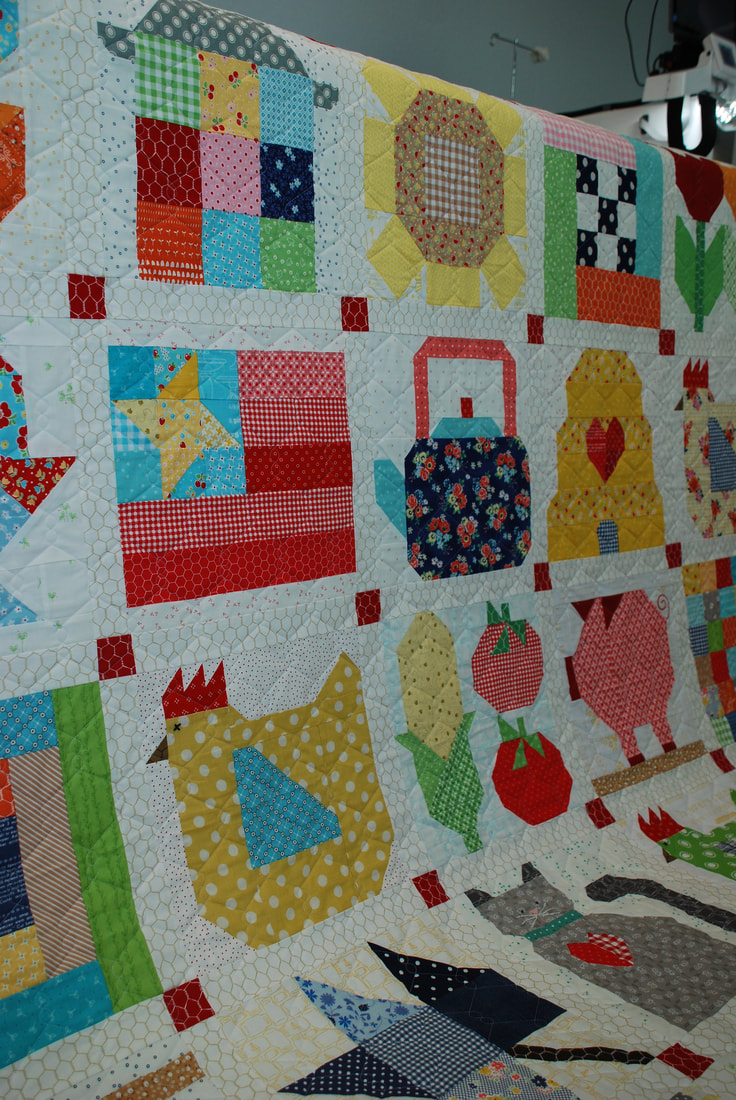
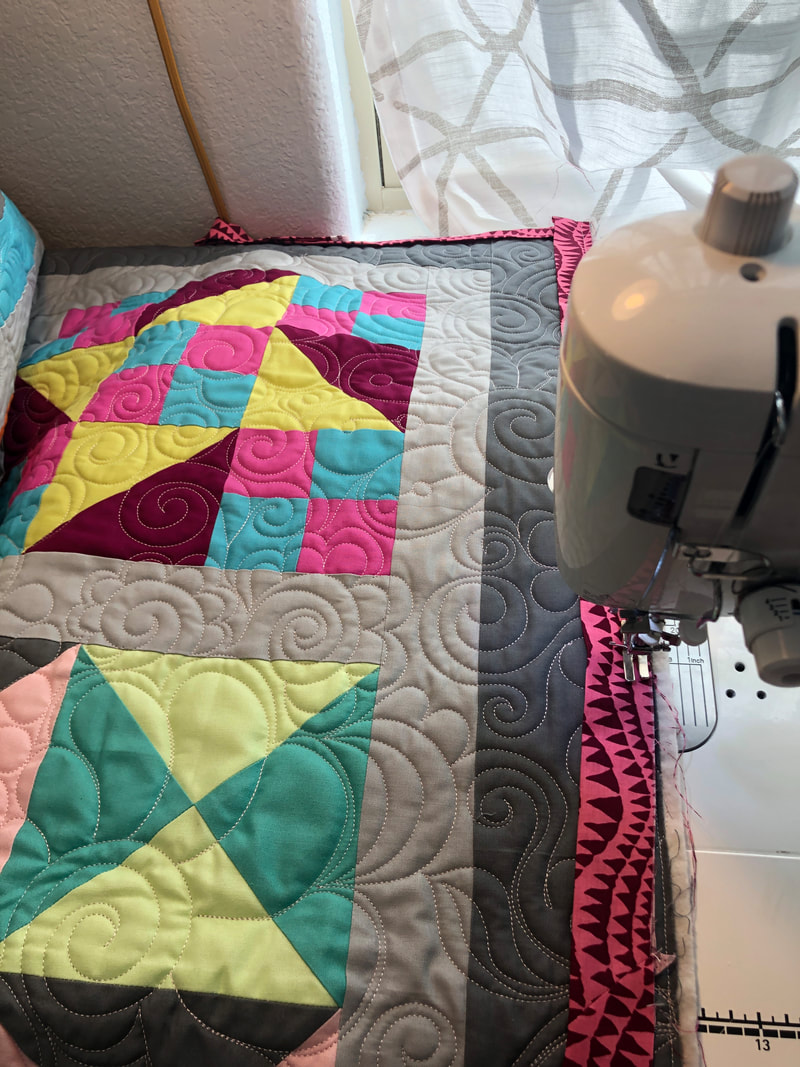
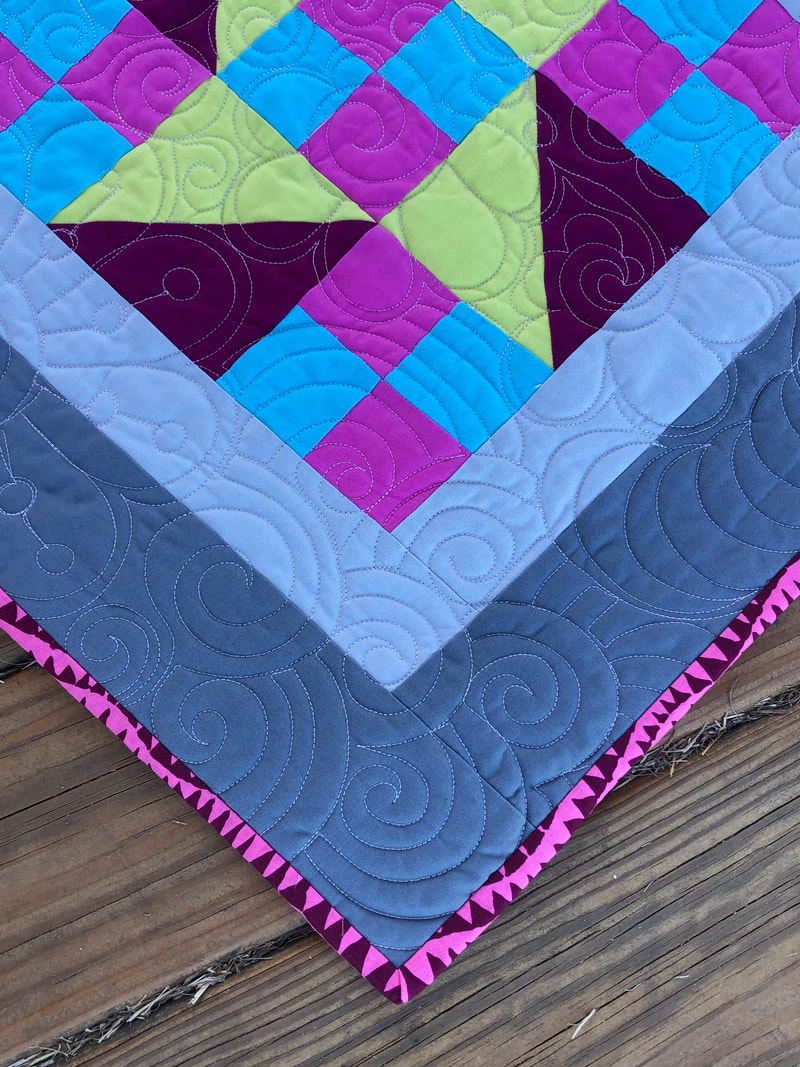
 Ever since Lori Holt’s new book, Quilter’s Cottage came out, I have fallen in love. It is such a sweet reminder that home is where the heart is, and makes me think of my childhood spent outdoors near a lake in Illinois while eating a whole lot of apples right off the trees. Fat Quarter Shop is celebrating the big finish of the Quilter’s Cottage Sew Along and asked me to include some of me behind the seams pictures for the finish. I was lucky enough to piece the main quilt and do the long arm quilting on all the projects in the picture below. Lori Holt is so much fun to work with, so I have some fun sneak peeks... 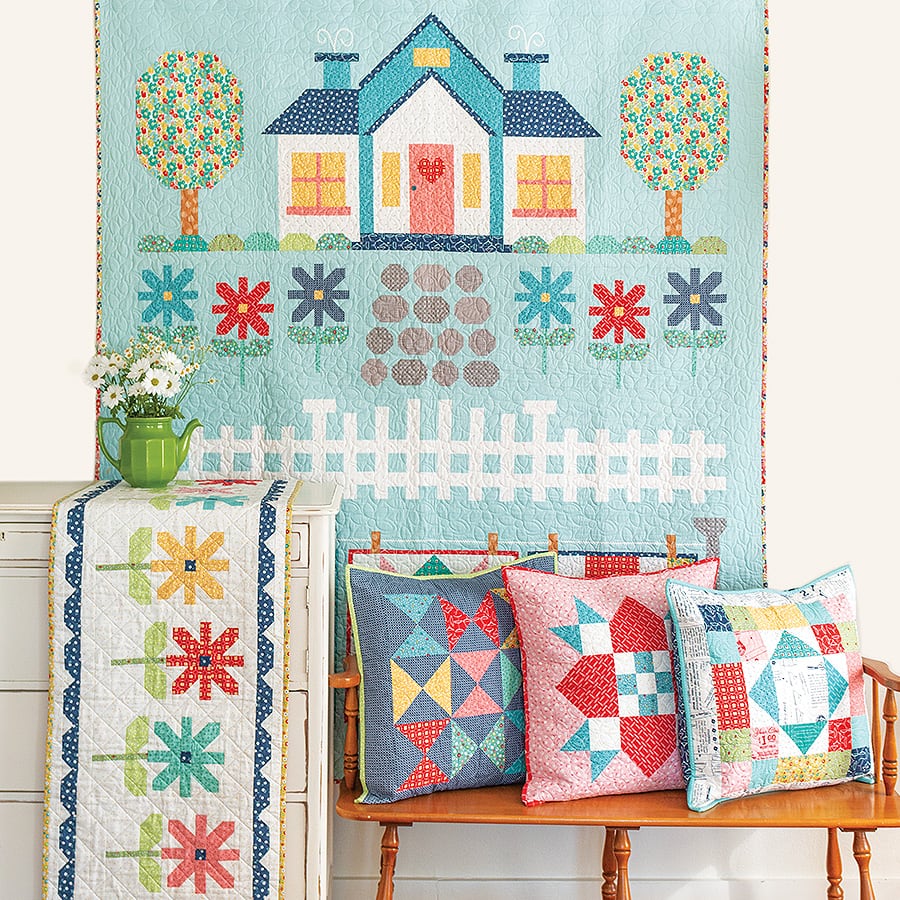 I have been long arm quilting about 4 years now, and I love what I do each day. Some days are spent doing custom quilting, while others I do e2e digital pantographs. Regardless what kind of quilting I am doing, I am loving every minute of it. 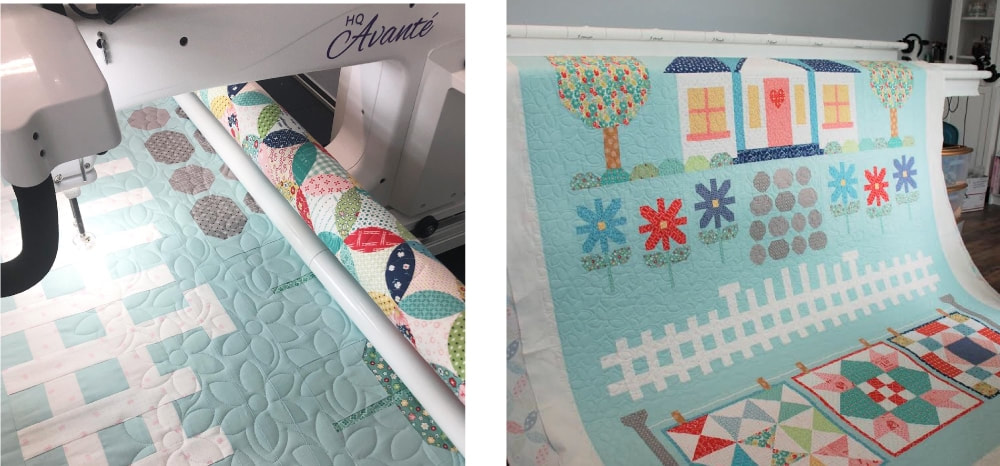 The main cover quilt I added the "Daisy Delight" digital pantograph using white Glide 60 thread. I used Glide because I love the sheen it has, and because it produces almost no lint, so that helps keep my tension pretty. 60wt thread is skinny, so it allows the texture to pop more so than the actual thread, it sinks right in and creates beautiful stitches. I also quilted the pillows and the flower runner on the long arm too. The pillows are always a lot of fun, I load one big piece of white cotton, then a layer of Quilters Dream 80/20 batting, then place each pillow top over. Then I used my long arm to program each pillow to stitch out the pantograph that has been chosen. It makes it easy to quilt them all at one time. Then for the table runner, I did straight lines running diagonal to created a crosshatch, this simple quilting really makes a statement on the right project. 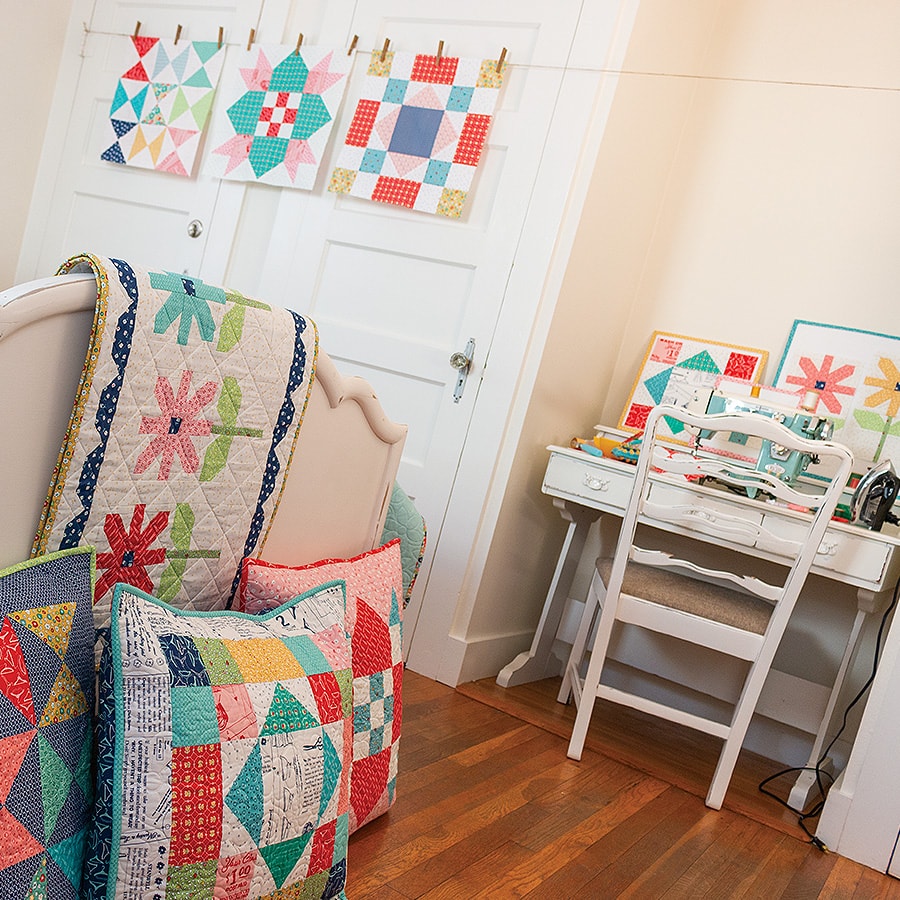  This is my favorite picture of the quilt I made, my son and I took it out to the lake we live on to get a picture before I loaded it onto the long arm. 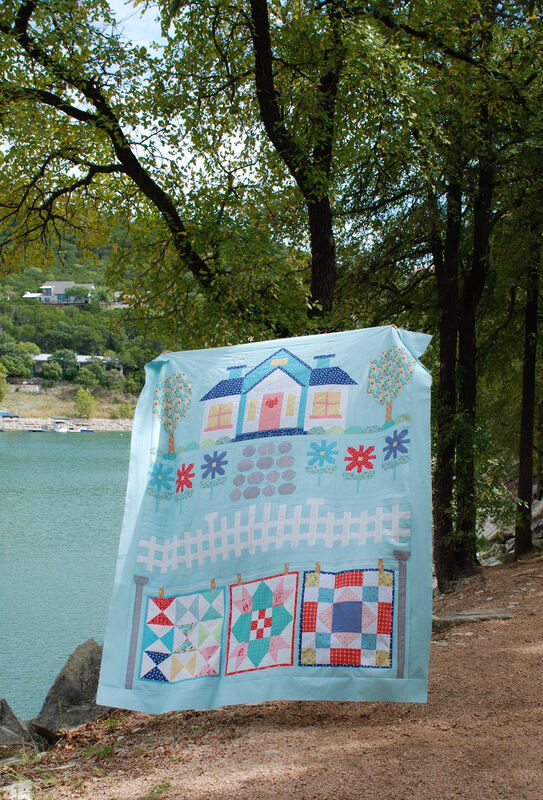 I had so much fun with this project, and I hope you do too! The book is great, and it really makes me feel so happy to see this adorable quilt! You can check out all the information about this quilt and all the extras on The Fat Quarter Shop blog, and order your copy of the book today.
I would love to see your pictures, so feel free to tag me on Instagram anytime if you have questions or want to show off your quilting. I love to see them! Happy Quilting Gina Tell Have you seen the new Jolly Bar 2 Book? Well, it's filled with 20 fun and simple quilts, and you are going to love it!! You and find pictures and links to everything you need to finish yours below.... The Jolly Bar Book Volume 2 includes 20 quilt patterns designed by my friends at It's Sew Emma just for these precuts. Grab a Jolly Bar, pick any design and sew! These quilts offer a wide range of styles while still being beginner-friendly. You will want to make them over and over again. The Fat Quarter Shop has hosted the Jolly Bar Row Along, and it did not disappoint! I had so much fun being creative and adding all my own touches to this quilt, you can scroll down for all my finished pictures, and visit my social media too. I made mine two sided, the front is all low volume, and the back is bright and modern with a lot of quilting texture to make things fun. Feel free to reach out if you have questions. 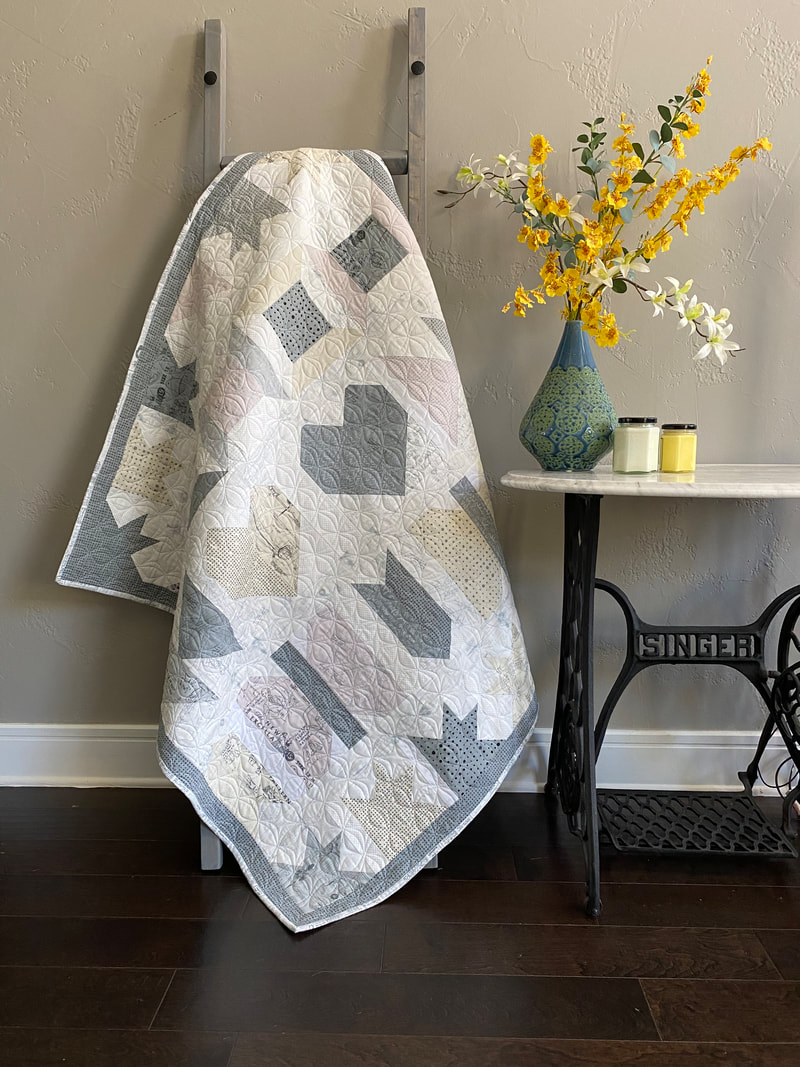 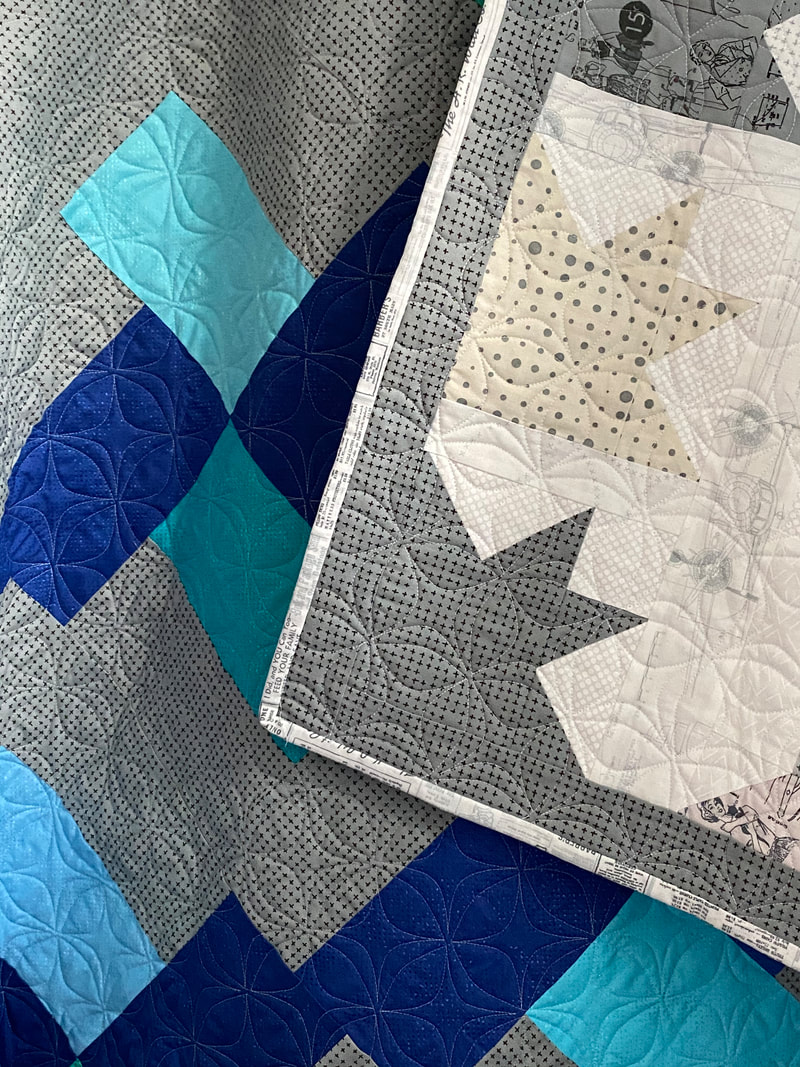 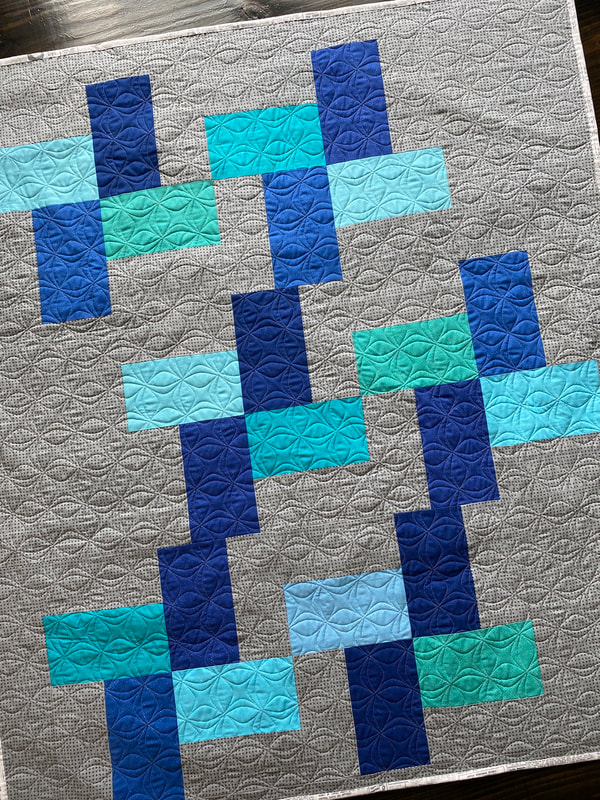 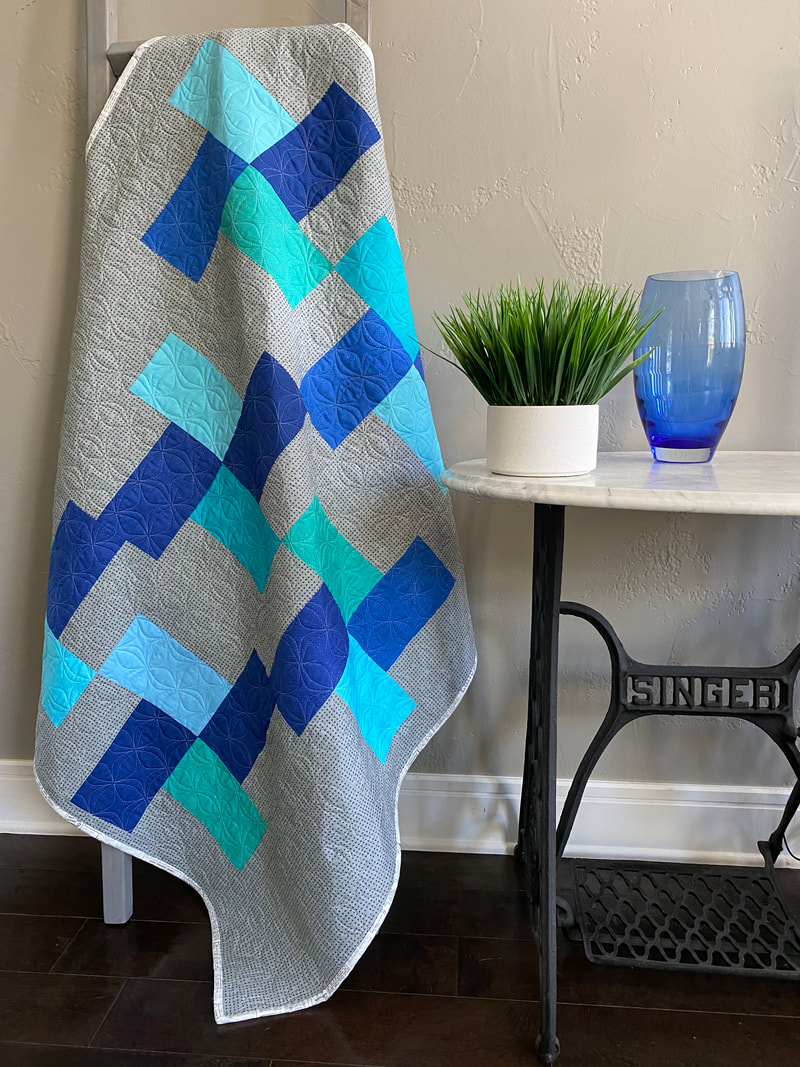 Here is the one Kimberly made: 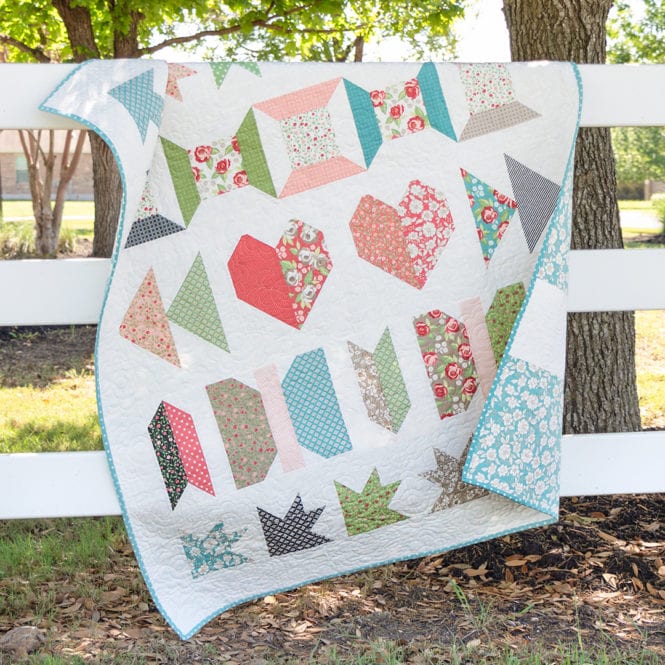 To make this pattern you will need the Jolly Bar Book Volume 2. (Kimberly used Bloomington collection by Lella Boutique for Moda Fabrics.) Here are the fabric requirements, grab your supplies and come sew with me! Download your copy here. 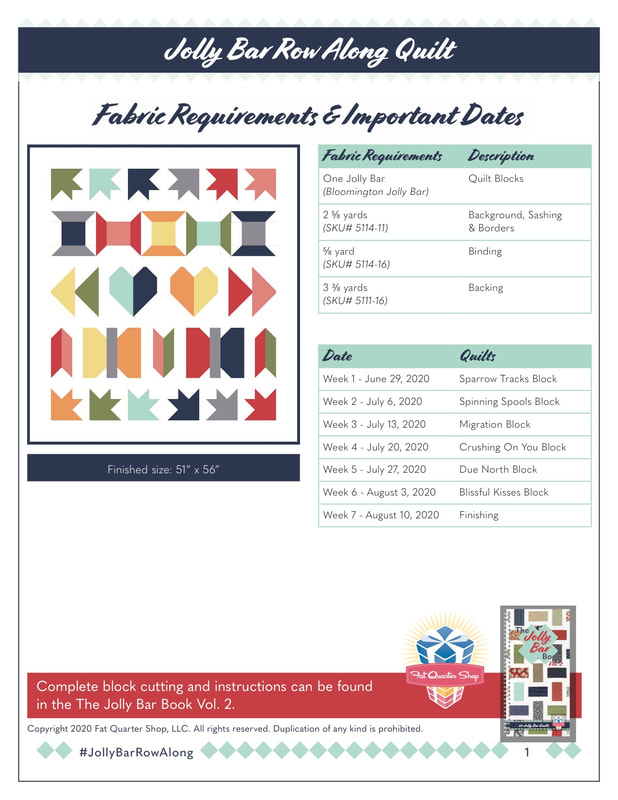 Block 1: You'll make 12 of the Sparrow Tracks Blocks this week, and then later we will put into rows, and have some fun with quilting! Block 2: You'll need to make 5 Spinning Spools Blocks this week- Block 3: This week we make 4 Migration Blocks - Block 4: This week we make 2 of the Crushing on You Blocks - Block 5: This week we make 3 of the Due North Blocks - Block 6: This week we will make 2 Blissful Kisses Blocks - Finishing: This week we will add sashing between blocks, and add whatever boarders you’d like. I wanted to keep mine small, so I just did 2” borders. Backing: SURPRISE! This is the first time I have ever made a two sided quilt, the key is laying it out often to make sure you have the focal blocks in the center, so you don’t loose parts you want included in the extra overhand that you provide to your long arm quilter. So I made the blocks for the back using a variety of blue Spotted 2019 and I then decided on a very off center layout, so if I did goof on the centering, it wouldn’t be as noticeable. I used one of the other patterns from this great little book called Tweed Quilt, along with one background from the Zen collection. I decided to make it a little darker and brighter since the front side is all low volume. For the front I used Modern Backgrounds More Paper Jolly Bar by Zen Chic for Moda 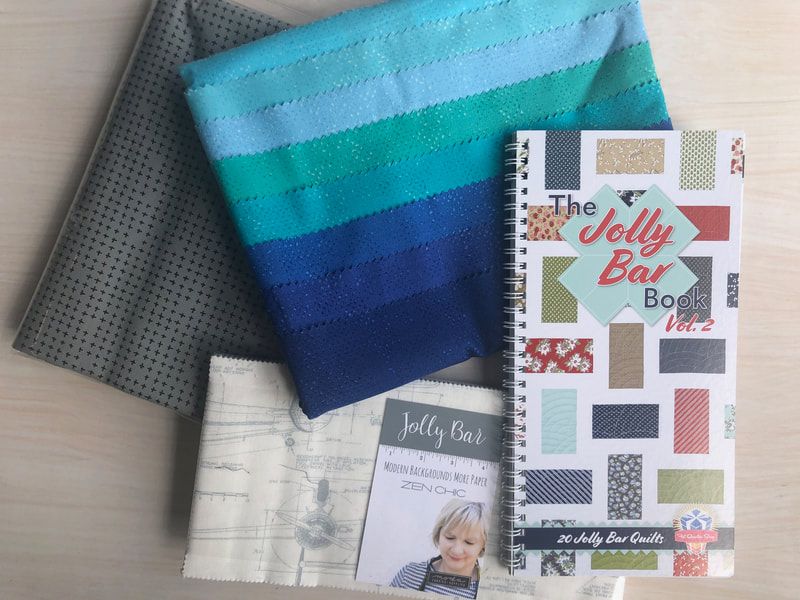 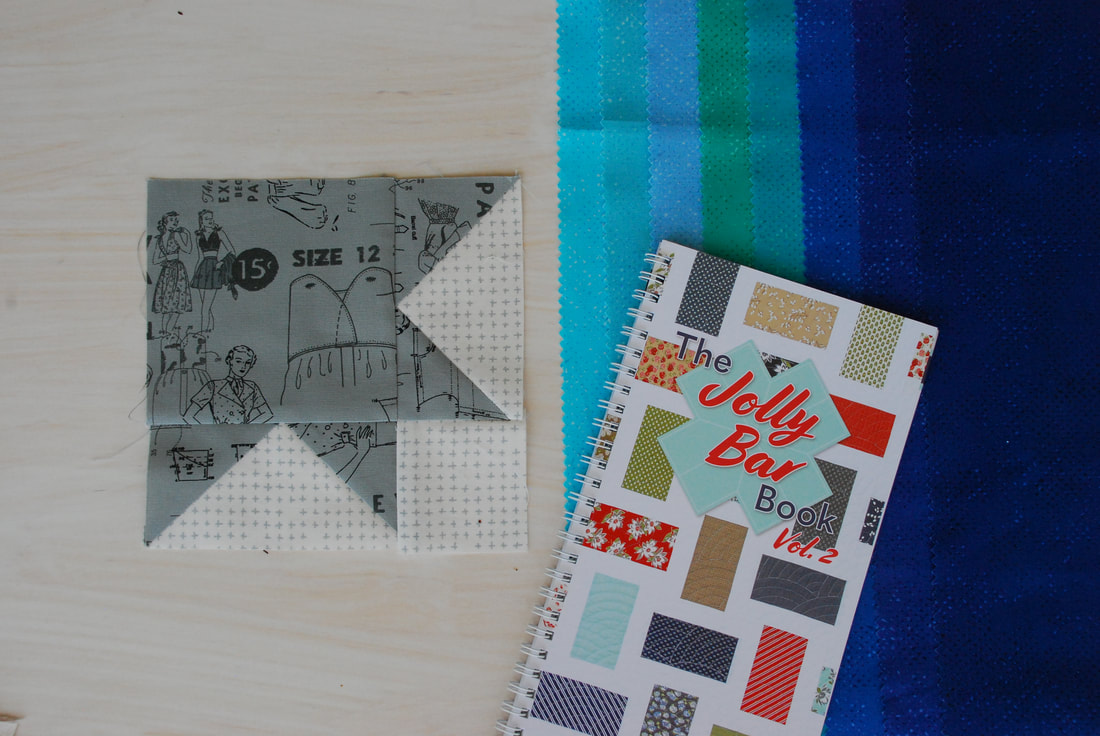 Block 1 - Sparrow Tracks 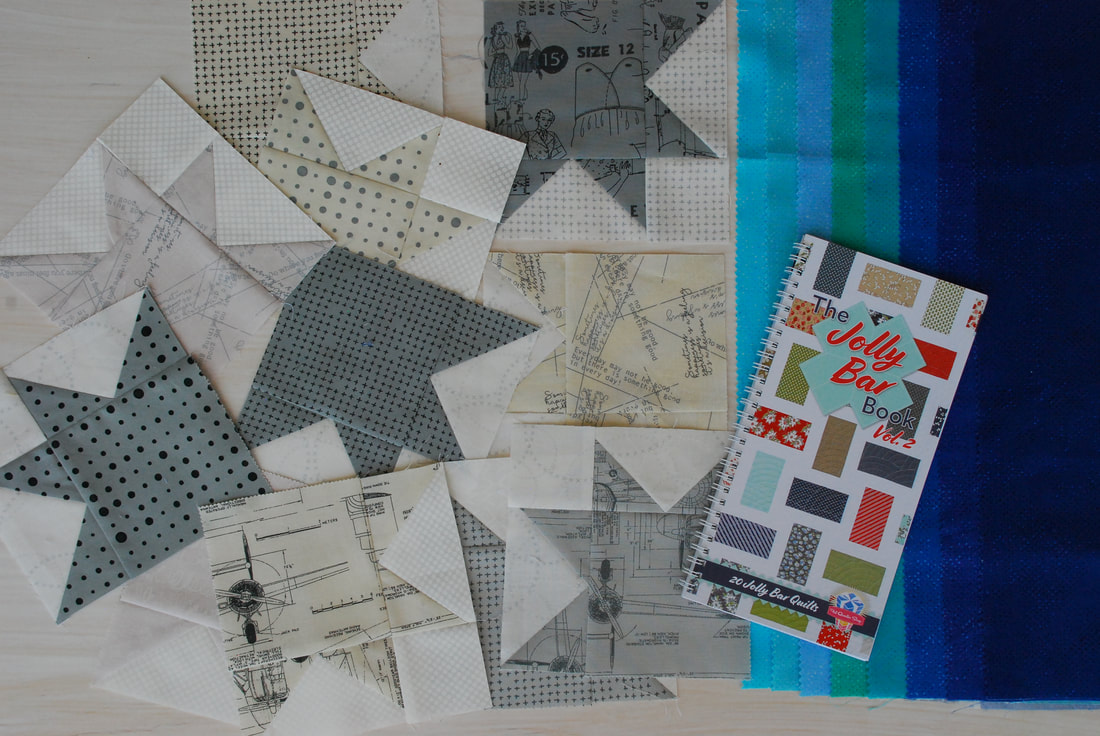   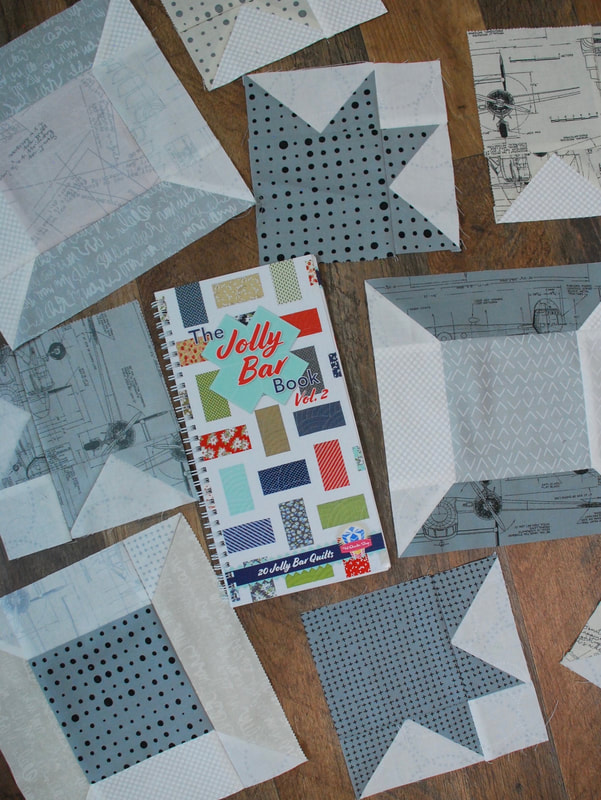 Blocks 1&2 Sparrow Tracks and Spinning Spools 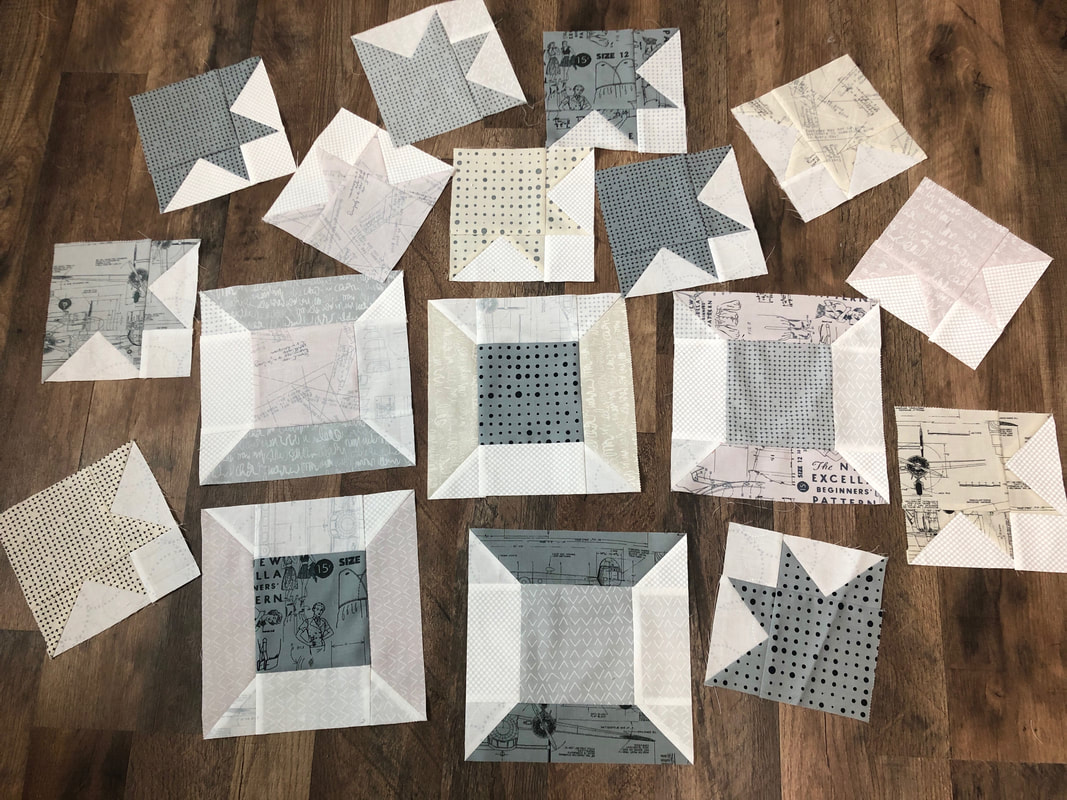 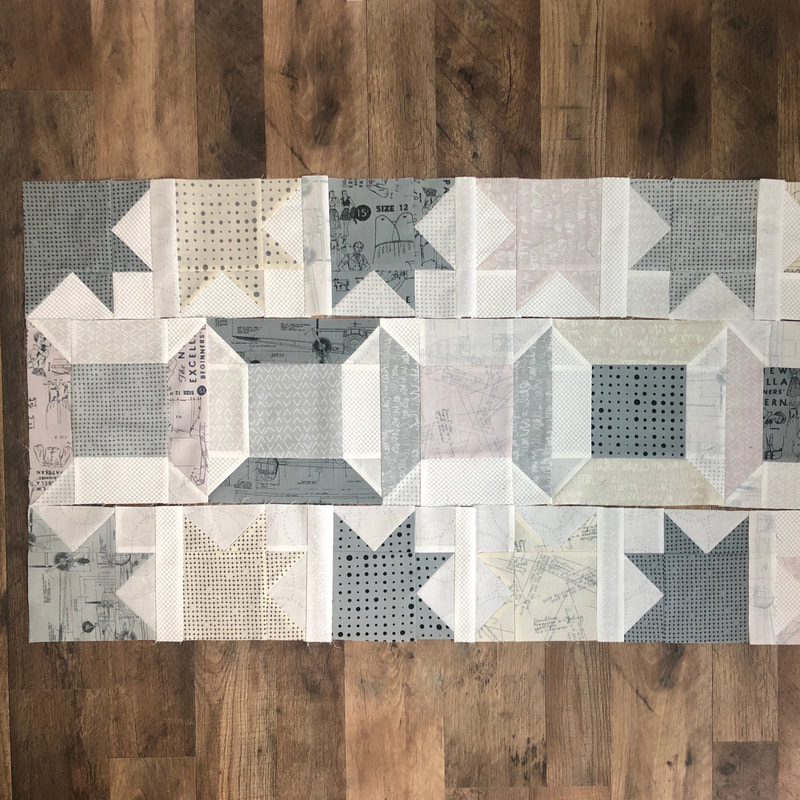 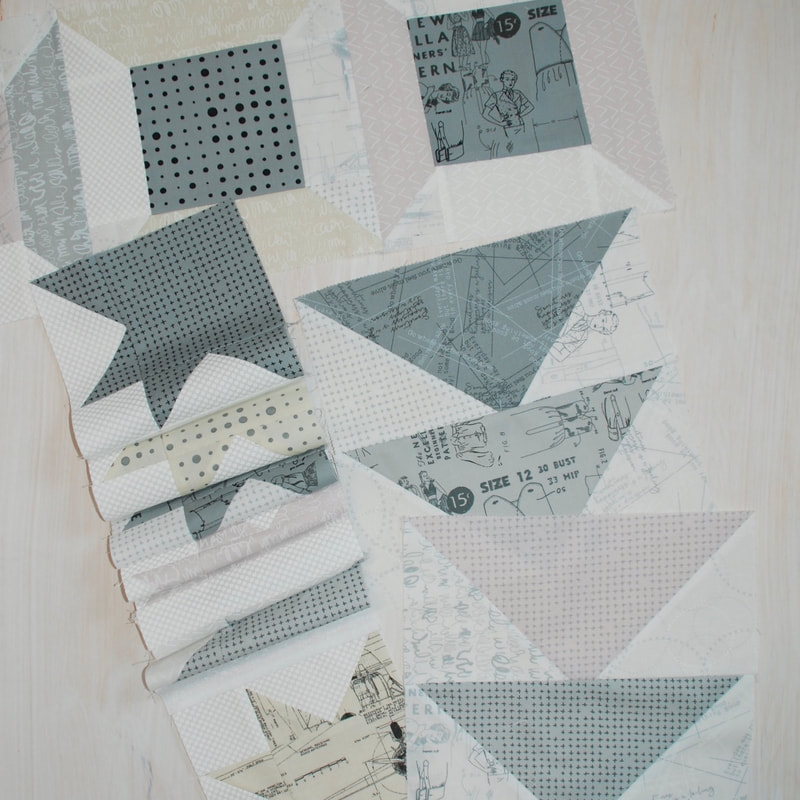 Week 3 Block - Migration 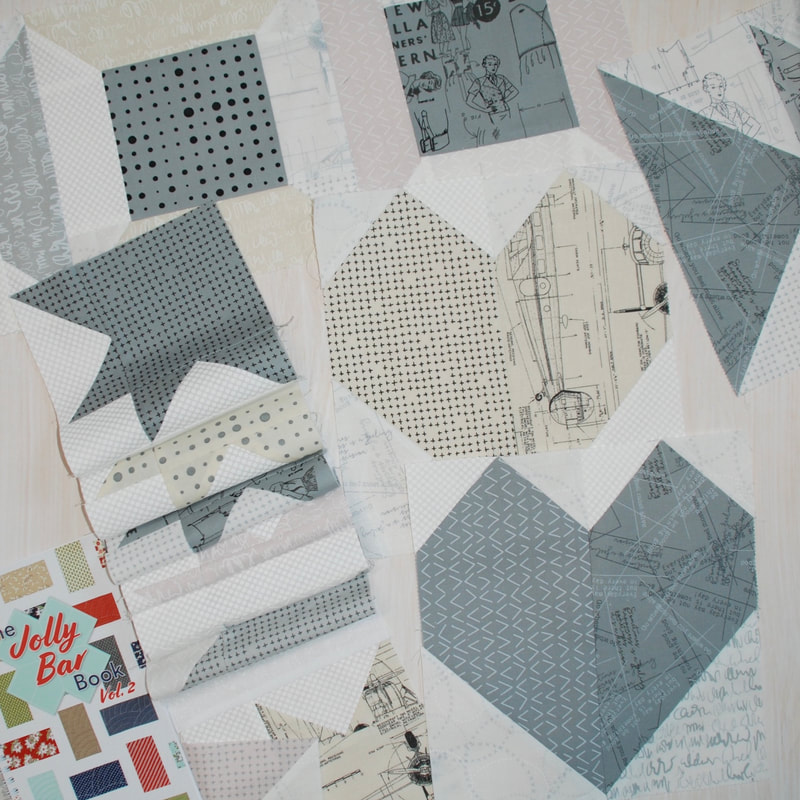 Week 4 Block - Crushing on You 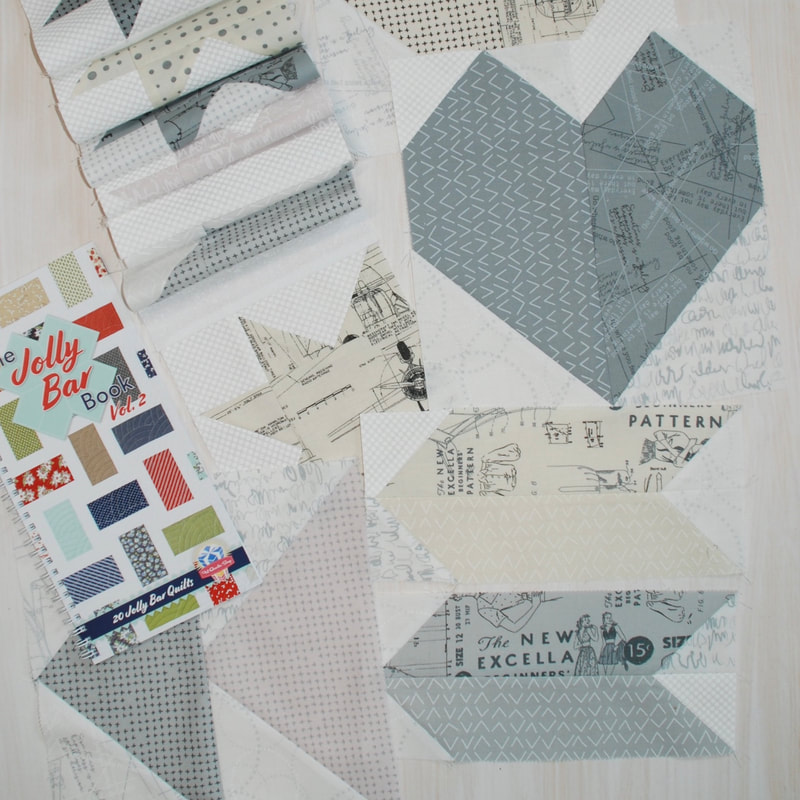 Week 5 Block - Due North 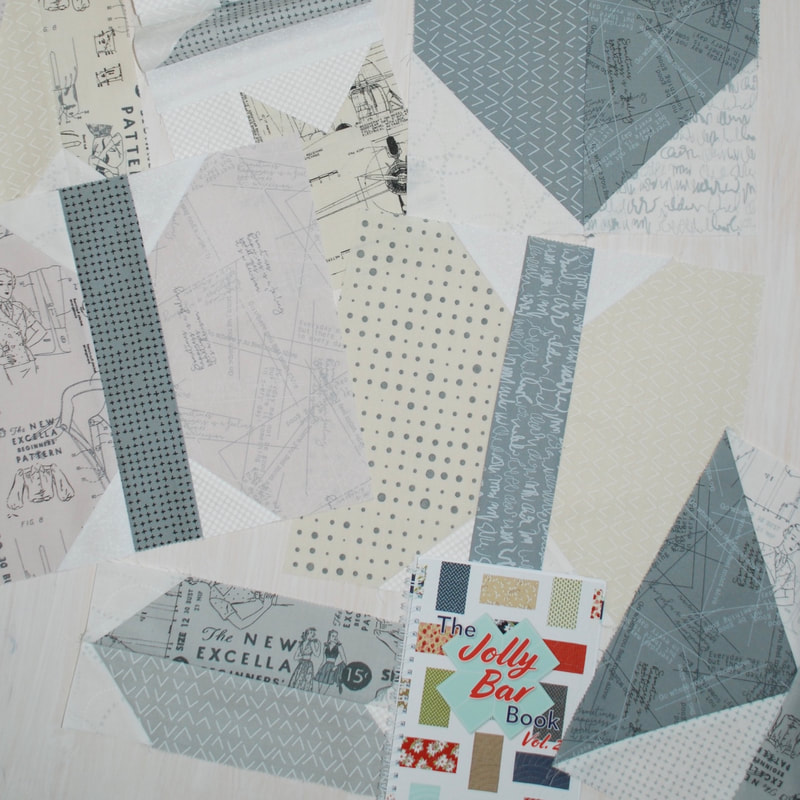 Week 6 Block -Blissful Kisses Here are some of the pictures I took of the quilt on the floor as I was finishing the top and laying out the blocks for the backing, and of course some shots while it was on the long arm, and afterwards to show off the quilting texture. Oh and ZenChic Newprint binding for the win - I had a lot of fun with this one! There is a fun lineup of quilty friends who will be sewing along. Check out their social media and blogs to see their progress and tips along the way! Tracie Henkel (@joyfully_tracie), Riceford Streams Sondra Davidson (@sondradavison), Out of the Blue Quilts Pat Sloan (@quilterpatsloan), Pat Sloan Melanie Call (@abitofscrapstuff), A Bit of Scrap Stuff Jen Belnap (@thesmittenchicken), The Smitten Chicken Hilary Jordan (@byhilaryjordan), By Hilary Jordan Gina Tell (@gina_tell_threadgraffiti), Thread Graffiti Geraldine Wilkins (@livingwaterquilter), Living Water Quilter Carole Carter (@frommycarolinahome), From my Carolina Home Here is the block schedule, click the green below to be taken to The Fat Quarter Shop Blog post for full details...
June 29th * Sparrow Tracks Block July 6th * Spinning Spools Block July 13 * Migration Block July 20th * Crushing On You Block July 27th * Due North Block Aug 3 * Blissful Kisses Block Aug 10 * Finishing ** Since I am a long arm quilter, I also have a ton of fun deciding on the way I will finish my quilts. Sometimes I do digital pantographs, and sometimes I like to do custom quilting, this time I picked out a panto called Bread Basket, and I love the orange peel kinda look it has. I uploaded a video on my Instagram if you would like to visit me there too. Click here: Instagram Be sure to share your progress with hastag #jollybarrowalong - oh and if you want me to see them add my tags #ginatell #threadgraffiti on Instagram and Facebook so we can see and share your work! Happy Quilting! Keep Calm and Wash your Hands.The big talk these days is germs and viruses, and since I have been a germophobe since long before all this, I thought I'd make some masks to help out. Deaconess Hospital is recommending a pattern due to the shortage with COVID-19, so that is the one I am making for our local hospitals, if you’d like to help out here is the link with directions and tutorial. Its a fast pattern! I used cotton on the front and flannel on the inside for this version. Click HERE 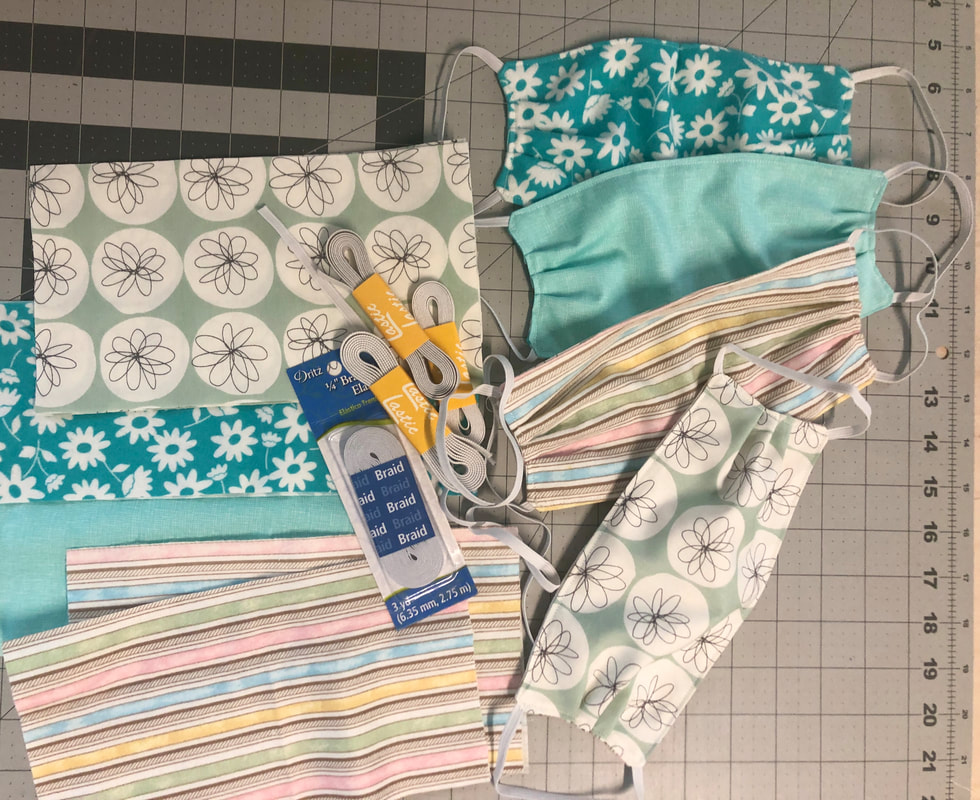 I also found another great super easy face mask pattern and I tested it out with a few different fabrics for my family. I used all cotton for the outside and lining, but you can use fleece for the lining if you have some. I purchased the only size elastic cord that was available at my local Hobby Lobby and it worked great, and only a couple dollars, I made several. They are pretty fast and easy, one thing I will mention is when attaching the straps, I cut a piece between 6-8inches and sewed them into the seam when I did the fold. After doing a few of those, I then tried cutting the elastic cord about 9-10inches and just making a knot and tucking it inside the fold. You should try both ways and see what fit you like best. 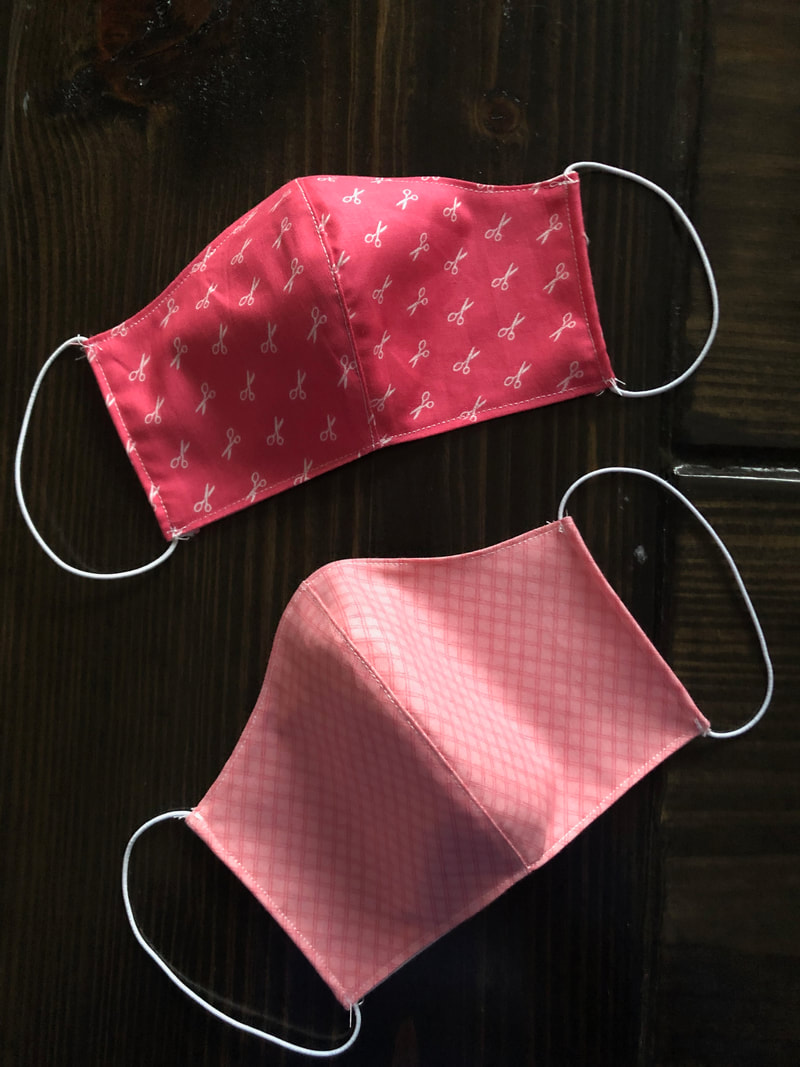 Craft Passion put out this super easy and FREE pattern along with a tutorial back in 2013, and she's got some other cute patterns and blog posts too. Here is the TUTORIAL Here is the PATTERN Here is Deaconess Hospital Pattern Keep Calm and Wash your Hands!
Gina :) My pillow made it to the Semi-Finals!! WooHoo I'd love your help to become Champion of the Pillows! Vote HERE Edyta Sitar’s new pillows from Pillow Talk: 25 Lovely Pillows for Your Home Sweet Home, sparked the idea for a fun contest sponsored by Fat Quarter Shop and it's been so much fun! Check out their blog for lots of info and a chance to win goodies!! Click Jolly Jabber  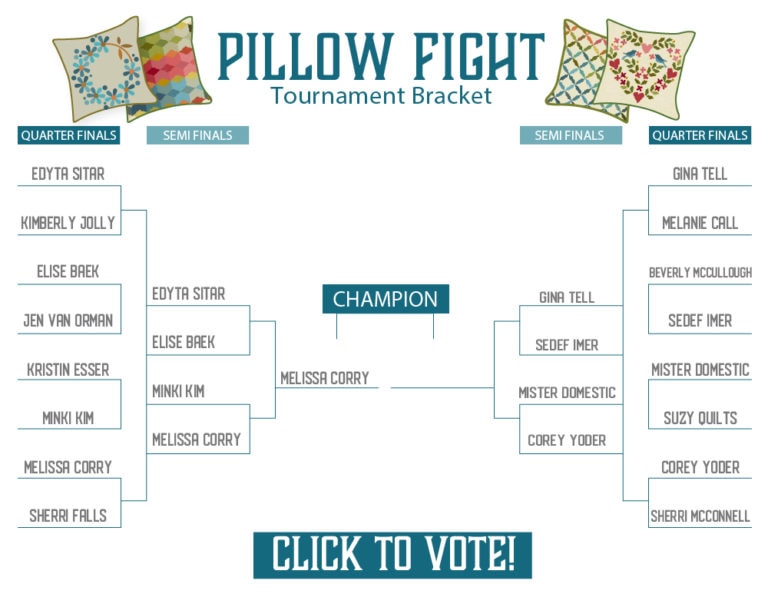 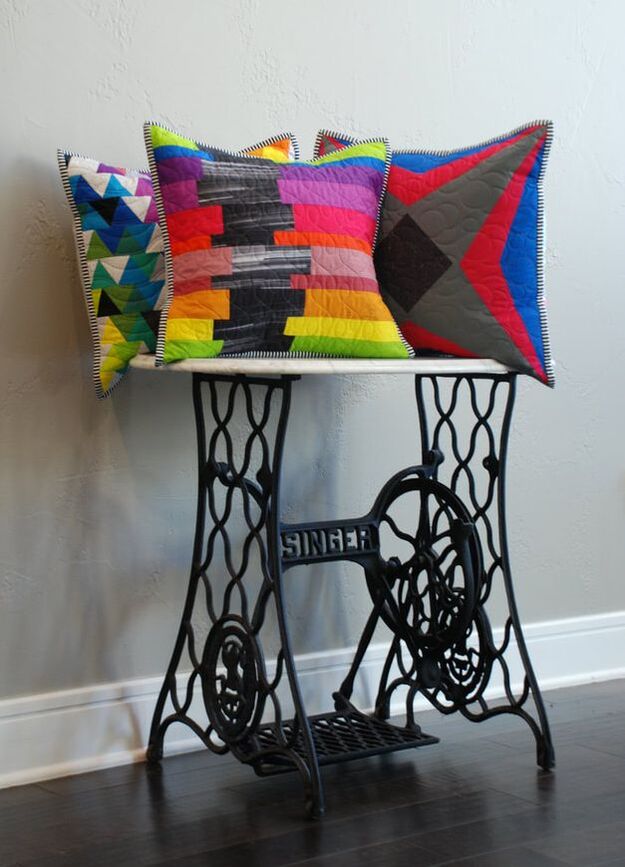 To me, pillows are like potato chips, you can't just have one!! So I went a little crazy and made a few, because the patterns in the book are so much fun, I just couldn't stop at one! I decided to put a modern spin on the Spectrum Pillow by irregularly cutting the strips and adding a burst of black down the center. I used a fun black and white striped binding after I finished the backing pieces with some charcoal Essex Linen. I also made a fun triangle pillow using the same Spectrastatic Fat Quarter Bundle | Giucy Giuce for Andover Fabrics and a Creative Grids triangle ruler and I loved how the two look together! My inspiration for my modern pillows came from my bedroom. I decided I needed a few modern decorative pillows for my bed because we just moved into a new home 9 months ago, and I have a clean slate! So you'll have to check back for updated pictures once I get my room all finished. I'm planning to recover my headboard and paint the walls a light grey to go along with my solid white duvet cover. It's going to be fun, so stay turned for that. 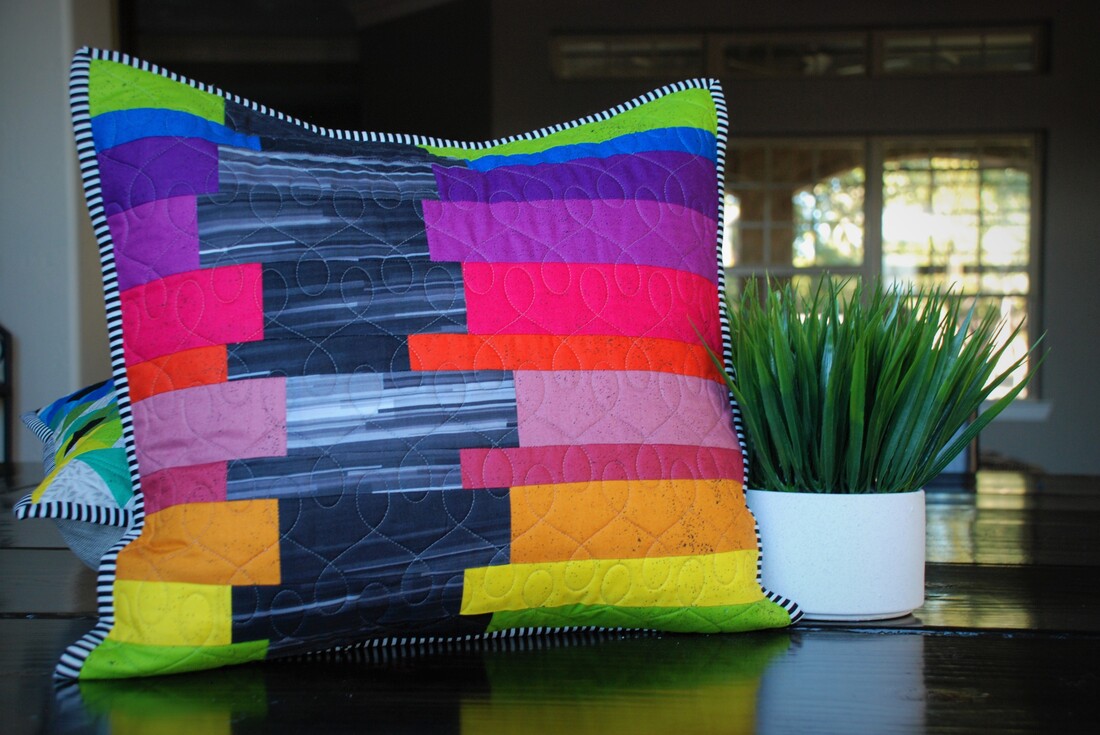 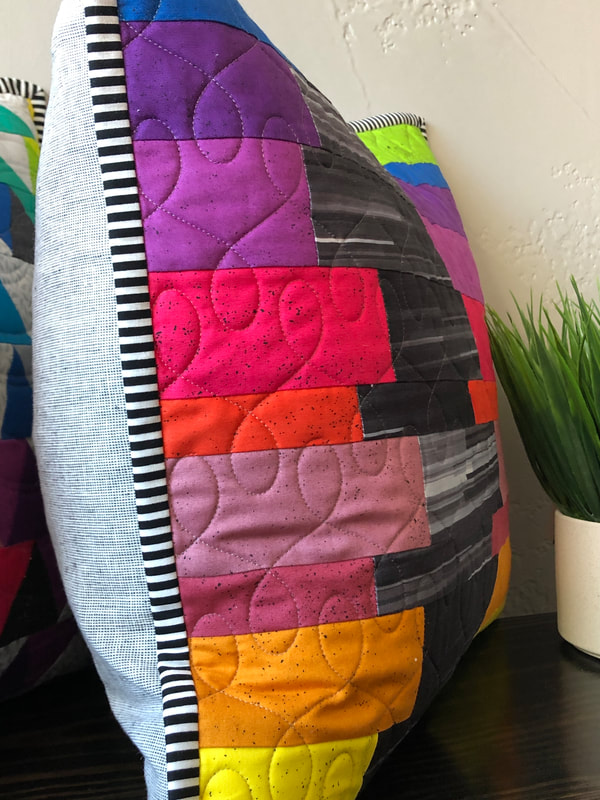 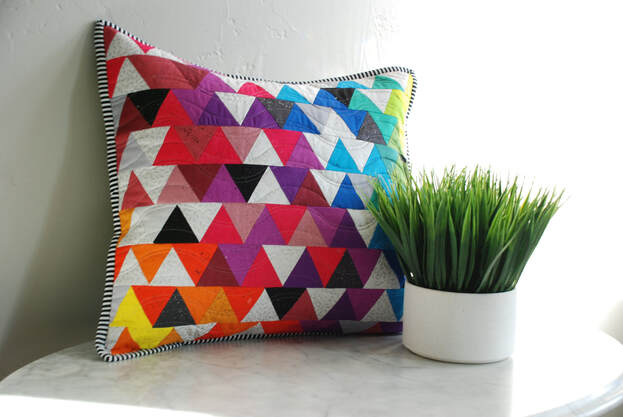 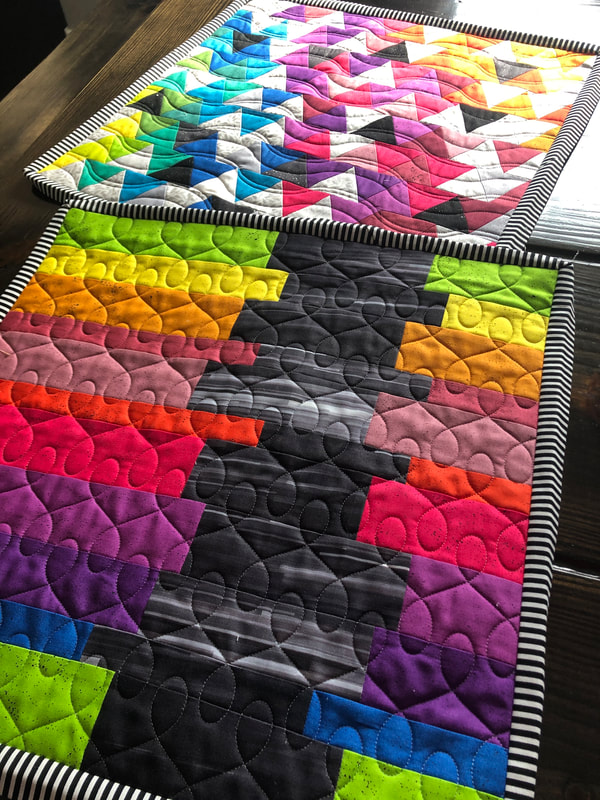 Since I am a long arm quilter I finished all of my pillows at one time, I loaded one really big piece of muslin fabric for the backing, then one big piece of batting, then placed all of the pillow fronts on top and basted down the 4 sides of each pillow. Then, I picked out pantographs for each pillow and since they are only 18-20 inches they stitched out really fast. If you work with a long arm quilter for your quilts, you might ask if he or she is willing to load all your pillows at once so you can save time and money. Here are a few behind the scenes of all my pillows loaded on my long arm at once. I also made an extra bonus pillow based on the Lucky Charm paper pieced pattern from the book, I added some bubbles on the long arm to give it some fun texture, but I forgot to take pictures of that one. 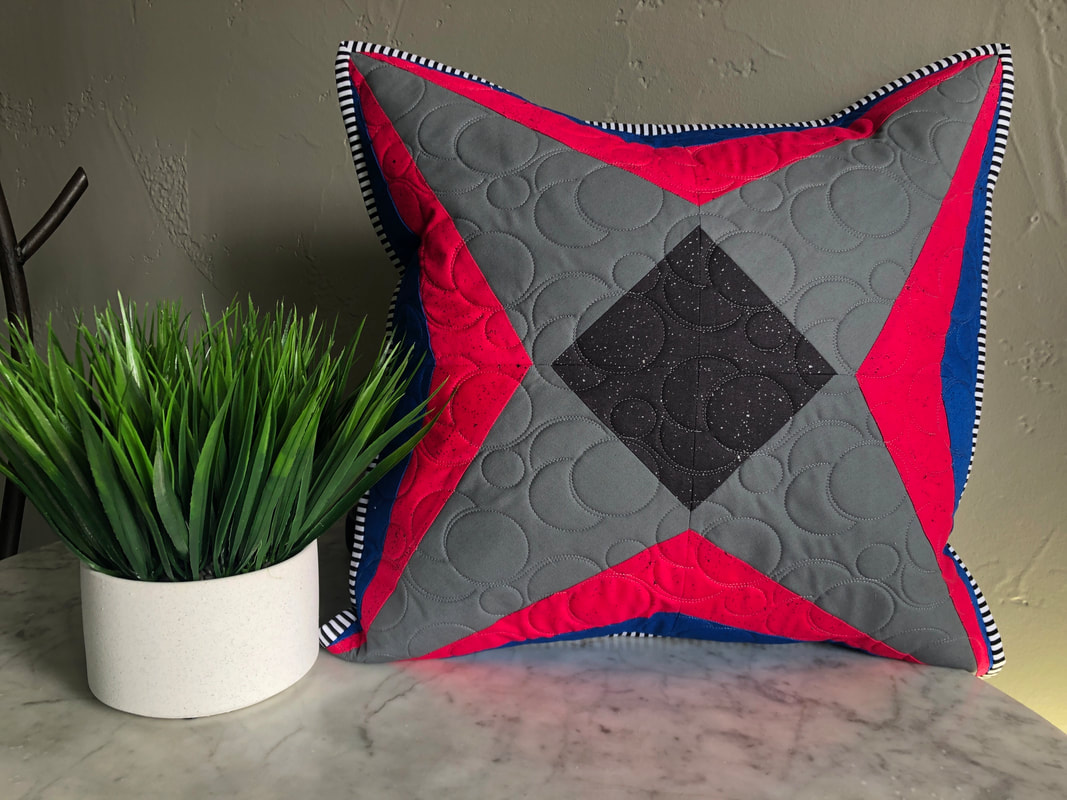 Since I have an IKEA close by my house, and I am putting these pillows on my bed, I decided to get some big fluffy 20" down pillows and I love how they look and feel! The picture below really looked pretty with the sun shining some amazing rays through the window onto all those colors! I attached the binding to the fronts of the pillows and then folded them over to the back and then hand stitched them down. Oh wait, when I do pillows I also cut my binding only 2" because I really like the thin look better. 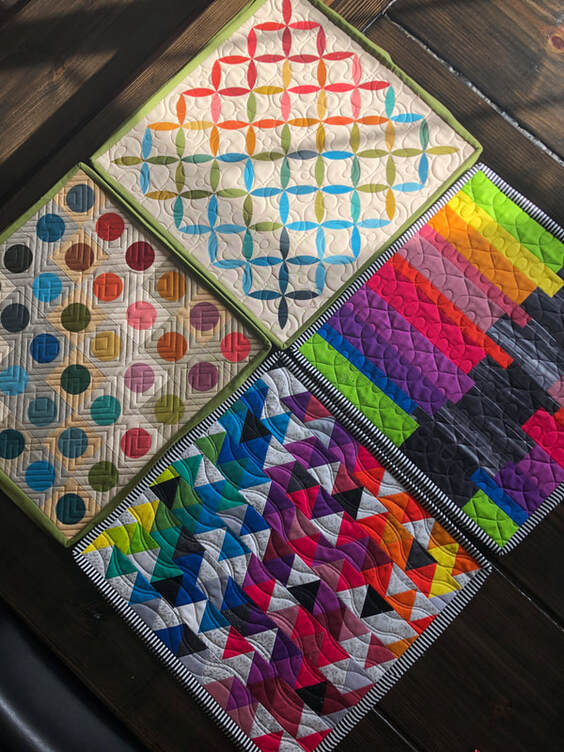 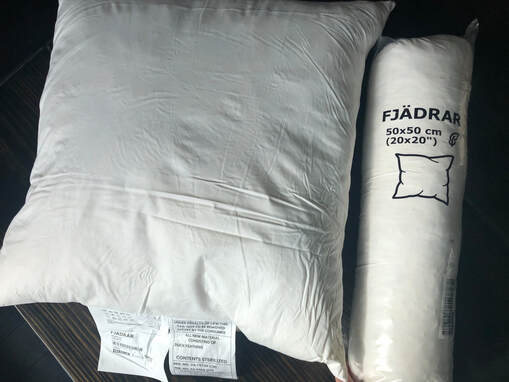 Here are the IKEA pillows I used, if you'd like to try them at home. Most of these pillows can be done in a day or two, especially if you use the pillow kits that the Fat Quarter Shop stocks! All the pieces are laser cut and perfect, and they already have the fusible on the back, so all you have to do it press them and quilt them. I got two of the kits shown below, I picked the Dot Dot Dot Pattern and I also made the Rainbow Drops Pattern after pressing the little pieces onto the provided background fabric from the kit, I just put them on my long arm, picked a dense panto and secured them that way. I figure since they are decorative they are not really going to be used all that much, and when they start to look worn out, I'll be excited to order new fabric and make more!! I really encourage you to try them, even if you are a beginner, you will love what a fast and fun project they are. They also make great gifts! You can do this!! 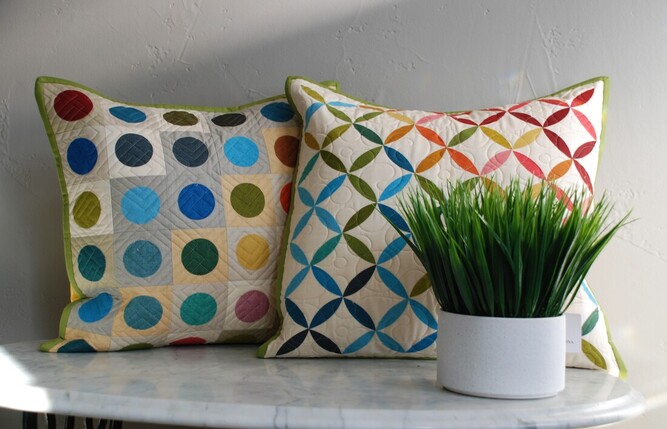 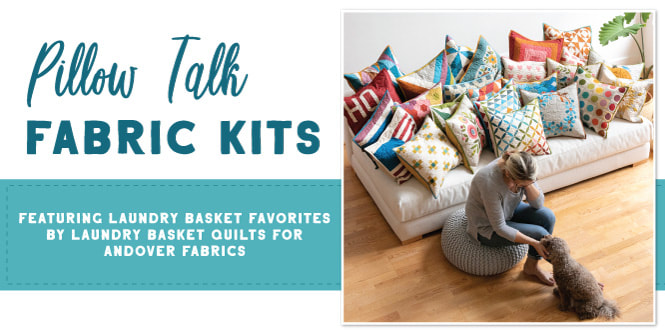 Fat Quarter Shops offers fabric kits for many of the pillows in the Pillow Talk Book. Each pillow fabric kit includes the Laundry Basket Favorites fabric for the 18″ x 18″ pillow top. You will just need to order the book and 0.375 yard for binding and 0.625 yard for backing separately. Please be sure to come vote, in the meantime, if you sew up some Pillow Talk pillows, be sure to share your projects using #PillowTalkBook and tag Fat Quarter Shop for your chance to get a shout out on Livestream!
I'd love for you to follow my quilty journey on Instagram too - @gina_tell_threadgraffiti Happy Quilting! Gina Tell Are you ready to rumble? Edyta Sitar’s new pillows from Pillow Talk: 25 Lovely Pillows for Your Home Sweet Home, sparked the idea for a fun contest and we’re kicking it off with our first pair of contenders – Kimberly Jolly and Edyta Sitar!  Starting today, we’ll have ten rounds of the Pillow Talk Pillow Fight here on the blog and on Instagram! Each week, two contenders will go head-to-head with their creations based on the patterns in the Pillow Talk book. This competition among friends will be accompanied by weekly voting, plus a monthly roundup with the chance for prizes and glory for that month’s winner and one lucky voter. At the end, the top two will go up for a final vote. Who will be the Pillow King or Queen? You get to decide! Each Thursday we’ll invite you to vote for your favorite pillow project here on the blog. Find us on social with #PillowTalkPillowFight. Then, we’ll put the winners from Rounds 1-4 to a vote here on the blog on Thursday, February 6, and the winners from Rounds 5-8 will be put to a vote on Thursday, February 27. Glory goes to the winners and we’ll have special prizes for those of you voting, too! Click HERE to be taken to the blog to vote for your favorite!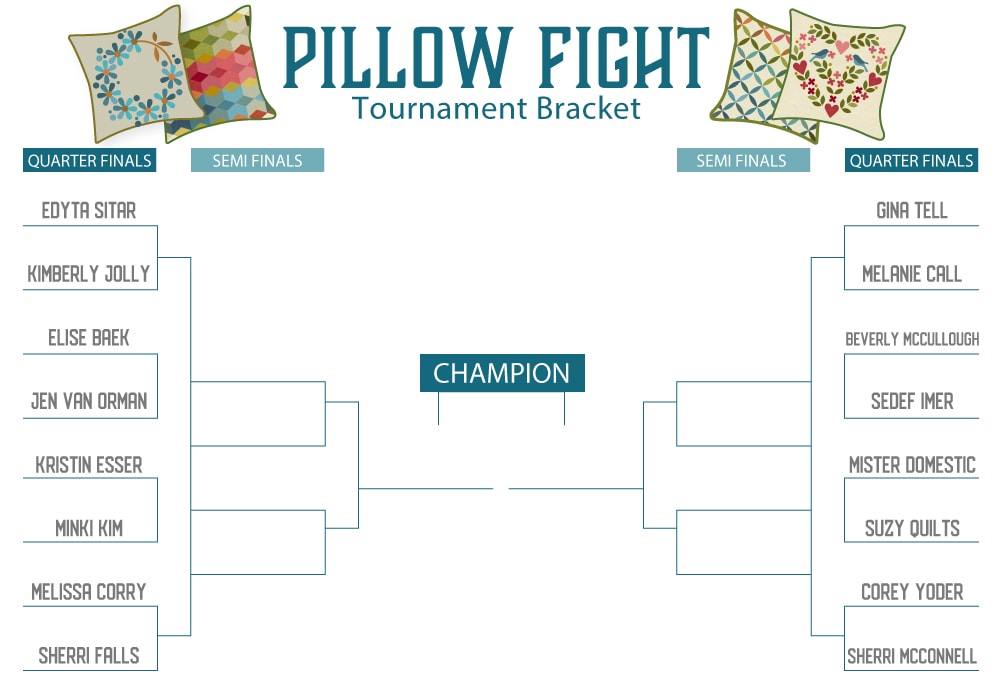 I will get the opportunity to share my pillow in a couple weeks, so please come back and visit! I'm gonna need your vote, Melanie is pretty awesome, and team Gina needs to win!! 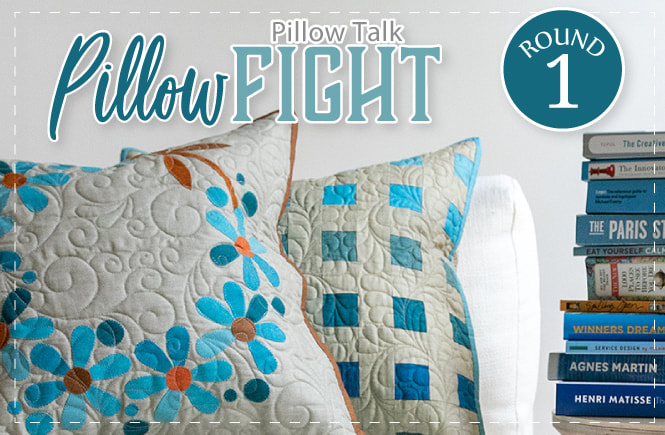 You should grab your book and come sew along! Fat Quarter Shop offers fabric kits for many of the pillows in the Pillow Talk Book. Each pillow fabric kit includes the Laundry Basket Favorites fabric for the 18″ x 18″ pillow top and binding. You will just need to order the Pillow Talk Book and 1/2 yard separately for backing.  We’ll see you back here next week to see creations by Jen Van Orman of Heritage Threads and Elise Baek of Elise and Emelie! In the meantime, if you sew up some Pillow Talk pillows, be sure to share your projects using #PillowTalkBook and tag us (@fatquartershop), @itssewemma and @laundrybasketquilts so we can see and share your work!
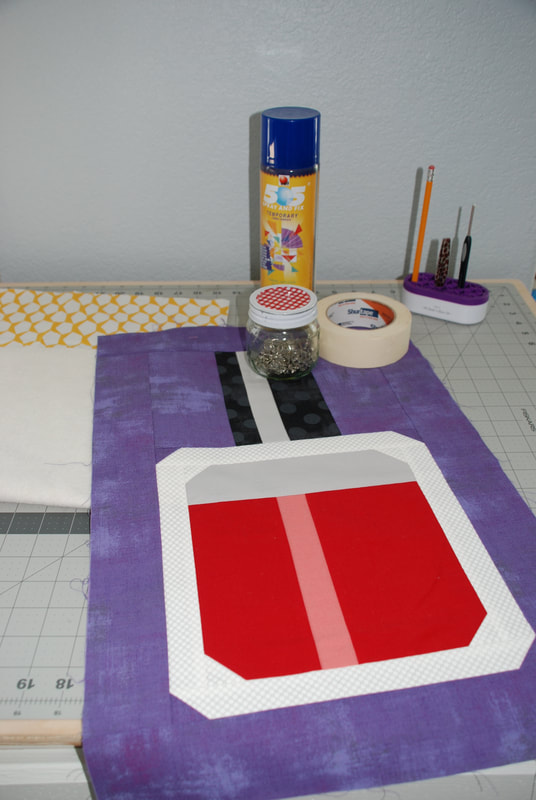
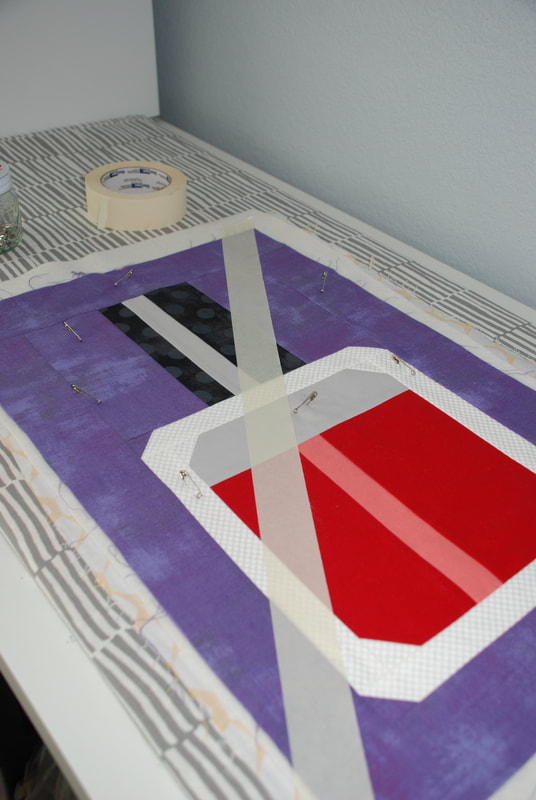
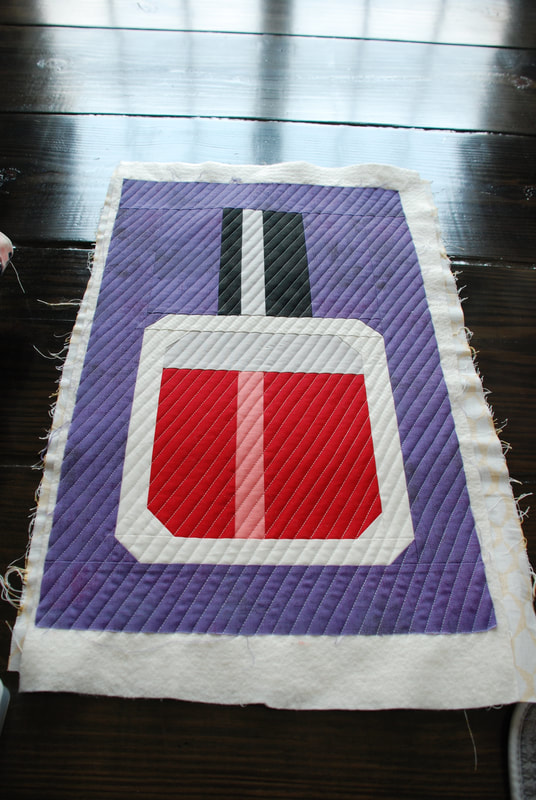
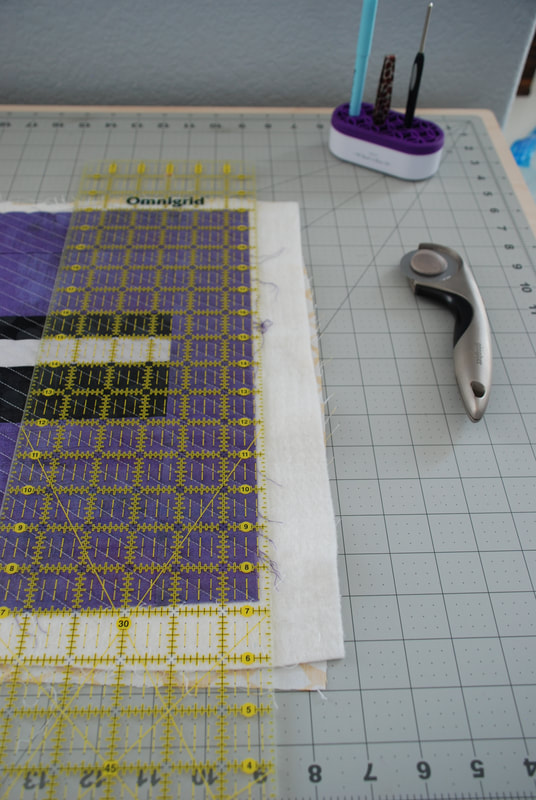
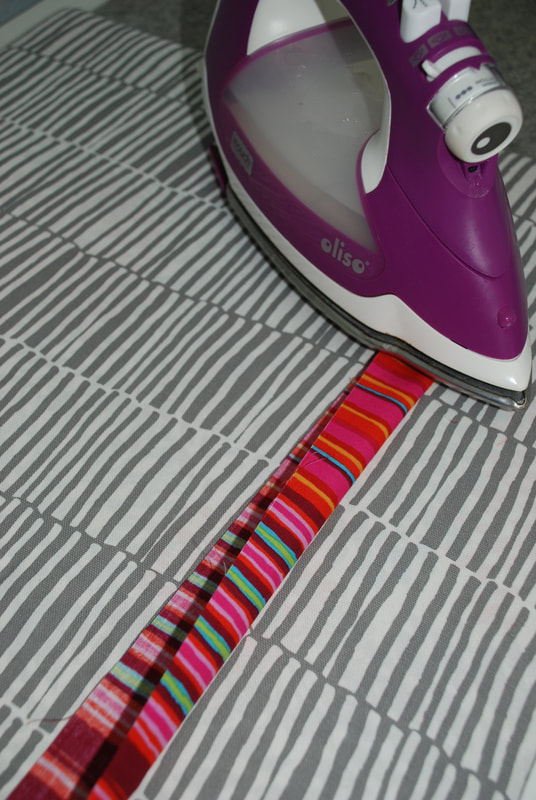
Happy Quilting! Binding: The Final Step of the Ultimate beginner Quilt SEries - Sponsored by FAt Quarter Shop10/23/2019 The Ultimate Beginner Quilt Series has come to an end, but it's been so much fun! Thank you to everyone who has watched my videos and shared so many kind comments! If you missed them you can search my name on YouTube and all the videos that I have done with Fat Quarter Shop will pop up. Or you can look at my previous blog posts, I have them all linked. 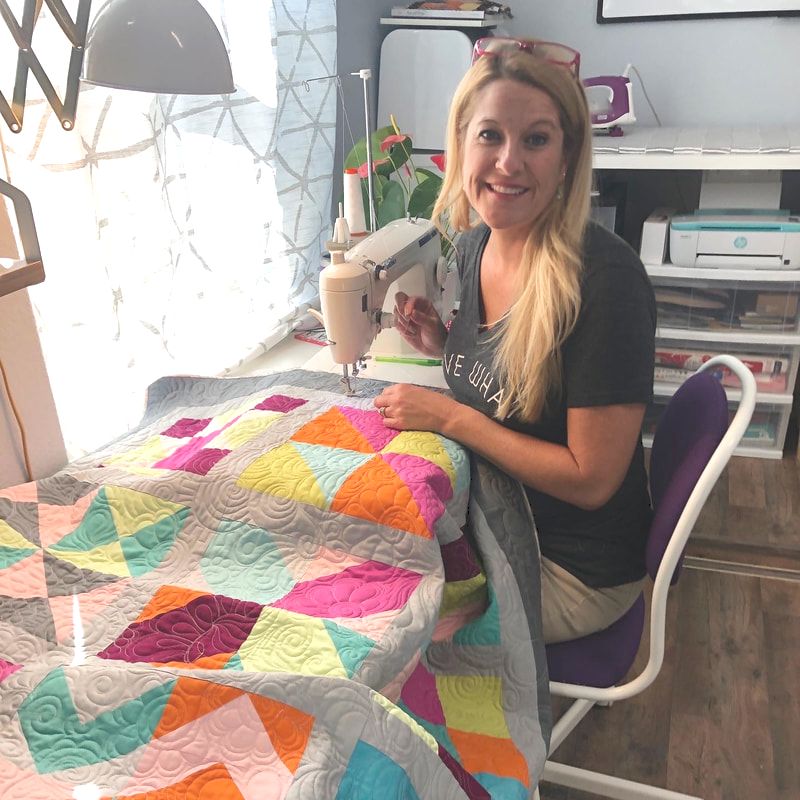 Today we will finally get to add binding and finish them!! Woo Hoo!! 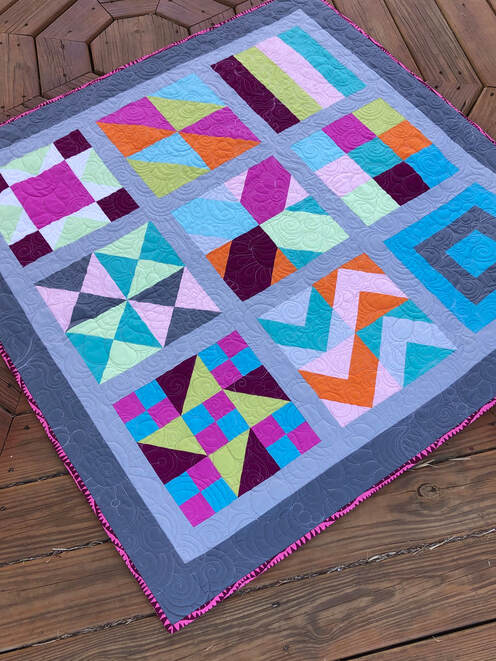 I love binding, but I used to really hate it!! So if you have trouble with it, don't give up. There are several different ways to attach binding to a quilt, so if you keep looking, you are bound to find a technique that works for you. In addition to Kimberly's video I have also created two different videos to help. (But I first want to tell you that these videos were done at home on my iPhone, they are not good quality, so before you share negative comments, please keep that in mind.) *The first one is the simple binding method, there is no measuring and it's always the first technique that I show any new quilty friends that want to learn. In this video I used a practice quilt sandwich just to show you how to attach it. I also many a second video showing the more traditional method of attaching your binding... Here is a video I made a couple months ago for some friends of mine that wanted a quick video on how I do my hand binding. Here are a few of my favorite pictures of my finished quilt, I hope you have enjoyed this sew along, and I really hope you continue to make more quilts! Please come follow me on Instagram and Facebook, I love sharing all the new projects I get to do for Fat Quarter Shop! Instagram: gina_tell_threadgraffiti Facebook: Thread Graffiti Long Arm Quilting by Gina Tell Finishing your Ultimate Beginner Quilt at home on your standard sewing machine is easy and fun, and I'm excited to show you how I learned!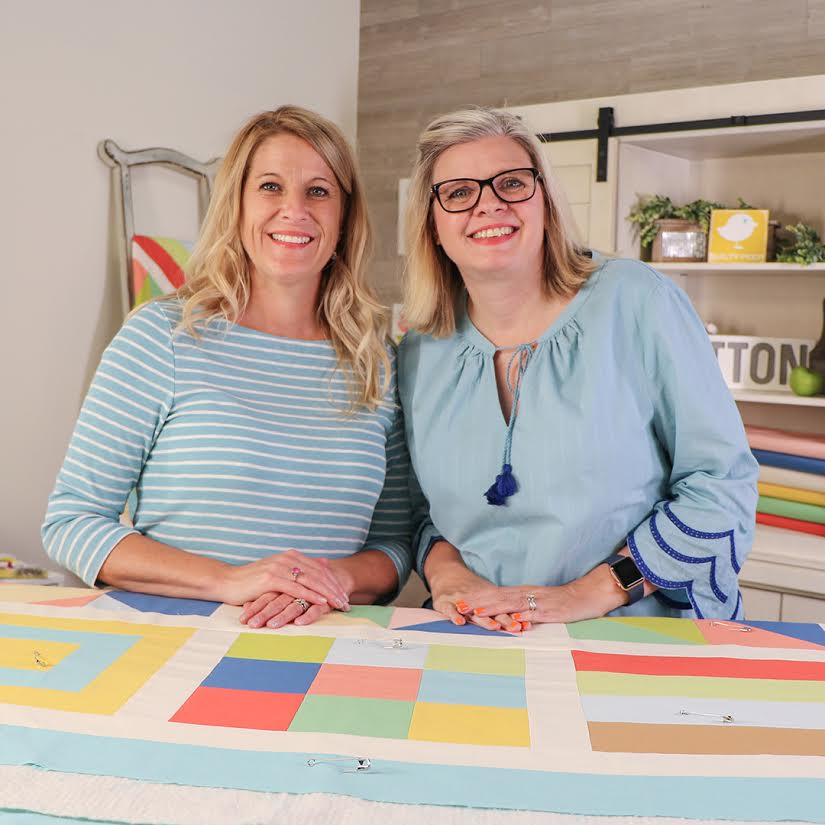 I was so excited when The Fat Quarter Shop asked me to be part of the Ultimate Beginner Quilt Series, because the quilting part is my FAVORITE part! I joined Kimberly Jolly and her fantasticly fun crew last week, and we had so many laughs! We filmed three different videos; one showing my tips on basting, another going over straight line quilting on your home machine, and now I am super pumped to share the free motion quilting video. Free motion means I dropped the feed dogs on the machine, added the darning foot and free hand stitched. I learned to quilt my projects years ago on my home sewing machine, and I've since transferred those skills to the long arm machine. Today I am going to show you the first few steps I used when I learned... My name is Gina Tell, and I am a long arm quilter for the Fat Quarter Shop. It is truly amazing to be part of their team, because I get to see so many fun fabrics, test some really great patterns and share so many creative projects. I have not always been a long arm quilter, I learned FMQ (free motion quilting) several years ago by practicing on my home machine, just like I am showing today. So I want to remind you that sometimes when you see things at first, it looks hard and intimidating, but quilting is not hard, it's all about practice, and anyone can do it! The quilting part is no exception, I like to think of it like learning cursive handwriting. At first it feels kinda awkward, but the more you do it the better it looks and the more fun you can have personalizing the look. You can practice at home on your machine, and you should also practice on paper too. Doodle as much as you can! Try to see how much you can do without picking your pen up from the paper, get used to doodling with your arm & hand up from the paper, so your muscles get used to this new activity. I like to turn music on, relax and enjoy the time to make something that is all you. Remember there is no way you can do it wrong, if you like how it looks, then it's right! That's why I love it, because there are no rules I have to follow, I am in charge! We all start somewhere, and I was really terrible when I first started too, if you have the extra time, I share some hilarious stories in previous blogs about my first quilts, I hope you will stop by. Oh and I'd love if you'd follow me on Instagram (links at the bottom of the page) I post a lot of new fun things there and I love all my quilty friends!! In the videos I show the meander design, we picked this design because it's the first design I ever tried when starting my free motion quilting journey. There are lots of other beginner designs that you are going to love to learn in your next steps. Since I've been sewing along with you during each step in the Ultimate Beginner Quilt Event, I also wanted to share some pictures of my own quilt here. These are just to give inspiration, and show what lots of practice at home can produce. I want to remind you that it's ok to not be perfect the first several times, enjoy the learning process. The pictures below is all free motion quilting, I stitched a variety of different designs in no particular order, it's called graffiti quilting, and it's how I came up with my business name. This is my favorite, I just smoosh all kinds of different swirls, pebbles, flowers and some other things that have no name until I fill up the quilt. There is no right or wrong placement. Once you build your muscle memory in your arm through practice and doodling, the curves will become consistent and then you can just swirl yourself around the quilt. 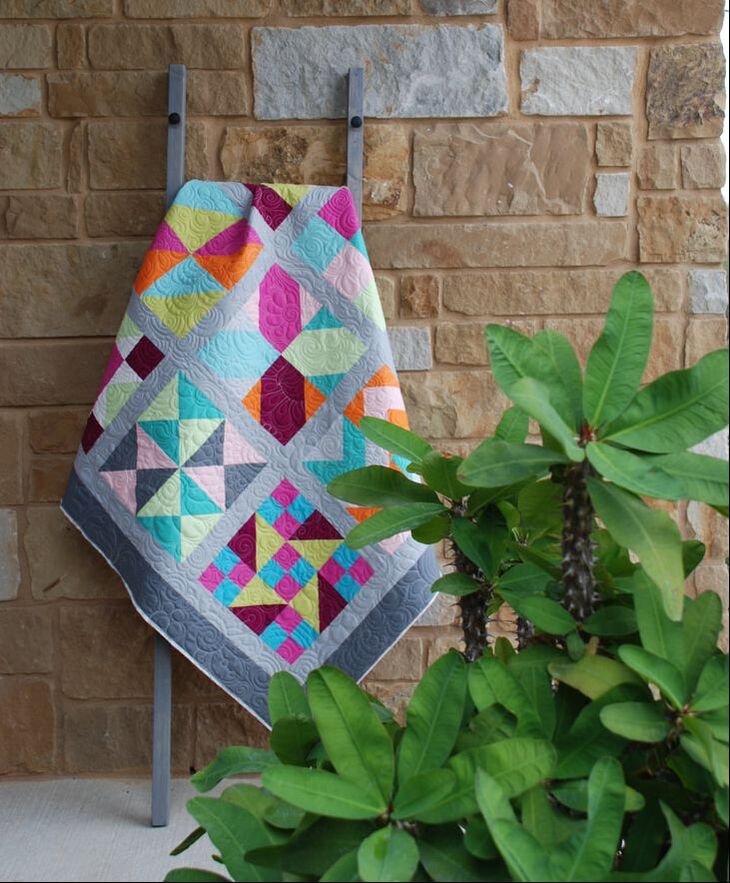  If you like the colors of my quilt you can order the bundle, it's called Zen Chic Bella Solids Bundle, it's got some fabulous fabric that you can use in all sorts of projects. Click HERE for the link. Here is a short video I did a home to go over a few beginner designs that you can try on your home sewing machine. I don't do a lot of YouTube videos on my own, I leave that stuff for the pros, technology is not my area of expertise LOL, so please no negative comments on my poor video quality :) Now it's time to trim it up, make your binding, and attach it to your quilt. When I trim I like to leave .25 inches of batting/backing all the way around, this looks great when you fold the binding over to the back side, it fills up the gap. I hope you return for my next blog post on Oct 24, 2019, I am going to have a full video tutorial showing how I add binding to my own quilt, and step by step pictures for you to follow along.... If you are just finding this sew along, you can still join in on the fun, The Fat Quarter Shop has created 2 kits that make it very easy to start. One kit has all the fabric you need to make a BEAUTIFUL quilt (link HERE) and the second kit has all the notions that you will need (link HERE) notions is just another word for all the other "stuff" you need to sew with. Like thread, pins, rulers, etc. There are also video tutorials and lots of tips to follow along on The Fat Quarter Shops YouTube channel, EACH step has videos from start to finish! All the videos will be around forever online, so it's never too late to jump in. Click here to Subscribe to their channel. I hope you enjoyed the videos, feel free to reach out or comment if you have questions, I love to help people learn and grow! Please click the icons below to follow me on Instagram & Facebook Thank You, Gina Tell Finishing your Ultimate Beginner Quilt at home on your standard sewing machine is easy and fun, and I'm excited to show you how I learned!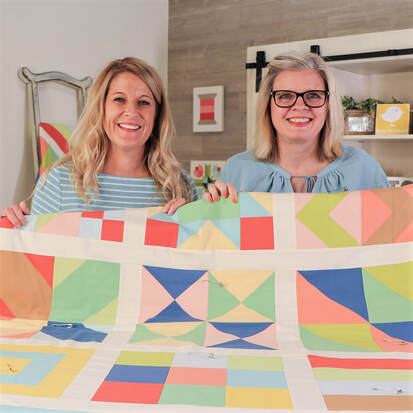 I was so excited when The Fat Quarter Shop asked me to be part of the Ultimate Beginner Quilt Series, because the quilting part is my FAVORITE part! I joined Kimberly Jolly and her fantasticly fun crew last week, and we had so many laughs! We filmed three different videos; one showing my tips on basting, another going over straight line quilting on your home machine, and we also did a free motion quilting video. My name is Gina Tell, and I am a long arm quilter for the Fat Quarter Shop. It is truly amazing to be part of their team, because I get to see so many fun fabrics, test some really great patterns and share so many creative projects. I have not always been a long arm quilter, I learned FMQ (free motion quilting) several years ago by practicing on my home machine, just like I am showing today. So I want to remind you that sometimes when you see things at first, it looks hard and intimidating, but quilting is not hard, it's all about practice, and anyone can do it! The quilting part is no exception, I like to think of it like learning cursive handwriting. At first it feels kinda awkward, but the more you do it the better it looks and the more fun you can have personalizing the look. You can practice at home on your machine, and you should also practice on paper too. Doodle as much as you can! Try to see how much you can do without picking your pen up from the paper, get used to doodling with your arm & hand up from the paper, so your muscles get used to this new activity. I like to turn music on, relax and enjoy the time to make something that is all you. Remember there is no way you can do it wrong, if you like how it looks, then it's right! That's why I love it, because there are no rules I have to follow, I am in charge! We all start somewhere, and I was really terrible when I first started too, if you have the extra time, I have some hilarious stories in previous blogs, I hope you will stop by. Oh and I'd love if you'd follow me on Instagram, I post a lot of new fun things there and I love all my quilty friends!! In addition to the videos we filmed in the Fat Quarter Shop studio, I also put a short tutorial together here for you to see what the quilting looks like on a smaller scale. 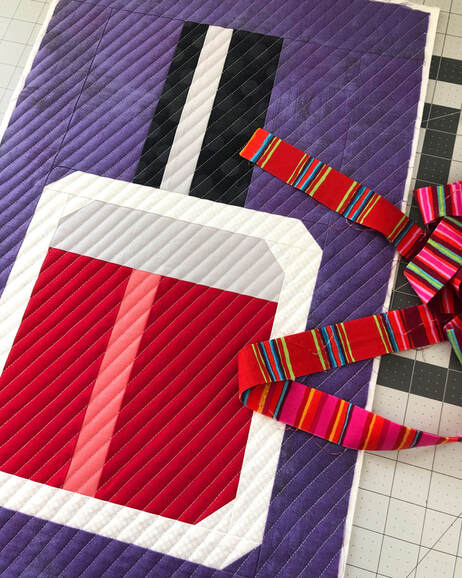 Here is an example of some straight line quilting I like to do. I also have another blog post with some free motion quilting tips. So please check that one out too. I love red and purple, so I thought this fun nail polish mini quilt pattern that my friends at It's Sew Emma designed several years ago would be fun to share today. If you love it too, you can make it, here is the pattern Download Here are the supplies you'll need to get started: Quilt top Quilt backing batting (I used 80/20) 505 Spray baste and/or a few safety pins masking tape sewing machine Lay your backing fabric down (pretty side down) then lay your batting on top, smooth it so there are no wrinkles, spray a little bit of 505 on the batting and then carefully lay the quilt top over the batting. Smooth it all out again and add a few pins to secure. Then I apply a piece of masking tape from the top right corner down to the bottom left and then head over to your sewing machine. This Ultimate Beginner Quilt Sew Along is sponsored by EverSewn Sewing machines, so I got to use the Sparrow QE and I thought it produced some very nice stitches. If you'd like to check it out, here is the link to read more. Since this machine came with a walking foot, I used it. Some machines do not come with one, if you don't have one it's ok, just use the standard foot. The walking foot is helpful to push the fabric through, but not necessary especially if you are doing a small quilt. 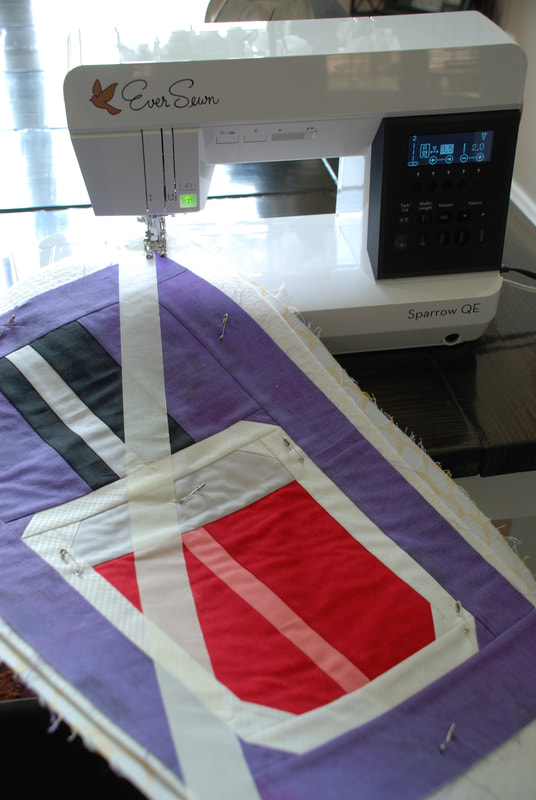 Start stitching just outside the edge of the quilt and follow the tape line trying to keep your first line as straight as possible, because you are going to echo this line  In this photo you will see the left side of the foot is lined your up with the last line stitched, keep doing this until you reach the bottom corner. Or, you can use masking tape as the marker for each line, if you'd like your lines to be farther apart. Now it's time to trim it up, make your binding, and attach it to your quilt. When I trim I like to leave .25 inches of batting/backing all the way around. (See caption in pictures above) This looks great when you fold the binding over to the back side, it fills up the gap. I hope you return for my next blog post on Oct 24, 2019, I am going to have a full video tutorial, and step by step pictures for you to follow on binding.... If you want to get a head start, here is what I do. I like to cut strips that are 2.5" for binding, then you will need to sew a few strips together so the binding is long enough to go all the way around your mini. Now you are ready to attach your binding to your quilt. See you on Oct 24th.... 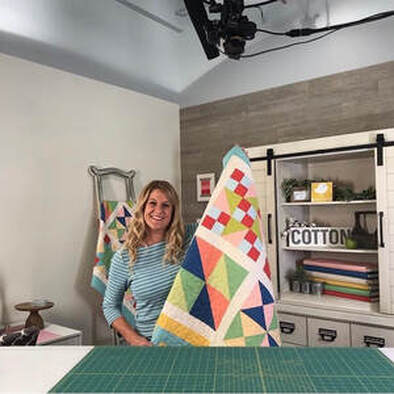 If you are just finding this sew along, you can still join in on the fun, The Fat Quarter Shop has created 2 kits that make it very easy to start. One kit has all the fabric you need to make a BEAUTIFUL quilt (link HERE) and the second kit has all the notions that you will need (link HERE) notions is just another word for all the other "stuff" you need to sew with. Like thread, pins, rulers, etc. There are also video tutorials and lots of tips to follow along on Fat Quarter Shops YouTube channel, EACH step has videos from start to finish! All the videos will be around forever online, so it's never too late to jump in. I hope you learned something about straight line quilting on your home machine. Please check out my other blog post showing free motion quilting... I hope you'll click the icons below to follow me on Instagram & Facebook Thank You, Gina Tell
Welcome to The Ultimate Beginner Quilt Sew Along, a free quilt pattern series with video tutorials designed by The Fat Quarter Shop just for beginners! Even if you have zero sewing experience, this is the free quilt class for you!
We are getting close to the end of the piecing portion of this sew along, and I'm super excited because my videos to show you how to quilt them at home on your machine will be releasing soon. I've been sewing along with you during each step in the Ultimate Beginner Quilt Event, and its almost time to finish them!! Woo Hoo! It's never too late to begin this project, even if you missed the beginning, because The Fat Quarter Shop has created 2 kits that make it very easy to start. One kit has all the fabric you need to make a BEAUTIFUL quilt (link below) and the second kit has all the notions that you will need (link below) notions is just another word for all the other "stuff" you need to sew with. Like thread, pins, rulers, etc. There are also video tutorials and lots of tips to follow along on Fat Quarter Shops YouTube channel, EACH step has videos from start to finish! All the videos are at the bottom of this page...
Please come join me, I know you want to!! :)
The Ultimate Beginner Quilt is a free quilt pattern series with video tutorials designed just for beginners. If you’re ready to get sewing, gather your fabrics and sewing tools and watch the free quilting tutorial below!
I strongly encourage you to purchase the fabric kit if this is your first quilt, link below, because the #1 question I get from people interested in starting to quilt is " How do I figure out what fabric I need and how much to buy?" Well, this makes it simple and it's affordable.
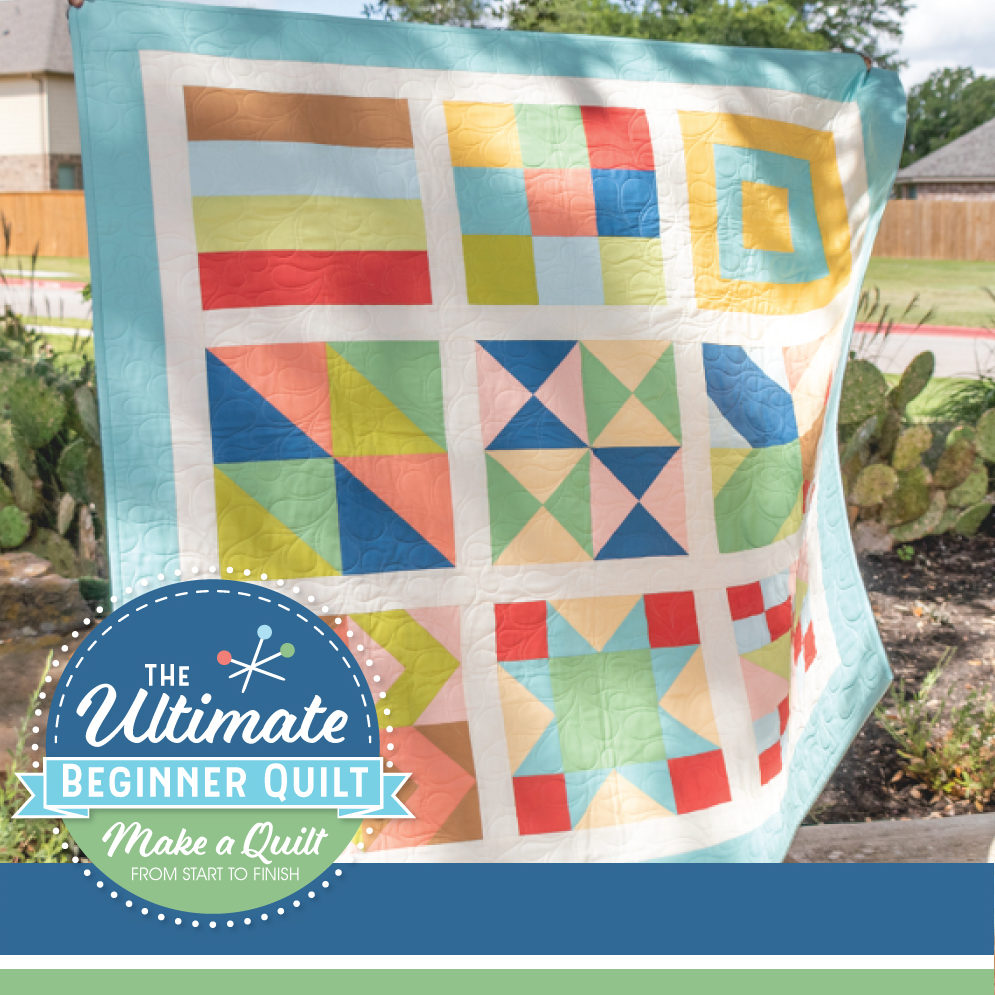
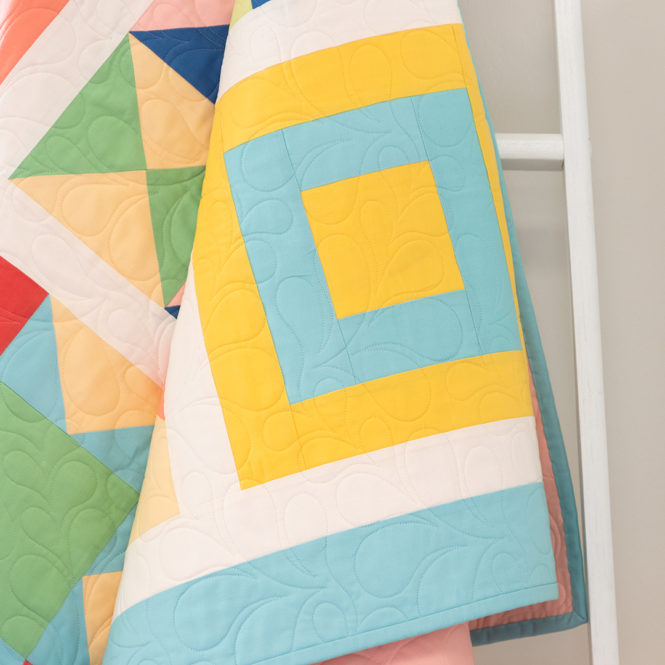
The kit will give you everything you need to make the quilt in the image below. Cute huh? 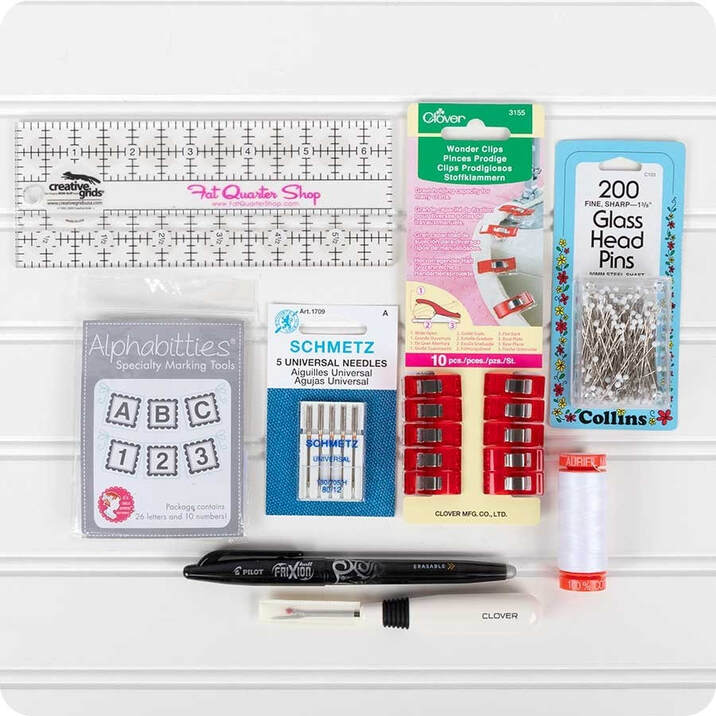

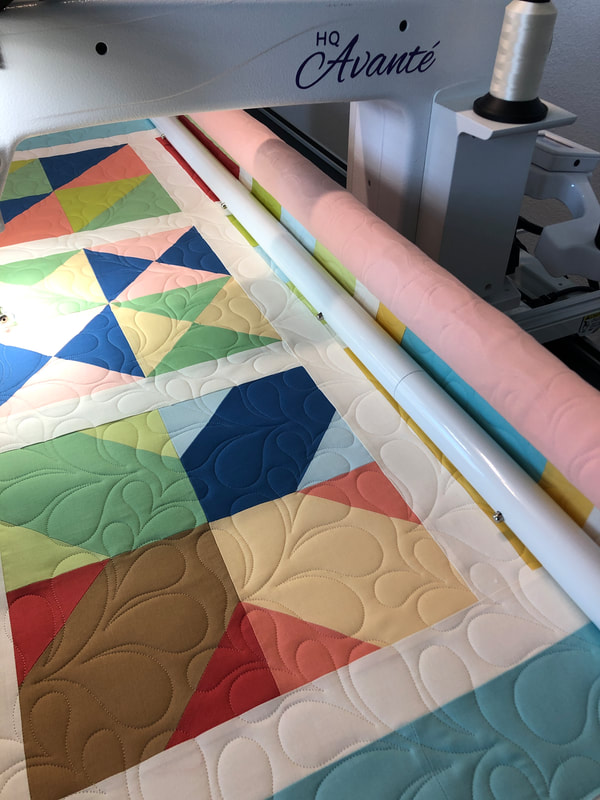
Look! I did the feather quilting for Kimberly's quilt on my long arm!
Oh and don't forget to subscribe to their YouTube Channel so you don't miss all the FREE tutorials that will be released.
If you don't buy the fabric kit, then you’ll need the following fabric amounts: • 12 Fat Quarters* • 7/8 Yards neutral color (we chose white) for sashing which goes between the blocks • 1 1/8 Yards for the border • 3 3/8 Yards for the back of the quilt For the batting, we suggest Happy Cloud Batting in Throw Size *A Fat Quarter is a quarter of a yard that’s cut wider, at 18″ x 21″ so that you have more room to work with. Read more about various types of fabric precuts. YouTube Video Tutorials Lineup: Block #1 August 15, 2019 Sew Quilt Blocks 1-9: August 8-October 3, 2019 Sew the Quilt Top Together: October 10, 2019 Quilting the Quilt: October 17, 2019 Quilt Binding: October 24, 2019 We’ll show off our finished quilts on November 7! 

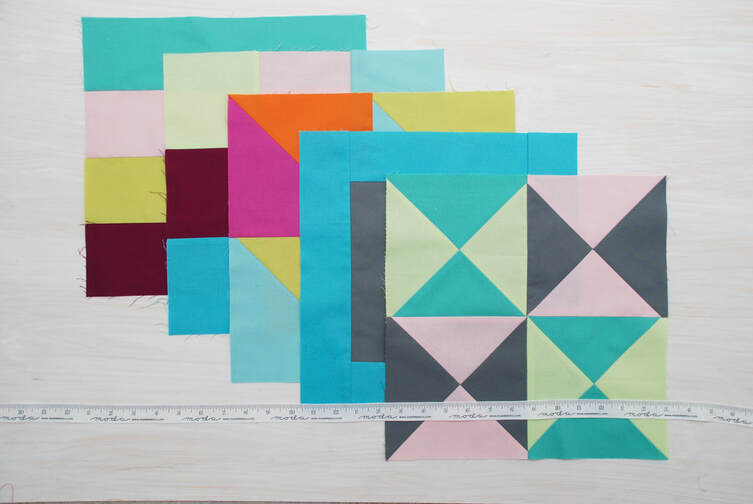
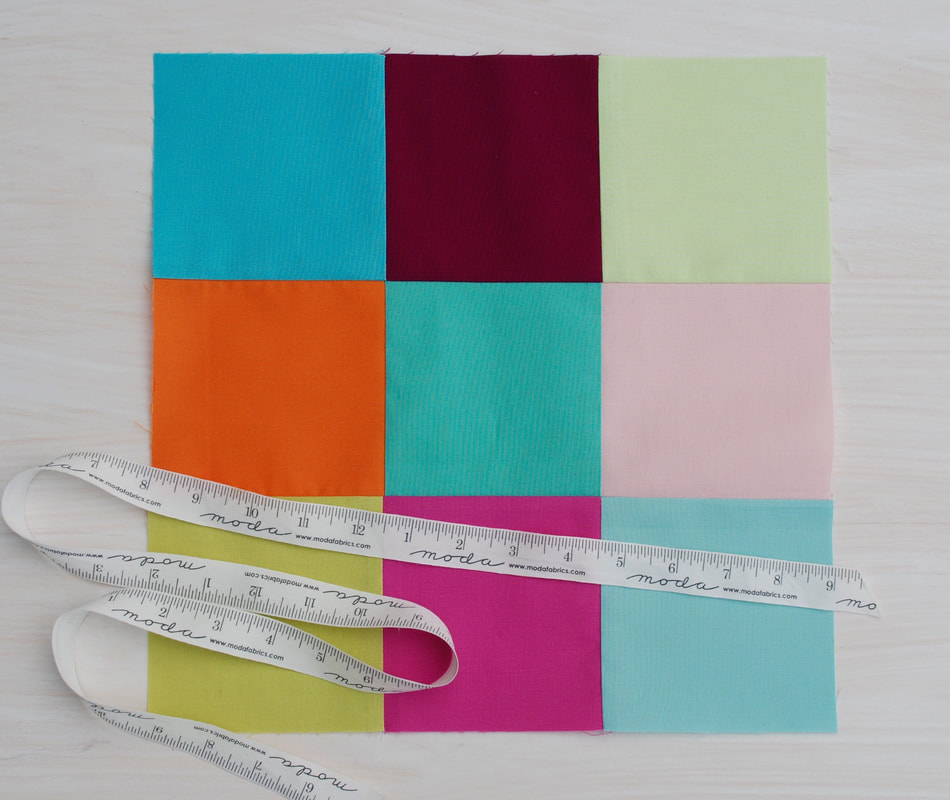
Here are all the blocks 1-9! Woo Hoo

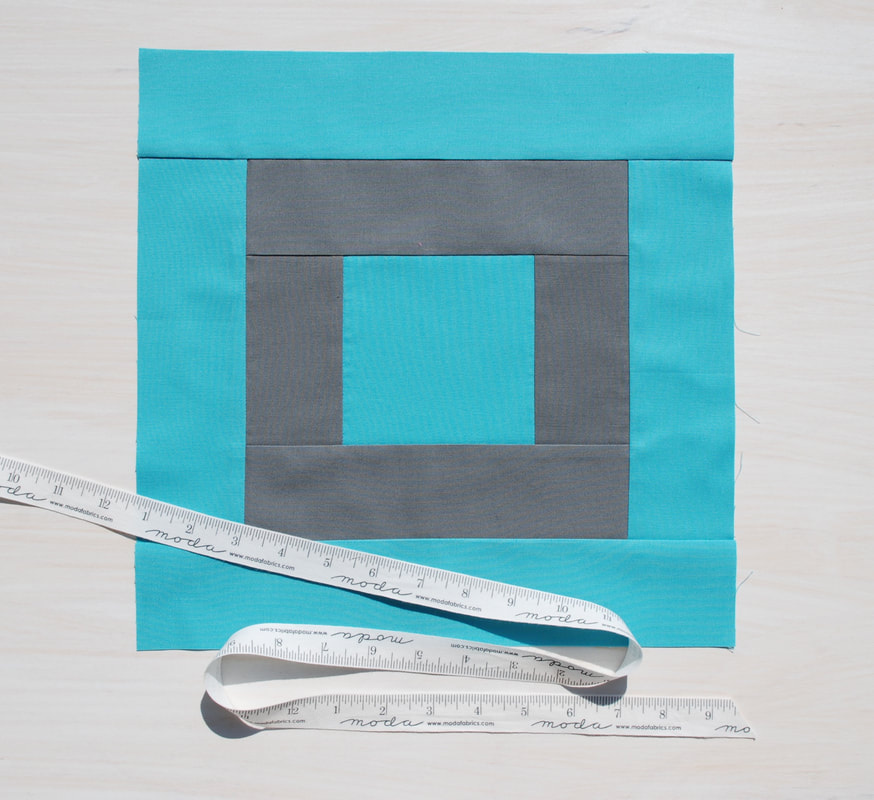
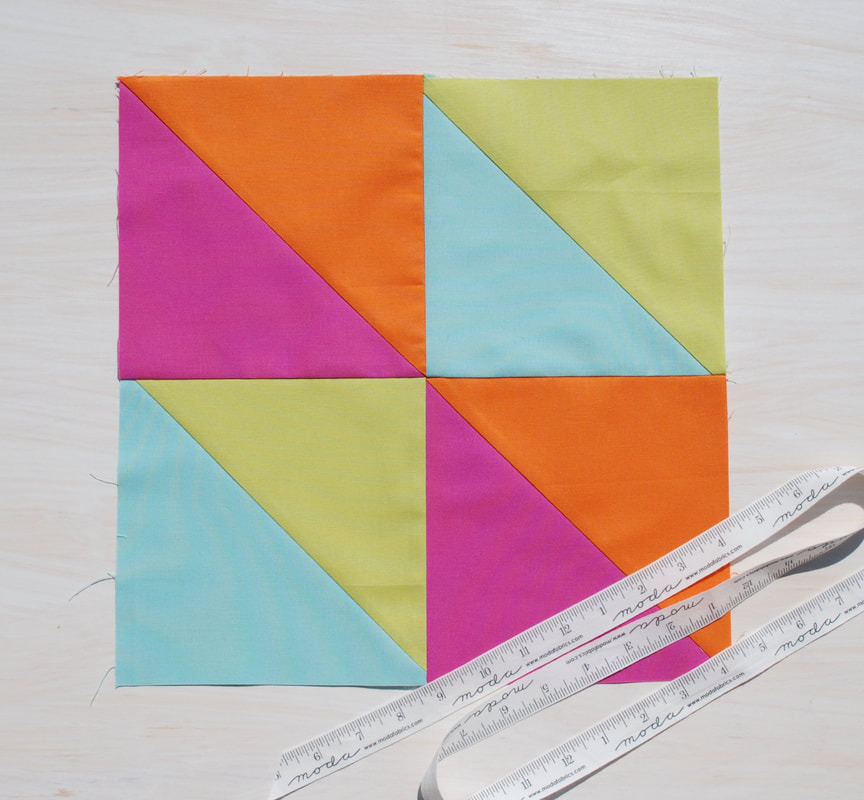
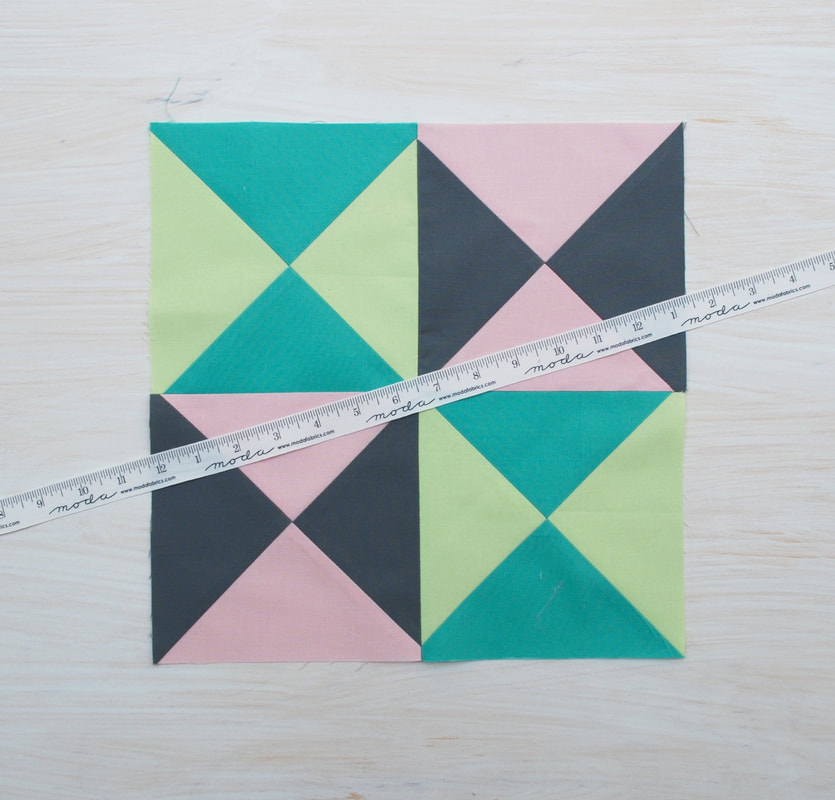
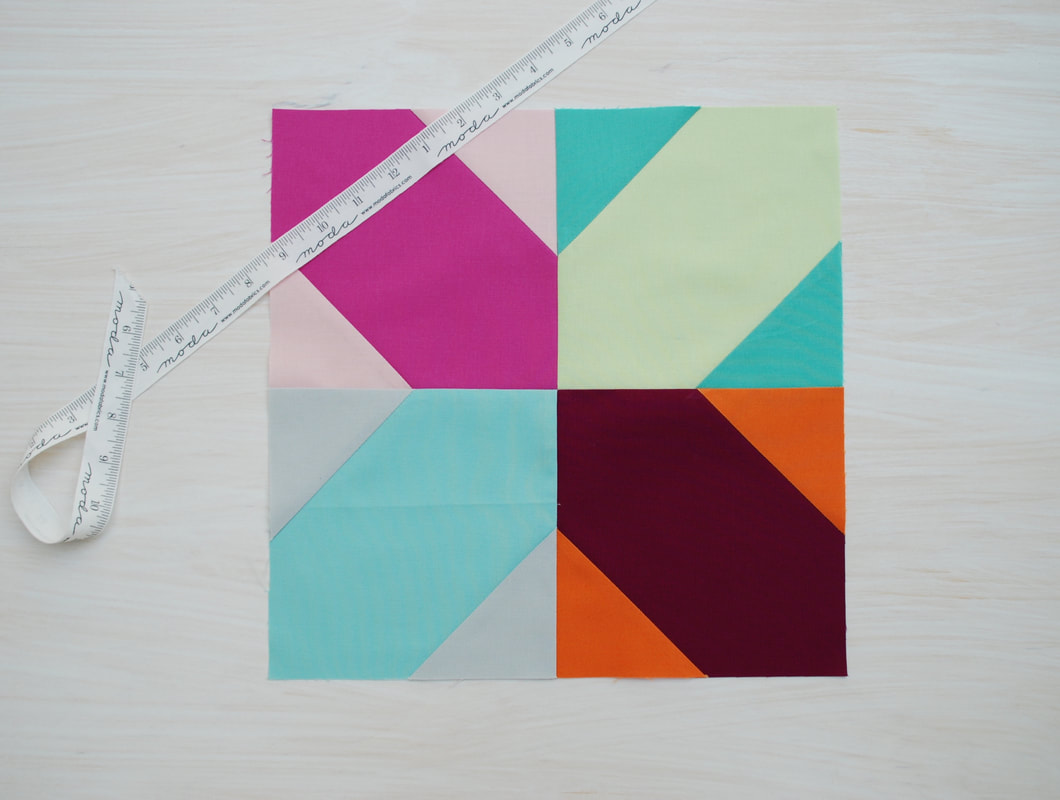
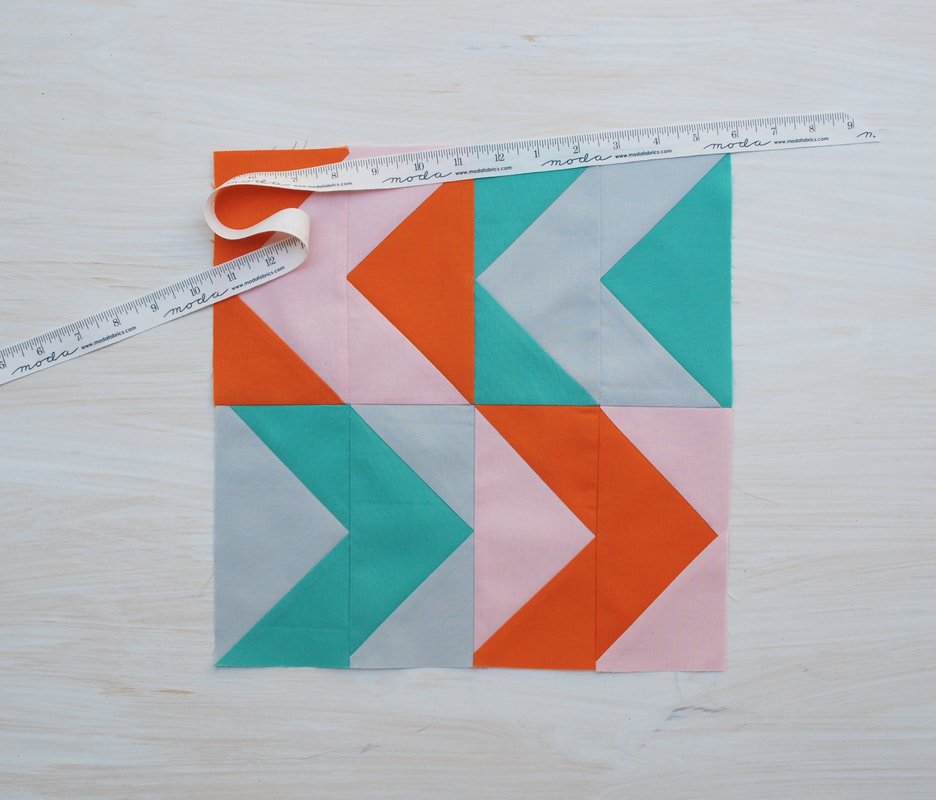
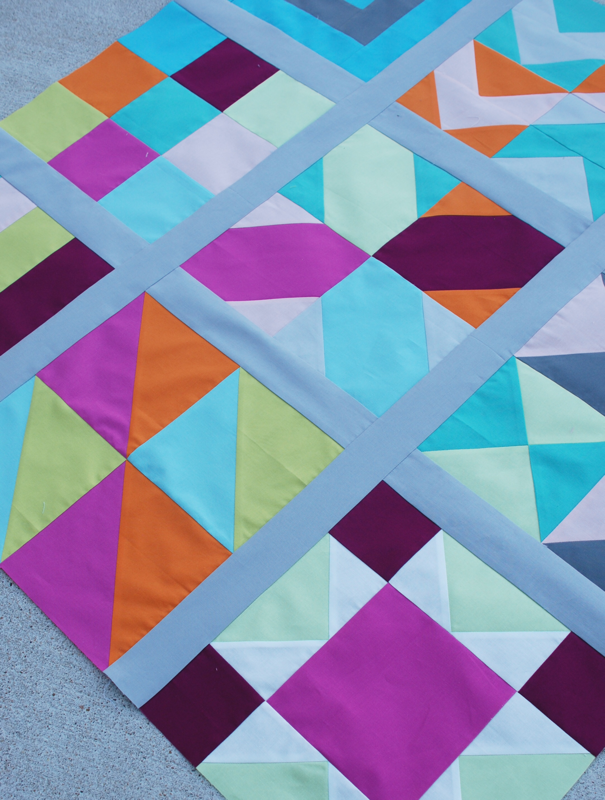
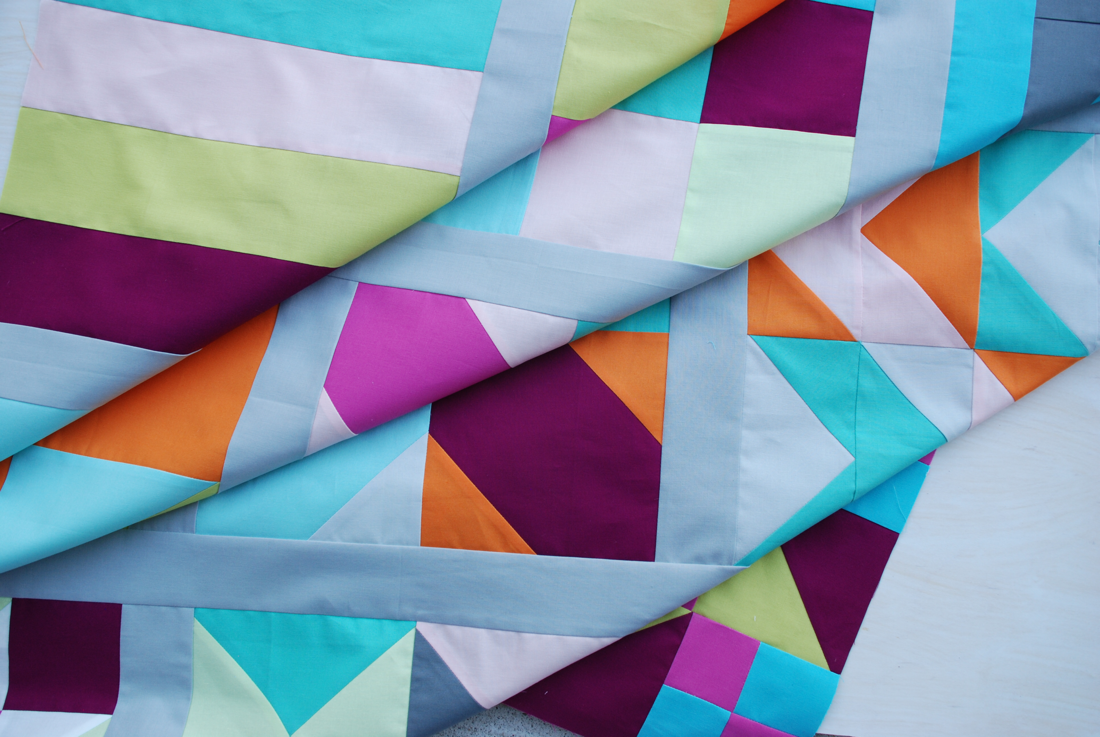
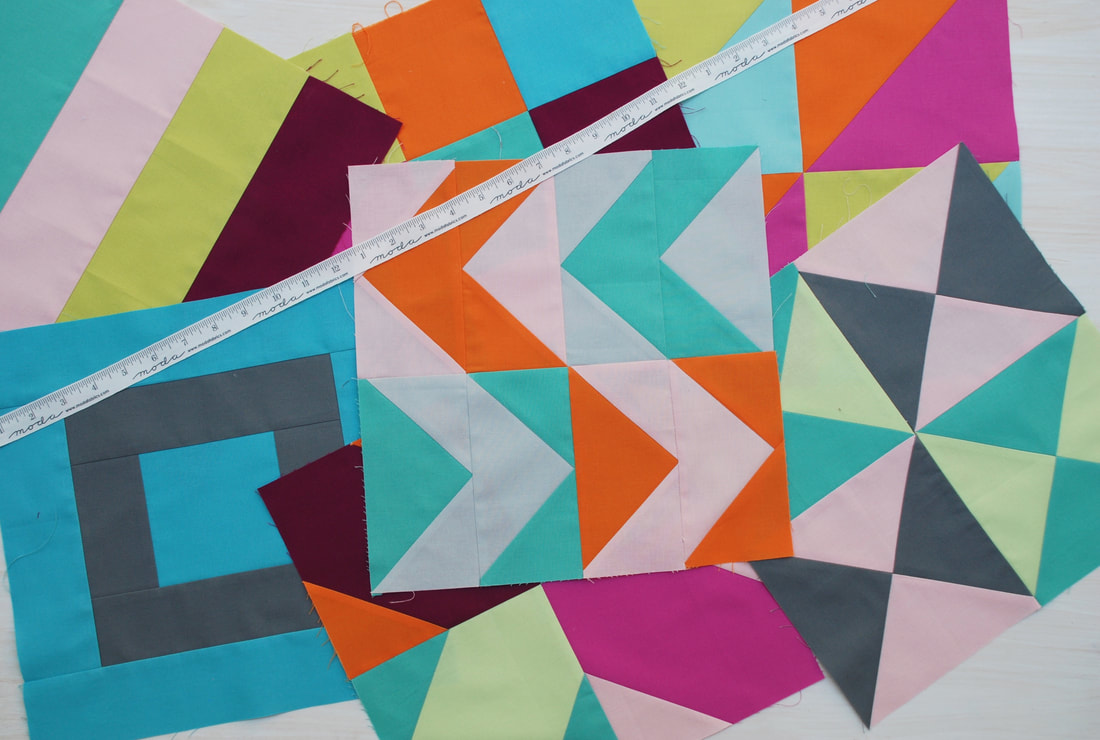
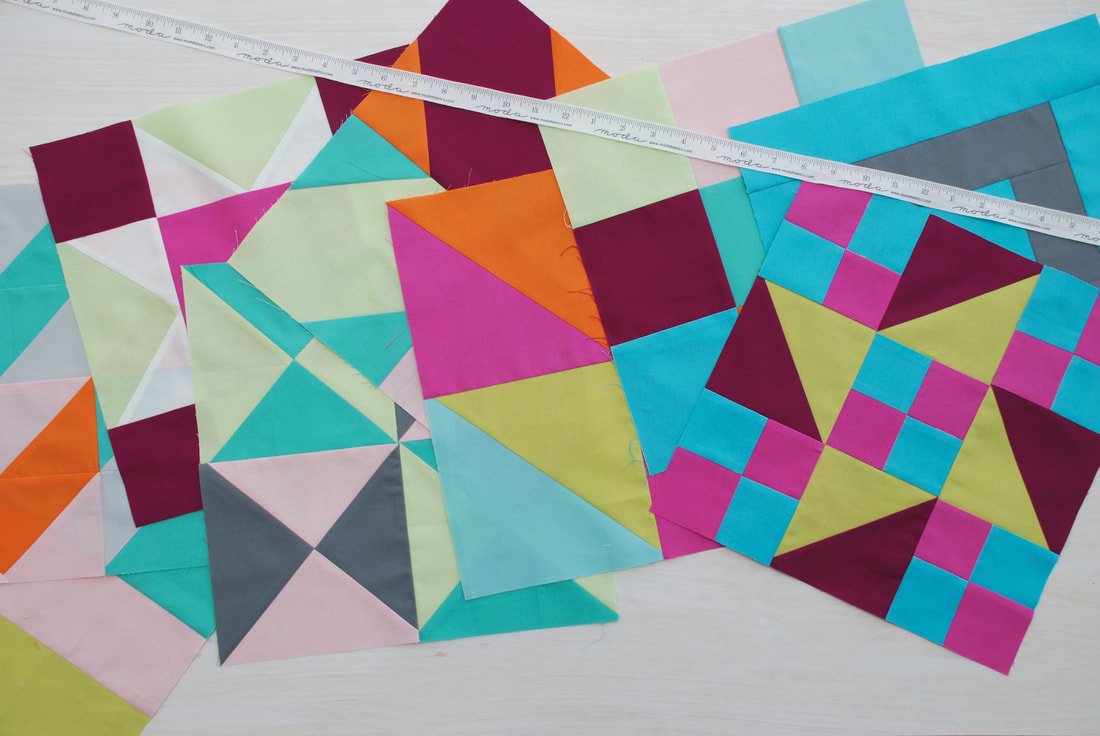
It's never too late to learn something new! Come sew with me! Here are the FREE Patterns to download: Block One Stripes - Click HERE Block Two Nine Patch - Click HERE Block Three Picture Window - ClickHERE Block Four Half Square Triangle (HST) - Click HERE Block Five Hourglass Four Patch - Click HERE Block Six Lattice - Click HERE Block Seven Flying Geese Zig Zag - Click HERE Block Eight Sawtooth Star - Click HERE Block Nine Friendship Star Variation - Click HERE Sashing & Border - Click HERE I really hope you'll take a minute to go read my previous blog post, I shared my ridiculously embarrassing story about my first quilt, and I know you will appreciate the feelings I had when I first started learning. Block #1 - make sure you go slow and cut the pieces the correct size, and then sew very slow so you learn how to keep the 1/4 inch seam consistent all the way down the block, Block #2 - Press your iron down, rather than pushing it around, while keeping the seam on the back side all going the same direction, this will help it lay flat and look great! See you next week.... :) Block #3- It is important to make sure you keep each section square, so after you sew the 4 strips around the first square, make sure you square it up before you add the final 4 strips. Block #4 - My tip for block four, just go slow and try to make your seams consistent, press so you have good nesting, but most importantly, have fun! Don't be too critical and hard on yourself, you do NOT have to be perfect! Block #5 - OMG This week I was behind and kinda out of sorts with the Labor Day Holiday, so I totally forgot it was share day. That said, I had to seam rip this thing twice, I was trying to rush and forgot to have fun. So that is my first tip for this block, is slow down, make sure you have your head in the right place, and enjoy the process. This is NOT a race! My second tip is to press the first seam to the dark side and then next them, you dont have to press open. This makes it easy to get them lined up, then press the second seam open. It is ok to have them both ways in one block! (see pic below) Block #6 - Well this week the lattice block was way more enjoyable than last week, ha ha because I was not as rushed! It's important to remember that this is supposed to be fun, so this week, I turned on my favorite music, got my favorite snack and had fun with it. Make sure you square up each section before you join them and use skinny pins to mark your points. Oh and you can never press too much! Block #7 - This week my tip is to make this quilt your own. There is a pattern, but that doesn't mean you have to follow it EXACTLY. I sewed my block a little different, because I liked the way it looked, and after all, there is no such thing as Quilt Police! Don't sweat the small stuff, just do your best, and if your geese are flying the wrong direction, it's ok, just laugh and fly with them! :) Block #8 - My tip for this week is to lay out all your blocks on the floor or all design wall, and look at the way the colors are lining up in each row, you may want to make this block with some colors from the first row so you can keep a balance of color. Block #9 - This block was my favorite! I love the friendship star because it looks difficult, but it's really the same as all the rest of the blocks you already learned! My tip here is to do something crazy with color! You are already a pro at HST (half square triangles) so pair that with nested squares, and you have yourself a great opportunity to use some fun colors to finish this with a POP!! Adding sashing & borders may sounds easy because it’s just big pieces, but if your strips are too long, or cut uneven, you could end up with wavy borders and in the end your quilt will not be square. Try to make sure you square up both ends of your side borders before you add top and bottom borders. Kimberly has great tips so make sure you catch her video linked above. Oh and press often, you can never press too much with quilting! 
You'll have to check out these links to all my friends sewing along, we are all happy to help if you get stuck, just comment below and let us know..
Pat Sloan https://blog.patsloan.com https://www.instagram.com/quilterpatsloan/ Tracie at Ricefordstreams Angie at a little patchwork Mathew Mister Domestic Karin at Blue Pip Designs Carrie in Texas Linden of VineLines Priscilla The Real Housewives of Cross Stitch Rebecca One Wee Bird Moda Fat Quarter shop |

AuthorHey Y'all, I'm Gina Tell! I live on Lake Travis just North of Austin Texas. I'm a full time long arm quilter and lover of all this art and outdoors!! 
|